-
TeamFDM.com is an UNOFFICIAL companion site for the DIY Voron 3D printer community. For official docs and final source of truth, visit the Official Voron Discord or the Voron Github
Printable Voron User Mods
Voron User Mods, or "UserMods", are a collection of community created and Team FDM curated modification for Voron Printers. All of these mods are available on the VoronUsers Github repo and unless otherwise specified follow the Voron communities GPL3.0 Licensing. Use any Mods at your own risk, if you make modification please share them on the VoronUsers repo.
Mod Authors: Have a Voron mod? Upload it at TeamFDM.com and let us know you're the author. We will ensure you can update and curate your files for more feedback! Please include tags for what Voron, or extruder your mod is compatible with.
660 files
-
 (0 reviews)
0 comments
Submitted
-
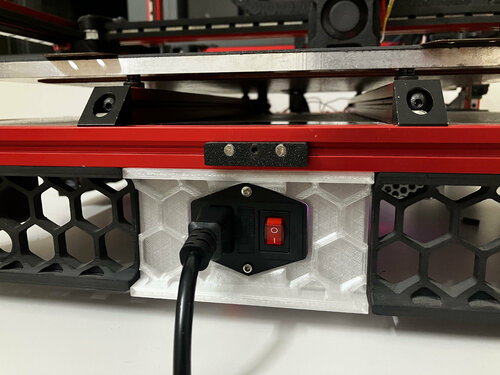
Front Power Inlet
I know some might feel this is a dumb design but as a tester, I prefer it goes. Just in case things went south
Print as standard instruction.
Use M3 8mm to mount (You might want to use heat inserts)
PETG/ABS is good enough
8 downloads
(0 reviews)0 comments
Submitted
-
Manta 8P mount for Voron DIN Clip. In center of the rail !!!
I found a couple of mounts but they ar not in the center of the rail (they place the holes wrong)
This version does the trick.
56 downloads
(0 reviews)0 comments
Updated
-
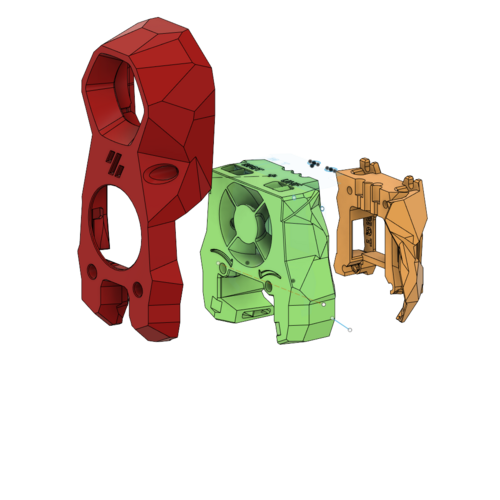
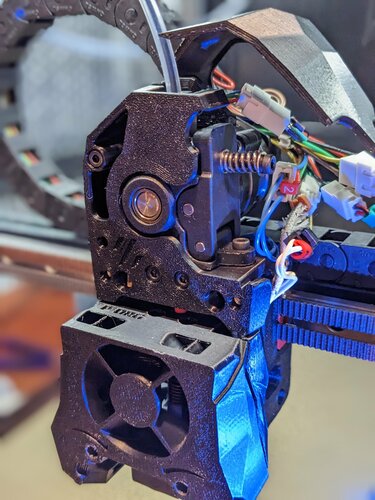
CW1 for TAP
I wanted to use Tap instead of Klicky/euclid probe on my V2.4 but i only had CW1 with Stealthburner so i set about seeing if it was possible to modify CW1 to fit TAP as CW1 motor mount fixes from the rear which TAP can't do.
I managed to find a solution so now this CW1 mod fixes from the front instead of the rear.
The left side mounting screw now fixes the CW1 Extruder Motor Plate from the front with an M3x8 SHCS screw going through to the heatset in the Tap Upper as in Pic1, the same as designed for CW2.
The right side screw now goes through the font of the CW1 Extruder Body with an M3x30 SHCH screw going through to the heatset in the Tap Upper as in Pic2, again the same as designed for CW2
Once the two parts of CW1 are mounted to the TAP then the Printhead Rear/Front can be mounted on the Tap as per Tap instructions for CW2 printhead mounting, the CW1 Extruder Body has access cut outs in the front for alen keys to be able to tighten those little screws that hold the printhead in place, the rest of the build is as per TAP SB fitting instructions.
I have had this mod on my V2.4 with SB and CW1 for a couple of months now and it works great....
52 downloads
- tap
- stealthburner
- (and 3 more)
(0 reviews)0 comments
Submitted
-
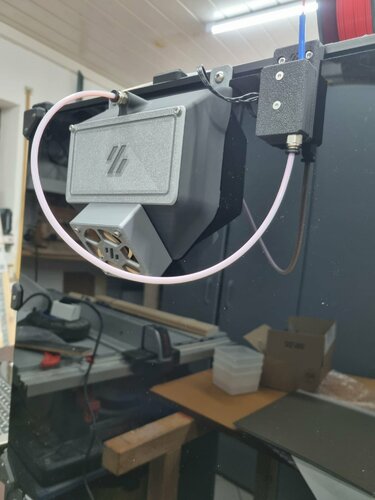
Voron 2.4 Side Entry Exhaust Housing
The stock exhaust housing requires alot of stand-off distance from the wall, behind the printer. Also, unless the radius of the Bowden tube loop is kept pretty big, it causes quite a bit of feeding friction between the filament and the inside of the Bowden tube. I modified the stock exhaust housing to allow for a more direct entry.
Using this version, I am able to run my CW1 extruder with a lower tension setting for my drive roller. Oddly, it improved my vertical wall surface finish too. I'm not sure how/why this would improve the surface finish, but the difference was noticeable.
It requires two additional m3 heat-set inserts for the guide/funnel mounting location. The guide/funnel attaches via two M3x6mm socket head cap screws.
If you print and use one of these, feel free to post a make, and give me a like either here, or on Printables.
I'm working on a filament run out sensor version of the tube guide. It will use the KW12-3 roller type microswitch. I'll post the model when I get it finished.
543 downloads
-
StealthBurner Orbiter v2 and Filament Sensor
Hi All
Here is my take on the Orbiter v2 and Filament sensor and mount for BTT EBB36. Could not have done this without the already existing excellent work form spacelab_2021.
2,265 downloads
-
orbiter Super Stealth Orbiter ( Orbiter 1.5 )
This is the Super Stealth Orbiter, a super low profile mount/housing for your Orbiter 1.5 with easy access for servicing the Orbiter without removing it from the printer/housing.
After using 3dPmamsih 'Orbiter 1.5 for StealthBurner' for a few months I knew there were a few things I wanted to change.
1) To have an unbroken PTFE path from the exit of the orbiter directly down to the hot end. 3dPmamsih version had a break and required two pieces of PTFE with a bit of housing between. There were a few times my filament hung up in this section, so I wanted to remove it.
2) To break the full loop in front of the Orbiter that prevented the idler door from fully opening. This further prevented easy access to clean the gears and thus service or clean the extruder.
3) To have a proper Bowden tube coupler.
4) Various tweaks to the design to add additional reinforcement, rigidity, ease of assembly, and overall long term durability.
5) A sleek look that gives little to no indication of the extruder being used. This includes removing the thumb wheel from the idler tensioner and instead simply using an m3 bolt. In my case I find I can still tension to the desired amount with just my fingers and the bolt. I also don't tend to adjust this much once its set.
PTFE path
BOM: (Ill add this soon, but nothing special. If you have some m3 hardware and heat sets from your build you are probably good to go.
Compatibility: Super Stealth Orbiter works with Orbiter 1.5 (I think that means the 1.0 should work too. Not sure.), the new MGN 12 based X-carriage (bolts go in from the front) and StealthBurner of course.
Please do leave a comment and let me know how its working for you.
If anyone wants to see a version for 2.0, send me one! Ill model it up and test it out. Don't need the motor, just extruder 🙂
Finally, Ill try get a GitHub repo up for this as well.
Thanks to 3dPmamsih. His design is the foundation for the Super Stealth Orbiter. I believe he adapted his design from Eytecz LGX lite mount, so big thanks to him too. (https://github.com/Eytecz/LGX_Lite_Stealthburner_CW2_style_mount/ ) "for his mount of lgx lite on SB to inspire me to complete this orbiter 1.5" .
605 downloads
- clockwork
- stealthburner
- (and 3 more)
-
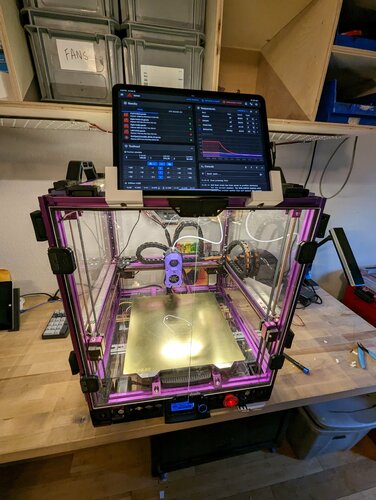
Simple iPad Pro Mount
A set of simple mounts that hold an iPad Pro. In this case, holding an 11" iPad on a 300x300 2.4r2.
Needed hardware:
2x M5x8 Cap-head Bolts 2x M5 tee-nuts72 downloads
-
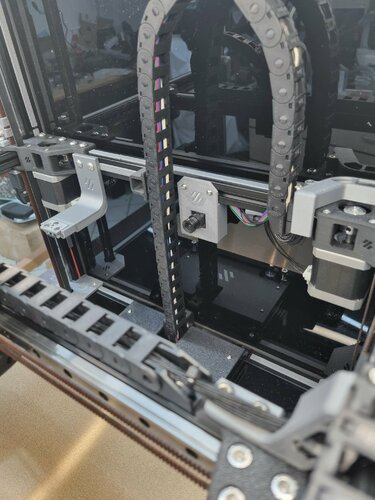
Voron Z chain lower mount with vertical riser
I have a Voron 2.4 - 350. The Z cable chain's first link did not lock at 180 degrees. This caused the chain to curve backwards. I re-mixed this version from the original that has a vertical riser than keeps the cable chain straight. Works great.
80 downloads
-
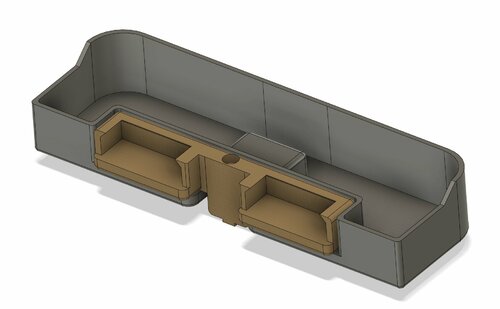
Large Nozzle brush: Two brushes and a large container - Voron 2.4 350
Here's a large nozzle scrubber and container for a Voron 2.4 - 350.
I have the 3 point bed mounting kit from Mandala Rose Works. It raises the bed about an inch. I included the STEP files if you want to modify for your printer.
This works great. The container mounts with magnets. I modeled in 3 magnets on each side. I only installed 2 on each side (4 total) and it's plenty strong.
The container is large enough where I can park the toolhead over the container for filament changes and the filiment that come out will land in the bucket.
332 downloads
-
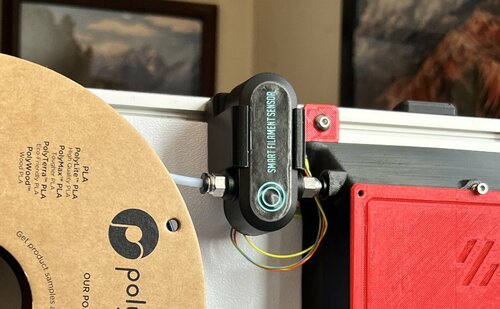
Smart Filimant Sensor Mount for voron 2.4
Here's a mount for the Bigtreetech smart filament sensor mount. I mounted this on the back of my Voron 2.4. Note I have an exhaust vent that exits out the side. This is so I can fit the big Voron on my desk.
BTT_Sensor_Mount v1.step BTT Filament Sensor Mount v1.stl
91 downloads
-
V0 Lazy Removable Clamp Hinges (V2.4/Trident compatible)
This is a hybrid of two excellent hinge mods that I very haphazardly slicer-spliced together. I have zero CAD skill, all credit for the design of the originals goes to their respective owners.
I'm just a lazy dude that wanted a little bit of each of these hinge designs for my V0, and I couldn't find it online. So I took these two great ideas and frankenstein'd them together in superslicer to make this ugly abomination that I find quite useful and painfully easy to assemble. It's Alexander T. Moss's brilliant clamping hinge idea combined with this amazing removable doors mod by ElPoPo. I literally just swapped the hinge attachment points of either part and merged them in my slicer before re-exporting. I did the same to the hinge mounts, but with the slot-in tabs for a 1515 extrusion.
The only reason I even bothered to post this is for the odd chance that someone is less motivated than myself and also looking for something similar. Alas, this is now the path of least resistence.
I recommend using double-sided VHB tape on the smaller back half of the clamps to get a more reliable grip on your panel. If you don't add that, you'll spend more time fussing with it to stay put than you will care to, I learned this from personal experience.
The "click and print" files are pre-arranged build plates of the parts you need.
The v0 version has all 6 parts layed out so they can fit on a 120mm v0 build plate.
The V2.4/Trident version has the minimum 12 parts layed out and pre-mirrored for a left and right door on a larger printer. They should all fit on a 180mm buildplate
if you want to DIY-print these parts the hard way:
you will need 2x V0 door mounts and hinge assemblies for the V0
you will need 4x door hinge mounts for the 2020 extrusion. If you use ElPoPo's original 2020 door mounts (which I have included here purely for convenience) then these spliced clamp hinges will also work on the trident or V2.4, the front part of the hinge will need to be mirrored to mount the doors on the left side of a larger printer. you'll need at least 2x hinges for each door.
https://mods.vorondesign.com/detail/uS9PdDxZtFj4MWLRzNXUyA
https://mods.vorondesign.com/detail/WqhhKrXksAZ4omhHS1RY4Q
721 downloads
-
Mini SB X carriage with Euclid probe mount for Voron 2.4 single MGN9 rail
After the Mini SB release, i realy like the light format and i whant to use it in my Voron 2.4 setup. This is work in progress so feel free to explore...
303 downloads
(0 reviews)0 comments
Submitted
-
Modified Eytecz Front_body_LGX_Lite_Stealthburner_ERCF_PCB
This is a modified version I made to adapt this for use with a 2 part hartk PCB. I pretty much eyeball modified this and be warned it does NOT fit perfectly. You will still have to trim some plastic by hand to get the connector for the 2 PCBs to fit.
40 downloads
-
Air Filter HEPA + Activated Carbon + CanBus ERCF wiring + Stealth
Burst from Discord Voron asked my if I can do an update of my old "HEPA + activated carbon Air filter mod" for his new machine:
he wanted wiring for CanBus and ERCF
I made it and added some "stealth" to it.
Work in progress...
This is based on Fanny Pack Air Filter. I dont know who made it originally.
1,073 downloads
-
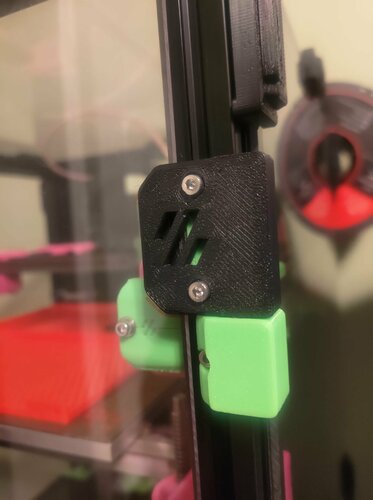
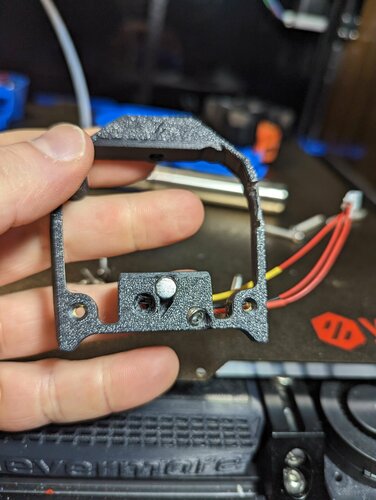
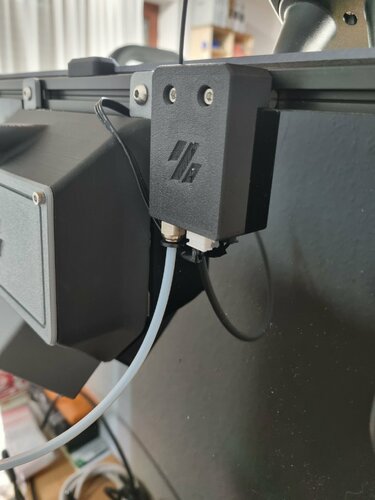
Simple filament sensor
For my Voron I used a simple filament sensor. Since the simple ones that can be bought only have a sheet metal strip for scanning, there was always the problem after a runout that the filament wedged itself in the sensor when it was pushed back. So I made one that uses a roller actuated micro switch. The original is designed to mount to the back of a Voron that has a 3mm backplate and 3mm tape. In order to make it a little more universal, I have uploaded a version with a separate mounting distance, which you can simply use in the slicer in height.
In addition to the printed parts you will need:
1 roller-actuated microswitch, e.g. Link
1 JST-XH, 2.54 male, e.g Link
1 Pushfit M10x1, e.g. Link
2 self-tapping screws M2x10
I printed the whole thing in ASA carbon, but in principle you can also use PLA, PETG or whatever
- After printing, it is recommended to clean the filament hole with a 2mm drill so that the filament slides through nicely
- It is advisable to fix the JST connector with a drop of superglue before soldering
- I wired the switch as an "opener", if you need a closer then just use another pin.
- After assembly, check whether the switch is actuated by the filament, if not you have to correct the roll bar a bit, I found that the switching points on the linked switches vary slightly
298 downloads
(0 reviews)0 comments
Updated
-
voron0.1螳螂头改蚊子voron0.1 Mantis head changed to mosquito
voron0.1 Mantis head changed to mosquito
零件7.STL
6 downloads
(0 reviews)0 comments
Submitted
-
voron2.4r1改r2 z电机脚垫 z drive baseplate
VORON2_v2.4_Assembly v4.stlVORON2_v2.4_Assembly v3.stl
8 downloads
(0 reviews)0 comments
Submitted
-
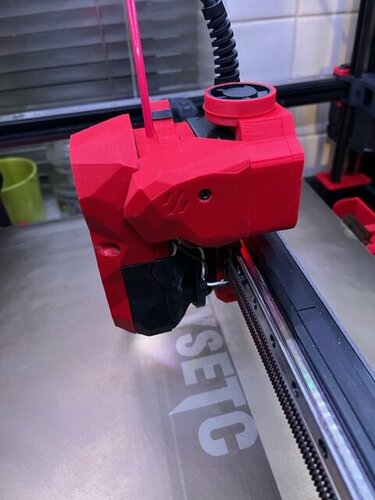
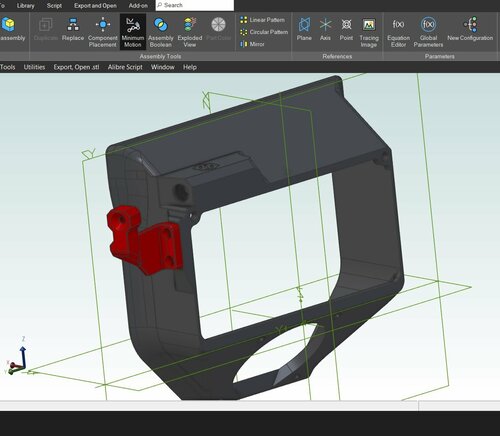
Voron Stealhburner door for BTT EBB36
On my Voron 2.4r2 i have an BTT EBB36 v1.2 installed. Since the board is mounted on the back of the LDO Nema 14 stepper behind a ClockWork 2 the cables came extremely close to the drag chain when homing. Also the wires were exposed on the Stealthburner.
I've remixed the door to have my Stealthburner encapsulated and shielded off in the back. This way i still can use the door and have everything safe and shielded. For ventilation and esthetics there is a cutout on the back of the Voron logo. I've included the EBB36 v1.2 mount, spacers and the drag chain anchor (3 holes, i don't have a 2 holes file) so you can create the same setup.
The door needs to be printed with support, mounts don't need supports. Printed mine in eSUN ABS+ Black with 110c for bed temp and 245c for hotend temp.
EDIT: I forgot to include the standoff/spacers, see attached files
spacer_17mm_2.stl spacer_17mm.stl
413 downloads
-
Trident Pinmod Gantry A/B Drive Units modification
As I'm currently swapping to hartk1213's pinmod I was wondering why A/B Drive Units have different Pin length (28/30mm). when looking at his STL's I saw the reason that one pin is secured against vertical down-movement by adding a 2mm stop, but not the 2nd what made no sense to me.
So I got his Step and looked to the specific lower A/B plates, but the.step doesn't correspond to the downloadable STL's as there are no stops in the .step parts?
Anyway, I decided to modify to have both pins secured and made 2 versions: 2 times 5x28mm or 2 times 5x29mm pins per side. so for both sides 4 pins are needed!
The 29mm Version makes more sense to me as the pin has 4mm guidance in the unit and I think 1mm stop to secure the pin should be enough.
I found the pins at Aliexpress: https://www.aliexpress.com/item/32769265211.html
134 downloads
-
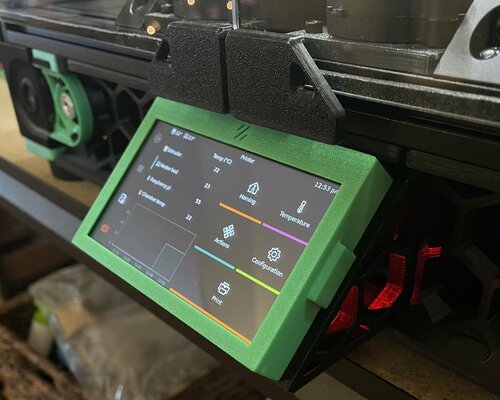
45 Degree Mount for PI TFT43 4.3" Display
I couldn't find a mount that fit the PI TFT43 screen so I remixed another design to fit and designed a bezel.
Print with normal Voron settings, no supports needed.
209 downloads
(0 reviews)0 comments
Submitted
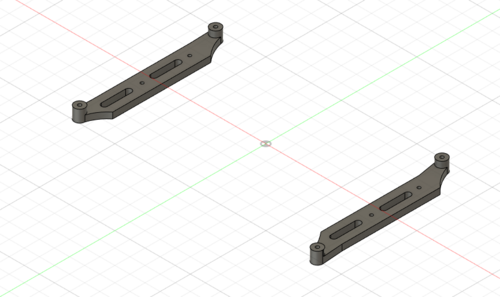
-
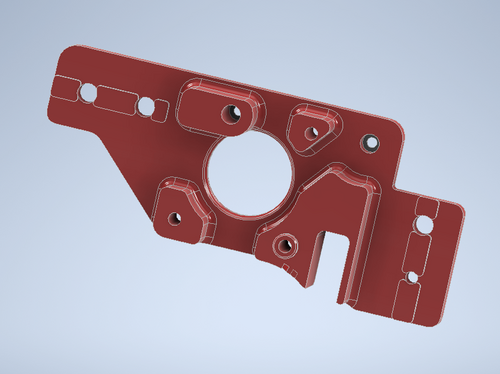
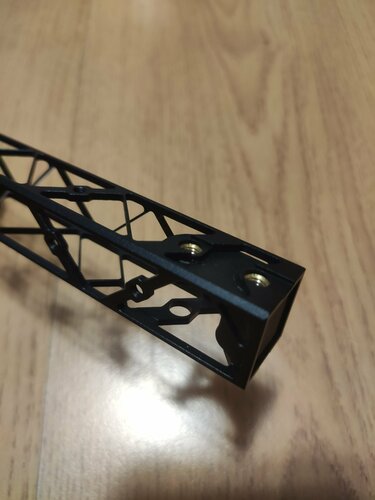
Light X beam mounting block
This is my design of mounting block for light X beam. It should work on both aluminium and carbon fiber versions, but make sure that inner dimension of beam is 16x16mm.
Required hardware:
6pcs M5x7x5 brass heatset insert
341 downloads
-
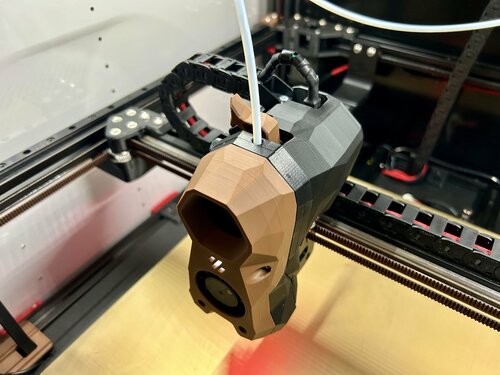
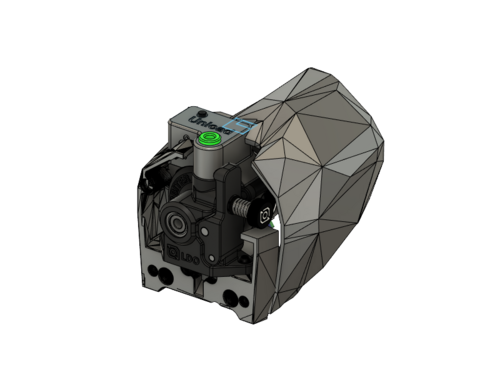
Stealthburner for Mosquito Magnum with Phaetus UHF Adapter
This is a modified Stealthburner to fit a Mosquito Magnum hotend with a Phaetus UHF Adapter/nozzle. Fan duct to Nozzle Clearance is 1mm. Included are files for 2 mounting options. and the front cover that will fit. The usual side by side mounting, and the probably not very used at all diagonal mounting. Requires 2 heatset inserts. Then you install the screw from the bottom. Let me know if it works for you, or if it needs adjusting.
509 downloads
(0 reviews)0 comments
Updated
-
Exhaust Fan Cover
I didn't like the open design of the fan, it looked even more stupid with the beige Noctua fan. So I created a cover for it, maybe you like it too and you want to dress up the fan. I uploaded a 20mm variant for the standard fans and a 25mm variant for Noctua
72 downloads
(0 reviews)0 comments
Submitted
-
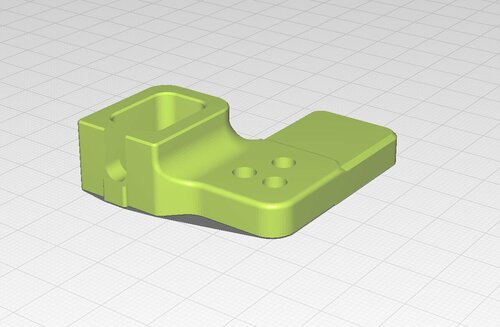
Holder for gantry camera
Since the camera perspective at the front above offers a good overview but you cannot see what is happening at the nozzle, I looked for a solution for a second camera. Since the Voron is designed to be quite space-saving, it wasn't easy to find a free corner. I then found a camera circuit board with a USB connection on Amazon that can also be extended.
Here's a link to the camera, hope it's OK here: Link
Make sure that longer cables are shielded, otherwise you will have connection problems.
I used self-tapping screws to screw it on
157 downloads


4B_P.thumb.png.e4480e7fb8e1187f5e7d9622aab8b720.png)
DCHYLNCJ@V90.thumb.png.d5dfb03c9a8abad9dc2178f0f9f74d79.png)