-
TeamFDM.com is an UNOFFICIAL companion site for the DIY Voron 3D printer community. For official docs and final source of truth, visit the Official Voron Discord or the Voron Github
Printable Voron User Mods
Voron User Mods, or "UserMods", are a collection of community created and Team FDM curated modification for Voron Printers. All of these mods are available on the VoronUsers Github repo and unless otherwise specified follow the Voron communities GPL3.0 Licensing. Use any Mods at your own risk, if you make modification please share them on the VoronUsers repo.
Mod Authors: Have a Voron mod? Upload it at TeamFDM.com and let us know you're the author. We will ensure you can update and curate your files for more feedback! Please include tags for what Voron, or extruder your mod is compatible with.
660 files
-

-
Volcano-Mosquito - Mellow stealthBurner
Volcano-Mosquito - Mellow Pint-Head for stealthBurner
Hope this Help
374 downloads
(0 reviews)0 comments
Submitted
-
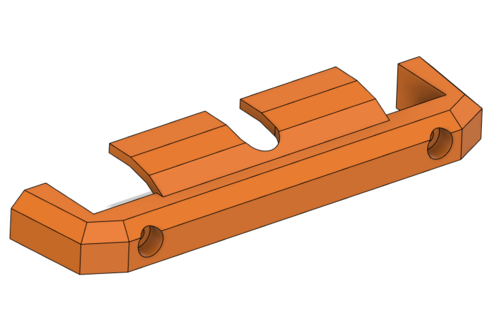
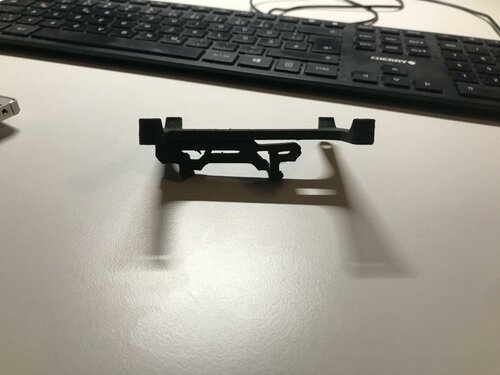
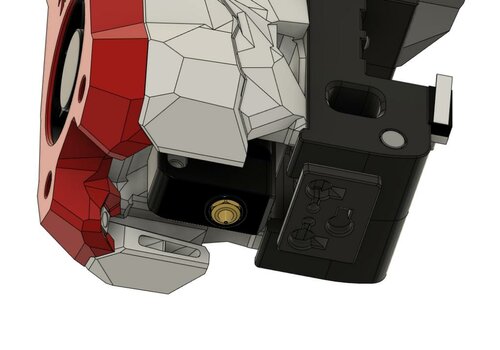
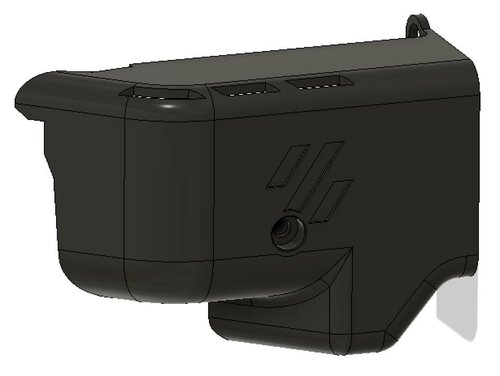
V0.1 Lower bay guard
I created this as a way to prevent filament from getting into the electronics bay via the space around the z-rod. This screws in place of the two z liner rail stops so you can use the existing nuts to mount it. per design, it is a snug fit, but allows for clearance around the z-rod so as not to hinder its movement. The face of this should be printed down and I only allowed supports for the holes. Please let me know what you think about this or if you'd like to see any changes.
178 downloads
-
SSD Bracket
ssd_bracket
bracket to mount a ssd-drive to the din rail under a voron printer
This bracket is designed to mount a ssd drive in the electronic bay of a voron 2.4 or Trident.
The following part has to be printed x1: pcb_din_clip_x3
Bom:
1x ssd_bracket 1x pcb_din_clip 2x M2x10 self tapping screw 4x M3x12 SHCS Instructions:
Use the M2x10 self tapping screws to mount the ssd_bracket to the pcb_din_clip. Then mount your ssd drive with the M3x12 SHCS to the ssd_bracket. Then snap the assembly in place on the din rail. It mounts similar to the Raspberry Pi on page 178 to 179 on the Voron 2.4r2 manual.
74 downloads
-
Revo Skirt Nozzle Holder
Revo Nozzle Holder v2.4 350mm
Remix of Andre's skirt-mounted nozzle holder to fit Voron 2.4 350mm printers, the BOM and installation steps are the same.
This will fit up to 4 nozzles, and uses the '300mm' part from Andre's design, unmodified (even though this uses the 300mm part from the Trident, it will only fit the 350mm v2 due to differences in skirt design).
Bill Of Materials
2x 6mm x 3mm Round Magnet 2x M3 Heat-set insert 2x M3x8 BHCS (SHCS will work as well) Instructions
Print skirt and nozzle holder parts (the skirt piece will be placed in the right-front position of the printer). Install the 2 heat-set inserts into the ends of nozzle-holder part. Install 1 magnet in the skirt, and 1 in the nozzle-holder such that they attract each other when the door is installed. Insert the nozzle holder into the skirt and fasten with 2 M3x8 BHCS Remove the stock skirt piece from your v2.4 and install the new one in its place (Note, you will likely need an angled hex driver or ball-end driver to install the skirt bolt with the nozzle tray installed).334 downloads
(0 reviews)0 comments
Submitted
-
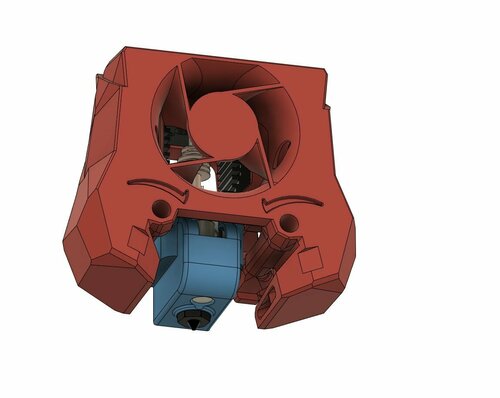
Stealthburner Crazy Dragon Toolhead
Stealthburner (RC1) Crazy Dragon Fan Duct
With special thanks to @chestwood96, sponsored by @3dmellow for the Crazy heatblock, as well as the awesome base design from the VoronDesign team, I'm able to create the Stealthburner Crazy Dragon fan duct.
The fan duct is designed based on the Rapido toolhead mount (RC1), retro-fitted with Dragon styled duct allowing wind to blow towards the throat only.
The duct is designed to be able to mount the Phaetus/Triangle Lab dragon heatsink with
Mellow Crazy Heatblock (verified by myself and @chestwood96) Phaetus Dragon UHF mini (standard UHF version without the melt zone extender) TriangleLab T Volcano (to be verified) Print Parameters
Print in standard Voron settings.
Previews
411 downloads
-
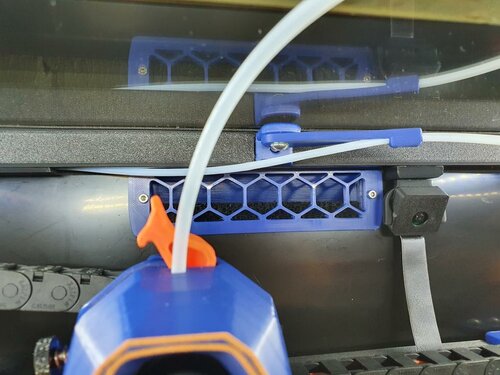
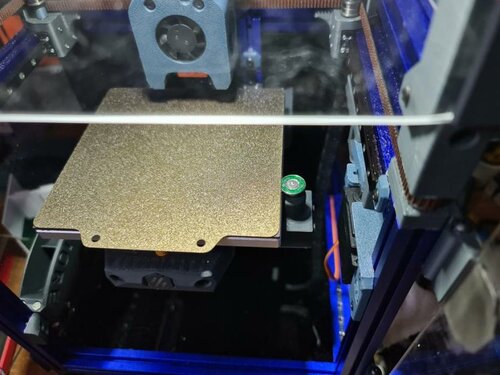
Bowden Tube Guide
PTFE Bowden Tube Guide and Canbus Wire Support
Required Hardware:
M3x8 Bolt and M3 T-nut M5x10 Bolt or a M5x8 Optional 4mm drill bit for cleaning out bowden tube path About
In my 350 build the PTFE tube kept getting caught so I made this arm to keep it up. The shorter arm works better so I recommend using it instead
Install
Drill out bowden guide with 4mm drill bit for a perfect fit (optional) Bolt mount to rear frame with M3x8 and tnut putting the lip at the top Screw arm on with M5x10 (I used a M5x8mm and it works fine) into the plastic allowing the arm to still be able to swivel1,549 downloads
-
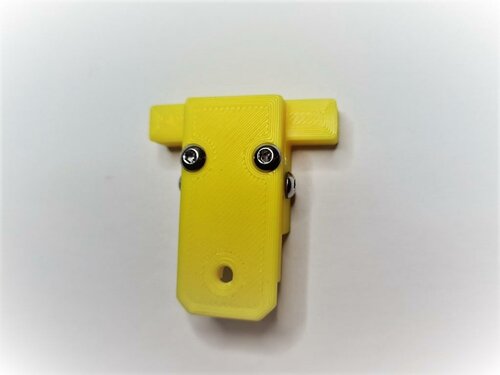
RunoutUnklicky
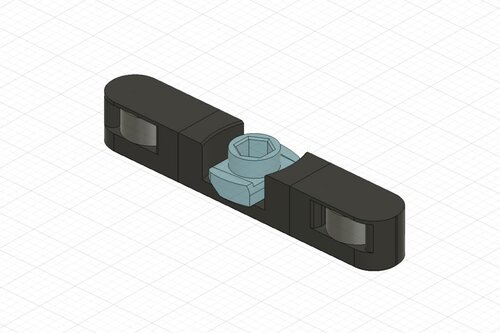
Runout UnKlicky Sensor
The Runout UnKlicky Sensor is a filament runout sensor that can be used to pause a print if printing filament breaks, runs out or otherwise is no longer present in the sensor.
The design uses magnets as the switch, making it easy and cheap to source BOM components.
Printing:
Components:
1x Pin.stl 1x Roller.stl 1x Base.stl (different options are available[*]) 1x Top.stl (different options are available[*]) Printer:
Use the Voron defaults and print in ABS or better The parts are orientated correctly in the STLs [*]Base and Top:
There are 3 bases and 4 tops to choose from:
Bases:
Base.stl is the standard base with push in holes for the PTFE tubes Base_PC4-M6.stl which allows the use of PC4-M6 connectors for the PTFE tubes Base_Collet.stl which allows the use of E3D M4 collets Tops:
Top.stl is the standard top with no mounting options Top_2020.stl provides mounting to 2020 extrusions using a t-nut Top_1515.stl provides mounting to 1515 extrusions using an inserted nut Top_1515_NoNut** provides mounting to 1515 extrusions if you have no inserted nuts available [**] The Top_1515_NoNut can be used if you don't have any free nuts. It snaps into the extrusion. If it moves or slips, you can use a M2x10mm self-tapping screw to secure the sensor to the extrusion. Do note that the screw can scratch the inside the extrusion if that might bother you.
BOM:
5x M3x8mm SHCS/BHCS (2x for the wired screws, 2x for the top/base, 1x for 2020 extrusion mount) 2x 6x3mm neodymium magnets (for the switch) 1x M2x10mm (optional for 1515 extrusion mount) 1x M3 Hammer T-Nut (for 2020 extrusion mount) 2x fork connectors (optional - for attaching wires) Assembly:
Parts used:
Insert one of the magnets into the pin, push it in fully so that it shows in the groove gap:
Insert the corresponding pin into the base and make sure that they attract from the outside as shown:
Insert the pin into the base with the pin grooves to the sides for the screws to enter. The pin should be pushed down to the bottom by the magnet in the base. Push the pin right up to the base magnet and screw in the screws to either side of the pin:
Place the top on the base and secure with two screws:
Attach cables to each screw that goes into the pin. There is no polarity and no voltage so it doesn't matter how they are connected. I used fork connectors for ease of use. Make sure the pin screws are screwed in tightly:
Hook up the wires to a multimeter and put it on it's continuity test. It should show resistance (and/or beep) when there's no filament in the sensor:
It should show no resistance (and/or remain silent) if you fully insert some filament into the sensor. Feed the filament through a few times from each side to ensure that you do not see any resistance when filament is present, and that you do see resistance when there is none:
Wiring:
Wire to an end-stop or similar pin. Do not connect to voltage, only to pin and GND. For example, with the BTT SKR MINI V2.0 you could use the E-STOP pin (PC15) and GND. For the BTT SKR Pico you could also use the E-STOP pin (gpio16) and GND.
Klipper:
A simple configuration is available in this repo. Upload and include runoutunklicky.cfg in your printer.cfg and change the PIN definition to the one you chose on your MCU. The config file contains what is required to use a runout sensor, but it will only literally pause the machine and resume when prompted. To have the toolhead parked away from the print to an accessible place to change filament, implement one of the following examples in your klipper configuration:
AndrewEllis93 Mainsail Test by inserting and removing filament. If it shows incorrectly in klipper add a ! in front of the PIN definition and test again.
Credits:
Thanks to:
chestwood96 for inspiration from the UnKlicky probe for SlideSwipe majarspeed for the Unklicky probe jlsa1 for the Klicky and Unklicky probes al3ph for the399 downloads
(0 reviews)0 comments
Submitted
-
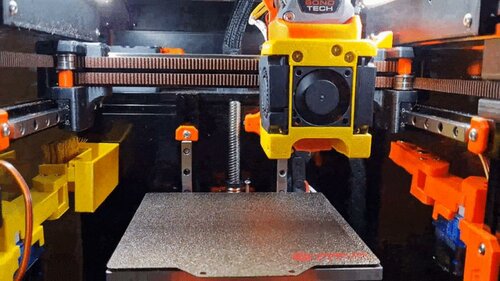
NozzleWiper
Nozzle Wiper
This is a nozzle purge and wipe mod for the Voron V0.1. It is based on the SlideSwipe magnetic probe by chestwood96.
It uses a snap in frame clip, that doesn't require screws, to attach a servo that extends a bucket and brush over the build plate for the hotend nozzle to clean it of filament debris for cleaner prints.
Goals:
Servo used to extend system over the print bed Bucket and brush to clean nozzle Snap in frame clip that does not need screws Klipper macros to control the entire process These have all been implemented in this public release.
Printing:
Use the Voron defaults and print in ABS or better The parts are orientated correctly in the STLs There is a single All In One STL that fits onto the v0.1 build plate to make life easier BOM:
1x Micro Servo 9G Servo Motor (SG90/MG90) 2x M3x8mm BHCS (for servo mount) 2x M3x6mm BHCS (for brush holder mount) 2x M2x10mm self tapping screws (optional: for snap in frame clip) 1x Nozzle cleaning brush in Copper 3x OD 4mm, length 16mm, PTFE tube 1x OD 4mm, length 7mm, PTFE tube Hardware:
Brush: https://www.amazon.co.uk/gp/product/B08H8SXBKM https://www.aliexpress.com/item/4000801101276.html
Servo: https://www.amazon.co.uk/gp/product/B0972M7JN1 https://www.aliexpress.com/item/1005001956791642.html
Assembly:
Step 1 - Set Servo
Take the servo and attach a single arm to the top. Slowly and gently rotate the rotor clockwise until it hits its limit. Remove the arm and replace it on the servo so that it is positioned slightly more than 90 degrees clockwise as shown in the picture above.
This sets the servo arm to its 0 position. Use the smallest screw in the servo packaging to affix the arm to the servo in that position.
Step 2 - Parts Preparation
Remove the support tabs from the bucket.
Cut down the brush head so that it matches the internal width of the brush holder. It's soft plastic so can be cut with a craft knife or a pair of angle cutters.
Cut the PTFE tube into 3 lots of 16mm and 1 lot of 7mm. These will act as the hinges.
Step 3 - Fit Servo to Mount
Push the cable connector through the slot provided in the servo mount as this will run on the inside of the extrusion. Fit the servo into the mount and fix in place with 2 M3x8mm screws. You may need to fettle the plastic around the hole for the top of the servo for it to fit. Note the correct orientation of the servo.
Step 4 - Servo Section Assembly
Place 1 of the 16mm pieces and the 7mm piece of PTFE tubing into the sections as shown above. Place the section with the space for the servo arm first and then the double ended section behind it. Carefully seat the PTFE tubes into the servo mount and fix in place with the angled part shown to the top of the mount:
Step 5 - Brush Section Assembly
Place the remaining pieces of 16mm PTFE tubing into the ends of the fitted sections and then fix onto the brush holder using the remaining 2 M3x6mm screws.
Fit the brush head into the brush holder:
Step 6 - Motion
Slowly and carefully, manually extend and straighten the arm to ensure a full range of motion:
Step 7 - Wiring
Before permanently mounting the nozzle wiper to the printer test whether it works as expected by wiring the servo to the MCU from outside of the printer.
Red wire = 5v Brown wire = GND Orange wire = signal pin There are various choices for connecting the servo to the MCU. Here will will refer to the BTT SKR Mini E3 V2.0.
Always turn off the printer before connecting or removing anything to or from the MCU.
The simplest is to connect to the Neopixel or E0-STOP connector if it is not in use as it provides all 3 required connections. Alternatively, a Klipper Expander can be used if there are no free pins.
Remember, do not fit the arm to the printer at this point.
Step 8 - Klipper
Upload the nozzlewiper.cfg file to your klipper configuration directory on the raspberry pi. If using Mainsail you can do this in MACHINE
414 downloads
(0 reviews)0 comments
Submitted
-
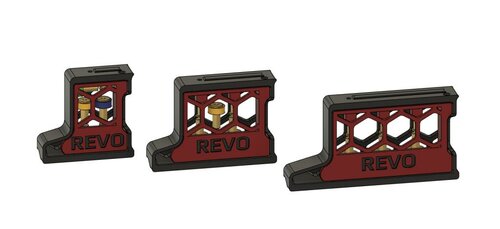
Voron 2.4 Revo Nozzle Holder
Voron Revo skirt mod
This is a modified skirt that lets you house the 3 current revo voron nozzles whilst they are not in use. Currently only designed for the 350, 300 is possible, 250 is small but I think I found a way to squeeze them all in
Designed for the Voron 2.4 R1 and R2
Hardware Required: 2 M3x8 or M3x10 SHCS.
They thread into the plastic and should be somewhat tight to keep the door closed, A design with a magnet may be in the works.
The Nozzles can either be left free floating, Or you can thread them into the top blocks if you do not want them rattling about.
A big shout out to So I says... [V0.420|VT.634] on the discord as he created the trident versions which gave me the drive to make these!
480 downloads
(0 reviews)0 comments
Submitted
-
LGX Stealthburner Connector Cover
LGX stealthburner connector cover
This is a remix of craxoor's Afterburner PCB Cover designed to work with the Stealthburner and Bondtech's LGX Extruder.
105 downloads
- sammynorway
- v1.8
- (and 3 more)
-
Magnetic Panels With Magnet Inserts
Magnetic Panels with Magnet Inserts
There are various panel latches and magnetic clips that offer quick panel removal for swapping between enclosed- and open-chamber printing, but I wanted to fix a few of the pain points that I ran into with some of the existing mods.
Does not require a lot of filament. The corner and mid-panel clips were modeled after the stock Trident panel clips and are similarly hollowed, saving filament and print time.
Uses a thin strip of VHB to adhere to the panels. This should provide (1) solid adhesion without the need for drilling or extra fasteners, (2) some amount of squish for the magnets to pull against, and (3) the ability to adjust or remove them in the future.
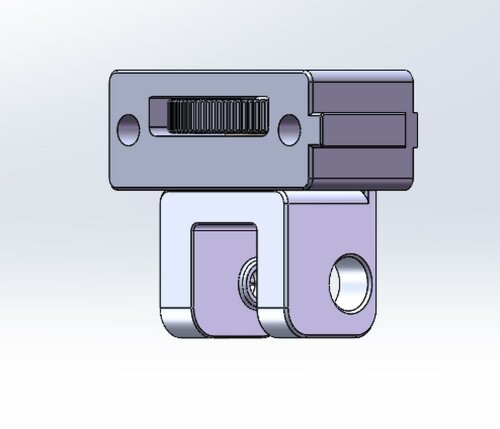
The frame magnet inserts are designed to (1) require only printed parts and no additional fasteners aside from the 6x3 magnets, (2) sit inside the frame slot flush against the aluminum frame face, (3) be easily adjustable, and (4) retain the magnets without glue and allow removal for correcting polarity or salvaging. Discord@PF VT.520 came up with the idea of using a hammerhead-style rotating nut to tighten and press against the magnet insert, holding it in place. There are two included versions of the inserts. Magnet-Insert.stl is the original design but may be slightly more difficult to print due to the bridging involved. Magnet-Insert-Side.stl is redesigned for easier printing; namely, reoriented on its side, uses 45° chamfers rather than fillets, and does not require bridging.
The panel's ability to sit right up to the face of the frame allows the panels to pop on and off without any interference.
The only required parts are a small amount of VHB tape and a lot of magnets (48 6x3mm magnets for each panel).
Magnet inserts hold two 6x3 magnets and is held in the aluminum extrusion with an unhammer
The corner and mid-panel clips hold matching 6x3 magnets
Installation jig makes it easy to set the proper spacing for corner inserts
1,810 downloads
-
Plug Panel Schurter
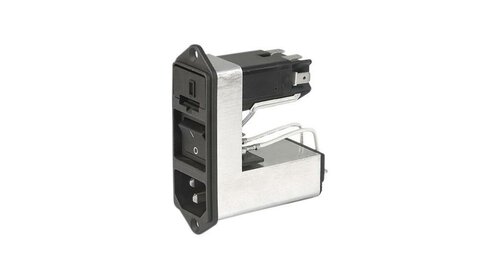
Plug Panel Mod for Schurter CD44.1101.151
Connection panel for Voron 2.4r1 with Schurter CD44.1101.151 power entry module. The panel has a LAN socket as well.
Compatibility with 2.4r2 not tested
The plug panel:
CAD and STL images:
Printed panel:
21 downloads
(0 reviews)0 comments
Submitted
-
Tool Free Tensioner
Tool free tensioner
Name and specification Quantity SHCS M5x20 4 M4*0.7 Square nut 4 HHCS M4x16 4 D4x7x1(4x8x1)Flat washer 4 M5 Hex Nuts with Lock 4 bracket 2 tensioner 2 bracket image 2 tensioner image 2 wheel 4 PART PRINTING GUIDELINES
MATERIAL
ABS LAYER HEIGHT
Recommended: 0.2mm EXTRUSION WIDTH
Recommended: Forced 0.4mm INFILL TYPE
Grid Gyroid Honeycomb Triangle Cubic SOLID TOP/BOTTOM LAYERS
Recommended: 5 WALL COUNT
Recommended: 4 INFILL PERCENTAGE
Recommended: ≥60%
662 downloads
-
Corner Cable Cover With Drop Down Holes
Top Corner Cable Cover with Drop Down Holes (LED Wires)
Covers cables that are running around the top corners of 2.4R2 extrusions behind the Z idlers with drop down holes around the vertical extrusions and inline holes with cutouts to keep the wire management as clean as possible.
Holes are big enough to allow 2 pin microfit connectors pass through. Works perfectly with LDO LED PCB breakout board.
CAUTION Check your max Z travel as there will be some loss.
Printing
Print 1 cover per LED strip Default voron settings No supports needed BOM
Size Qty M3x8 2 M3 T-Nut 2 QTY per cover
233 downloads
-
Stealthburner Creality Toolhead
Creality toolhead for stealthburner.
Not recommended but a potential pathway for e3-
216 downloads
-
V0.1 Its Not A Sexbolt Switch
2 piece vented back Panels for Voron V0.1 Mounts with the stock V0.1 panel retaining clips. STL is sized for 2.5mm thick panels. 2 color print was made with a color change on layer 6 for a 2.5mm panel.
26 downloads
-
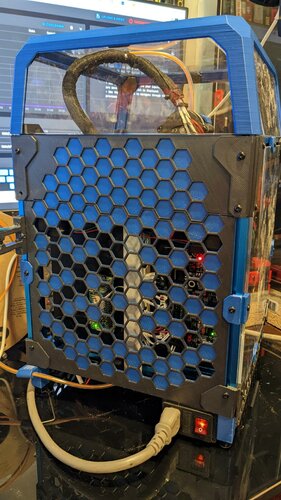
V0 Two Piece Back Panel
2 piece vented back Panels for Voron V0.1
Mounts with the stock V0.1 panel retaining clips.
STL is sized for 2.5mm thick panels.
2 color print was made with a color change on layer 6 for a 2.5mm panel.
128 downloads
(0 reviews)0 comments
Submitted
-
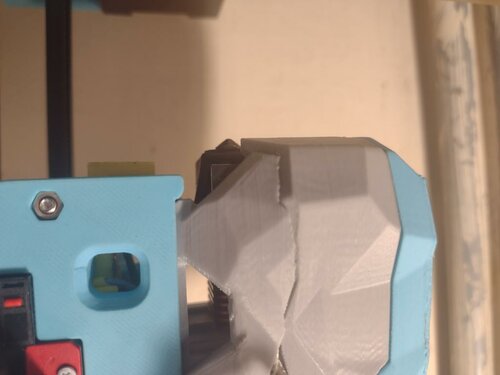
Stealth Zero
Stealth Zero
A low poly gantry mod for the Voron V0.1
In anticipation of the Mini Stealthburner I decided to alter the design of the V0.1 gantry to match the low poly aesthetic.
You can find the low poly front bed mount here: https://github.com/MapleLeafMakers/Stealth_Bed_Front
WARNING
I feel like it is worth mentioning that this mod is in active development. I've personally been testing the V0.1 parts along with the front mounted X carriage without any issues. zruncho3d has been providing feedback on the design of the BoxZero mod and will be testing shortly.
Included in this mod are:
Front mounted belt tensioners - These can be used to allow for additional tension adjustment in combination with the stock motor tensioners of the V0.1 or in conjuction with the rest of the items available in this mod for a full stealth look. Optional front mounted X rail - The use of the motor mounts included in this repo are required to maintain the full 120mm of Y travel. A custom designed, adustable Y endstop mount is included in the folder containing the X carriage. Toolless motor caps - I can't be the only one that's dropped something into the motors, right? BOM (WIP)
I've included the BOM for each individual component in their respective folders. There are a number of parts that are reused from a stock V0.1 build and the rest should be lying around as extras if you bought a kit. The only
197 downloads
(0 reviews)0 comments
Submitted
-
(0 reviews)
0 comments
Submitted
-
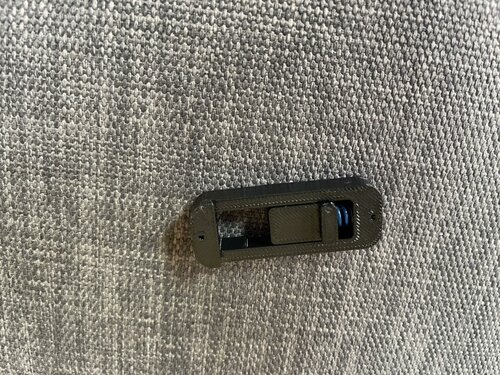
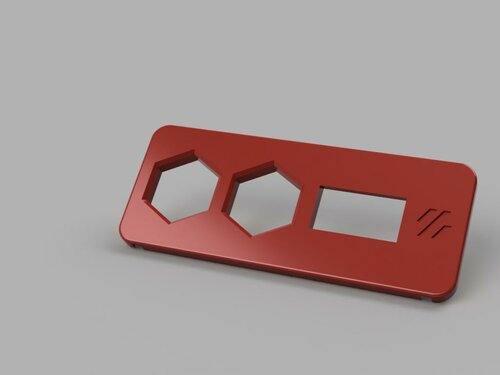
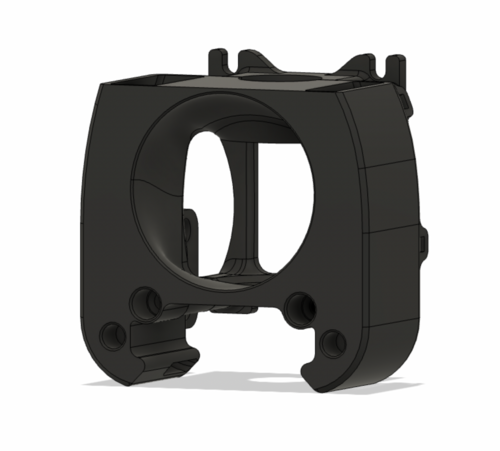
SSD1306 Case Front Cover
SSD1306 Case Front Cover by Lukas#2722
This is a front cover replacement that uses a SSD1306 Display.
The holes are the same size in the skirt so you can mount the G-Code Buttons by meteyou https://github.com/VoronDesign/VoronUsers/tree/master/legacy_printers/printer_mods/meteyou/gcode_buttons
Notes:
I didn't edit the backplate of the original design. I just used some side cutters and cut it out by hand.
It mounts the same way as the original using heatset inserts.
It also does not have the same shape as the original (there is no curve on the front face) that is just due to my lack in modelling experience.
0 downloads
(0 reviews)0 comments
Submitted
-
-
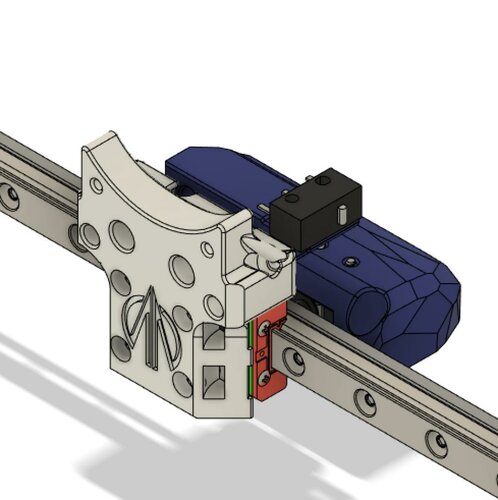
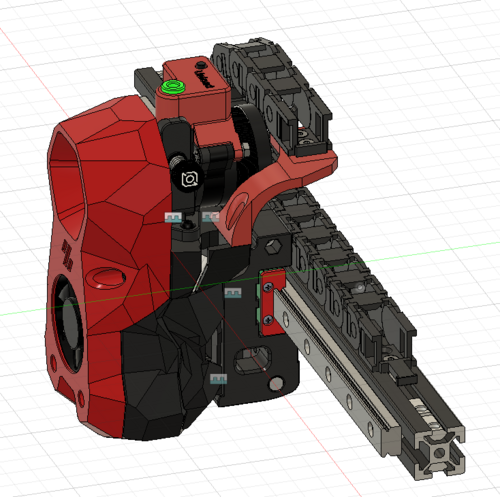
2.4 X Carriage
Voron 2.4 X Gantry adapted with a few things in mind:
- MGN12H carriage
- Annex Engineering Quickdraw Probe
- Allows hotend cables to go without hard corners
- Printed in one pice (with support and support gap)
Printed nicely, not tested yet!!
**Cables duct is a bit tight, I got mine through but might not work if you have pins already crimped at the end of the cables.
128 downloads
(0 reviews)0 comments
Updated
-
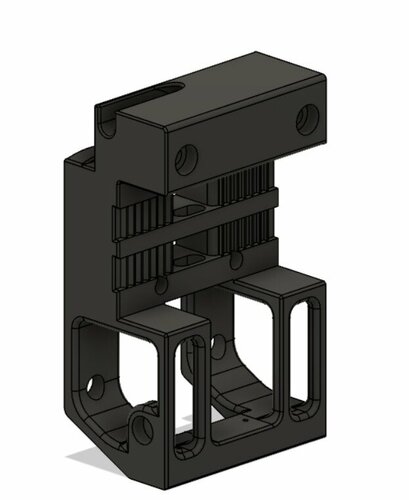
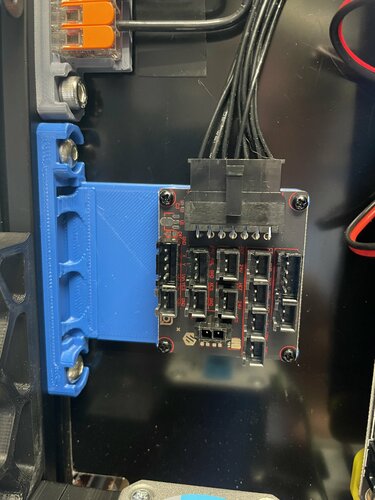
LDO breakout board mount for 2020 frame
I wanted to use the LDO breakout board and pre-made cable with my Voron build, but didn't have enough room on the DIN rails to mount it, so I made this frame mounted board holder for it.
It's a combination of the LDO din mount bracket, along with a 2020 mount from the Wago mount that comes with the Voron STLs. And a small reinforcement from one of the side skirts. Anyway, it's a mashup of things to make something useful, at least for my build.
Use the standard 5mm bolts & 2020 inserts from the standard Voron build that the Wago mount uses.
34 downloads
(0 reviews)0 comments
Submitted
-
Afterburner E3D Revo Six printhead
I make this mod to acomodate the E3D Revo Six hotend wiring on afterburner setup.In adition i create a adxl345 mounting option.
72 downloads
- paulthealien
- afterburner
- (and 1 more)
(0 reviews)0 comments
Submitted
.thumb.jpg.455d15673ede3fd647f42b97864bbce2.jpg)