-
TeamFDM.com is an UNOFFICIAL companion site for the DIY Voron 3D printer community. For official docs and final source of truth, visit the Official Voron Discord or the Voron Github
Printable Voron User Mods
Voron User Mods, or "UserMods", are a collection of community created and Team FDM curated modification for Voron Printers. All of these mods are available on the VoronUsers Github repo and unless otherwise specified follow the Voron communities GPL3.0 Licensing. Use any Mods at your own risk, if you make modification please share them on the VoronUsers repo.
Mod Authors: Have a Voron mod? Upload it at TeamFDM.com and let us know you're the author. We will ensure you can update and curate your files for more feedback! Please include tags for what Voron, or extruder your mod is compatible with.
660 files
-

Din Mounts - Low Profile - Electronics Voron
I ran into these on Printables, I hope its ok to post them here and help out others.
Lower profile, more space for airflow or/and fans.
Seem very solid, will be default in my builds from now on!
Thanks to the original poster - Frogree - https://www.printables.com/@Frogree_371528
231 downloads
-
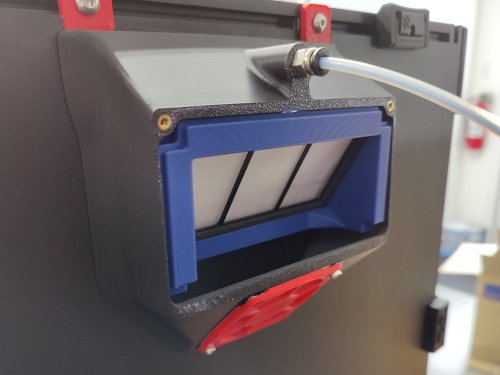
Voron 2.4 Roomba 800/900 HEPA Filter Box
A proper filter box for using Roomba 800/900 series HEPA filter in your Voron 2.4 Exhaust.
Unlike the other HEPA box posted here, this one fits the original exhaust housing and should use less material.
Print with Filter insert side on bed with support on build plate only.
To install it in the exhaust box, insert it at 90C angle and rotate it as you insert (last pic). The last push to lock it in place might require you to push from inside the printer. You might have to temporarely remove the fan for installation!
110 downloads
(0 reviews)0 comments
Updated
-
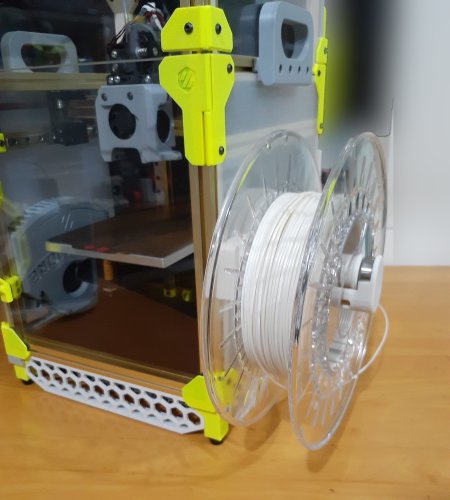
Remix of RyanDam's Cable Management Duct for Voron Printers
This Remix of RyanDam's Cable Management Duct for Voron Printers includes a number of custom ducts which I am using in my Voron 2.4 build. Thanks to the original author for the excellent design of the ducts, which this remix is based on!
Since these models are designed to work with electrical components, if you use these models, it is at your own risk.
Included here are several customized ducts which may help with cable management in a Voron build. I am still in the process of building mine, and I chose to use the same electronics layout as the voron spec. These ducts were designed based on my FYSETC R2.4 kit (which I am building as an R2.4 V2), so some dimensions may be different in other kits. This was designed with help from the STEP file from the Voron Github.
There are several ducts included, which are designed to go over the DIN rails, and these parts include “BRIDGE” in their names. These parts will need to be printed with supports. There is an integrated support in the “HALF_BRIDGE” part, but that could also be printed with supports if needed. The “HALF_BRIDGE” part also has a thin raft like integrated support which will need to be removed. The 90 degree full bridge ducts are slightly different between the right hand (RH) and left hand (LH) versions. The difference is that the RH version (Cable_Management_Duct_Remix_DUCT-FULL-BRIDGE_90DEG_RH_5B.stl) is cut off a bit short to allow the power supply stabilization bracket to pass.
I set my ducts up so that the high voltage AC wires, and the low voltage DC wires, would stay in separate ducts. To do this, I used two half ducts (one for the AC, and one for DC), on the center duct which crosses the lower DIN rail in the pics, which is nearest the power supply. I also printed the AC ducts in orange so they would be distinctive as a reminder they contain the high voltage AC wires.
There are also plain and logo versions of the covers. The covers for the “BRIDGE” parts have print in place hinges, so if you find they are welded together when printed, it will be helpful to calibrate flow and horizontal expansion, as well as adjust the temps for the filament used. I made some minor improvements to parts since I printed mine (either for length or printability), but I do not think there will be any issues due to the changes. I printed the ducts for my printer in ABS and PETG, but use your best judgement on the appropriate material to use. I used VHB tape to secure them, but just note that once placed, they won't likely be going anywhere soon.
Parts are not oriented for printing.
Feedback is welcome, and if there is a problem I will try to fix it as I have time. I'm still building my printer, so if I run into an issue with this design, I will update it further, however I don't foresee any interference issues currently. Most likely I will not be able to accommodate requests to customize these further. The STEP files can be found on Printables (since the file was too large for this site), so remixing will be simpler. If you print these, or use these, it is at your own risk.
I posted some remix covers for the boxes, which have inset printed labels, as well as some single and double wire guides which I am using to secure my ground wires. If you find these models useful, please post a like or a comment with some pics of your prints. You can find some other things I am working on at my blog (https://www.mystoopidstuff.com/blog), thanks for looking!
You can find some additional low profile wire guides here:
https://www.printables.com/model/502345-wire-management-guides
There is a remix of the small box (not included here but shown in the pics), which holds two WAGO 221-415 connectors here:
https://www.printables.com/model/505826-wago-box-for-the-remix-of-ryandams-cable-managemen
The AC caution covers, with inset text and warning symbols for the small box and half bridge duct, can can be found here:
https://www.printables.com/model/505838-ac-caution-covers-for-remix-of-ryandams-cable-mana/files
6,950 downloads
- cable management
- wire management
- (and 3 more)
-
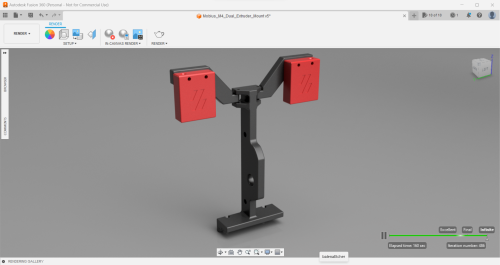
Mobius M4 Dual Extruder Mount - FOR VORON
Hey guys,
So! I'm going dual (and triple) extrusion on my printers and didn't want to fuss with the ERCF for my smaller ones, so I bring to you the Mobius M4 dual extruder mount for the Voron 2.4 / Voron Trident.
Tested as working - All fits together, all fits on to the voron, extruders attach easily.
This is (kind of) a remix of the following:
Elegoo Neptune 2-2S-2D Dual M4 Extruder Mount by mlee12382 | Download free STL model | Printables.com
I got the original idea from the linked file above, I imported it into fusion 360 and sketched around it (getting rid of the unnecessary holes where they've obviously used tinkercad and the M4 baseplate. Instead of the silly (weak looking) cylinders that have been merged to some other blocks, I sketched out a stronger join and inserted the holes through that - also got rid of the stupid hole sizes that were used and made these 3.2mm in diameter for the M3 screws and 5.2 for the M5 screws - this means your screws should slide in nicely even if your settings are off.
With the Filament Runout Sensor mounts, so far I have just copied the original, but again made the joints stronger and the holes a decent size - I'm not sure if this will work with the sensors I want to use so will report back later - the way these are designed means you can print them flat instead of upright, saving time!
On top of this, I have added fillets to any stress points I considered to be weak - this should improve longevity of the mount.
To mount it on to the printer I have just used the Voron spool holder mounting technique - it is designed to sit into the 2020 extrusion and grip over the top panel.
61 downloads
(0 reviews)0 comments
Updated
-
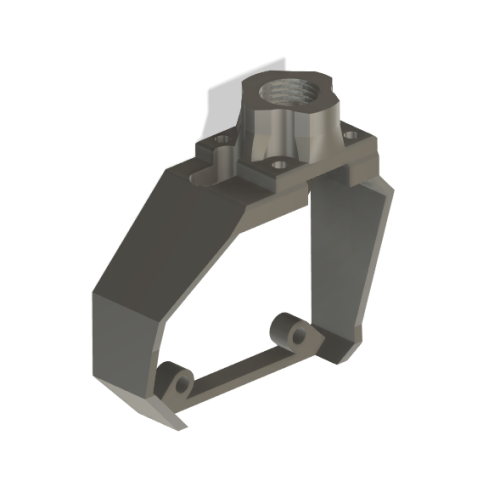
Stealth burner 3rd parts cooling fan mount
When I changed over to CNC tap I decided I need more parts cooling. Cooling has always been just so-so. I wanted something lite and easy. Added a 30mm fan to the existing mounting holes in the ChaoticLabs CNC Voron Tap. No issues with tap. No clearance issues.
Mounts with 40mm M3 screws to existing set of holes in CNC Stealth-burner mounting plate and M2 button head screws for the fan. I just spliced in to the existing parts cooling fan for control. Before bridging was terrible. Now I am able to bridge 150mm at 70mm/s with exceptional results.
This should be adaptable to other hot ends, mine is Revo.
file posted in .STL and .step
Link to fan on Amazon.
https://www.amazon.com/gp/product/B07RMHH74G/ref=ppx_yo_dt_b_search_asin_title?ie=UTF8&psc=1
196 downloads
-
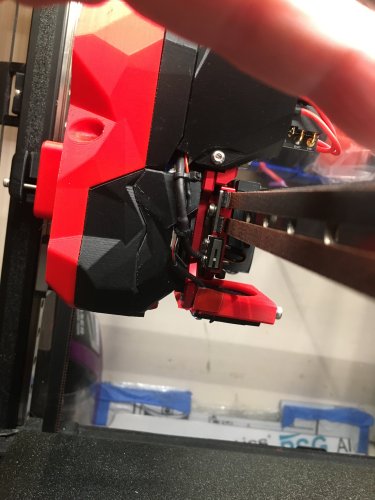
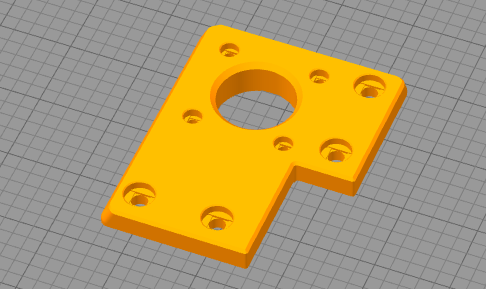
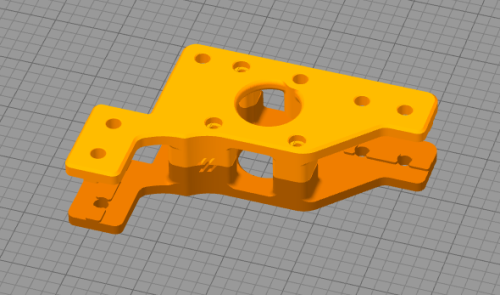
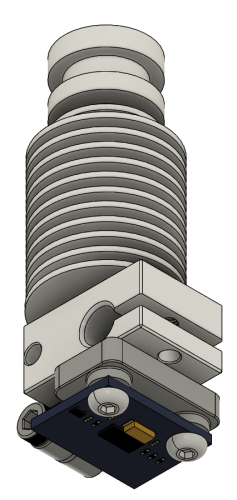
Voron Stealthburner EBB2240/2209 PCB Support
A PCB support to mount the EBB2240/2209 on the StealthBurner
61 downloads
(0 reviews)0 comments
Submitted
-
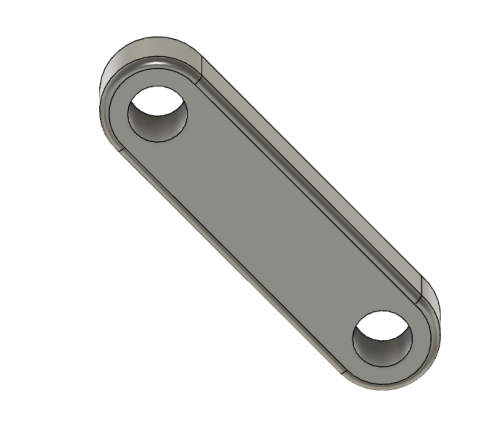
Voron v0.1 v0.2 filler spool holder brace
Enjoy the butter smooth filler spool holder on voron v0. Size comparable with official spool holder, but smoother and now you can quickly remove the spool holder during transport/storage without screwdriver.
Supports mounting on right front and back right. It replaces the middle panel clip, reusing the nuts. You may look at the photo for reference. Instead of original length filler, you can measure your common spool thickness and get a smaller filler remix for best space saving. Here is my favorite mini filler:
[66mm] Filler 66mm Remix https://www.thingiverse.com/thing:5335512 [56mm] Even SHORTER Filler Filament Spool System https://www.thingiverse.com/thing:5241172 Installed with M3x10 screws. The design will hold the nut exactly where the screw goes in. Just remember to only insert the screw after the nut has reached the bottom. It is designed to be loose to handle poorly printed filler.
48 downloads
(0 reviews)0 comments
Submitted
-
HUVUD Board Mount w/ PG7 Thread for Umbilical for CW1 Stealthburner
HUVUD Canboard with PG7 Threads for Umbilical Mod. Works with CW1 Stealthburner.
0. Install M3 heat inserts
1. Install board and bracket with the spacer between the bracket and motor. (Offsets bracket because there are little divets in the corners of the stepper motor.)
2.Slide the cable through the PG7 Gland
3.Terminate the molex connector for the canbus
4. Slide the Molex connector through the PG7 threads
5. Connect the molex connector to the board
6. Bolt up the thread piece using 4x m3x8mm bolts.
7. Screw on the PG7 Gland
8. Wrap with wire sheathing and slim measuring tape cut to length as needed.
54 downloads
(0 reviews)0 comments
Submitted
-
Side Skirt Power Switch - Retro Style IBM Computer Power Switch - with front skirt variation too
When form meets function.
I wanted to add a power switch to the side of my printer so as not to have to lean around for access. Anyone with 80's computers experience will know about the famous 'side switches' of early IBM home computers. So I took inspiration there and started looking for the original switch.
Sadly, the original switch (Chili 3031) was discontinued and I'm not going to put an actual retro switch on my build so I found this one that has similar enough looks, though a bit smaller than the original:
https://www.digikey.ca/en/products/detail/c-k/D602J53S205QA/3752581
As requested by @Avalonstar , here's a version to fit the switch on the front skirt of the 2.4 r2 :
front_skirt_b_350 - IBM style switch.stl
60 downloads
-
2040 Front Mounts Trident.
Upgrade the front left and right extrusion to use 2040 instead of 2020 extrusion. Combined with the AB drive 2040 files I've uploaded allows you to use 2040 extrusion for all 4 vertical extrusion posts.
134 downloads
-
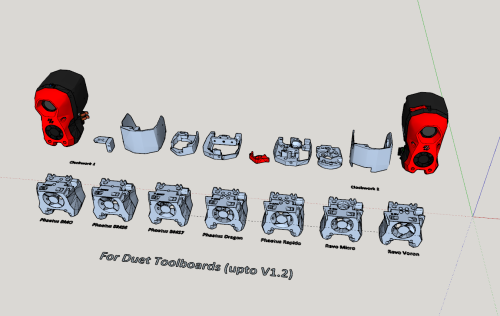
Stealthburner CW1 & CW2 for Duet (LC1) Toolboards
The original Voron Stealthburner Files modified to accept the Duet LC1 tool boards upto v1.2
2,112 downloads
-
2040 A B Drive Brackets Trident
Allows you to use 2040 vertical posts instead of 2020 for the Trident. I also have this for the 2.4 but these work for the Trident.
379 downloads
-
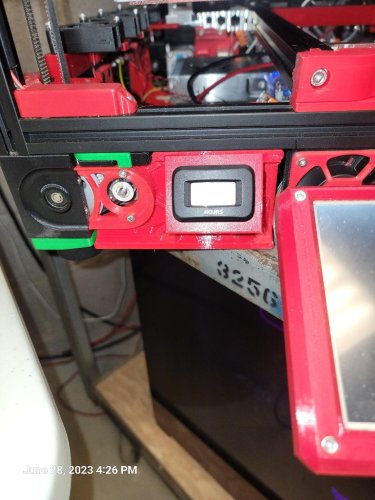
Voron 2.4 Modified Skirt with Hour Meter
I modified the front left skirt on my Voron so I could add an hour meter. I
connected the meter to the 24v side of the 110v relay so it only runs when the printer is printing.
The hour meter can be found here. https://www.amazon.com/gp/product/B07XNTBGY3/ref=ppx_yo_dt_b_search_asin_title?ie=UTF8&psc=1
34 downloads
(0 reviews)0 comments
Submitted
-
PCB_Klicky_Mount
This model is for the PCB Klicky probe available from Fysetc, as featured in the Whopping Voron Mods pack - whopping_Voron_mods/pcb_klicky at main · tanaes/whopping_Voron_mods · GitHub
PCB Klicky is based on 2 mods - Klicky Probe by JosAr and Euclid Probe.
I really didn't like the original dock that came in the mod pack, I found it to be very fiddly and ineffective for holding the probe.
This replaces the dock-front_insert.stl file from the pack.
This dock has an enlarged hole on the front to fit the magnet attached to the probe, it also has a space behind big enough to fit a 6x3mm magnet to help hold the probe in place. As well a this, it has tabs on the top to cover the klicky while docking and undocking.
This model should be printed upright (as loaded when opened in your slicer) with Voron specs.
Tested and working on one of my custom 2.4r2's
I went through 2 other iterations of this design before settling on the one that's uploaded;
V1 kept to the height of the original dock, however, was slightly too tight all over and didn't have the back magnet mounting. V2 saw an increase in the height of the tabs, allowing for slightly more space to rest the PCB. This proved to be a better fit, but I wasn't happy with the sizing of the front magnet hole - in this iteration I included the back magnet hole. V3 saw an increase in the hole sizing on the front, this enables the probe to dock and undock effortlessly, with no thought.
**ADDED 28th JUNE 2023**
I have also now made a side mount to attach probe to an adjustable docking station - I use a Volcano hotend and the standard dock isn't long enough, also the side mount doesn't fit the adjustable mount. This enables you to use a longer print head and still use things like the nozzle scrub mod 🙂
993 downloads
-
V0.2 Stealth Skirts
V0.2 Stealth Skirts
Shout out to hartk for iniating this project and to meteyou for putting the final touches on it.
All skirt parts are single bodies - to achieve the look below, use of color swap is needed. There are two versions of the side fan grills - one for 4010 fans and one for 3510 fans. 4010 fan version does not allow the use of an electronics bay panel, while the 3510 version does. No additional hardware (outside of your choice of fans) is necessary.
822 downloads
(1 review)0 comments
Submitted
-
Almost stock Voron Hinge. Removable Doors + Easy to Print + Extra Tolerance
By simply removing the print in place hinge pin and replacing it with two spherical couplers at each end, the hinge becomes much more versatile.
1mm of extra clearance is added to ensure doors are that bit easier to position.
The hinges can be clipped in and out of place to remove the doors as needed.
221 downloads
-
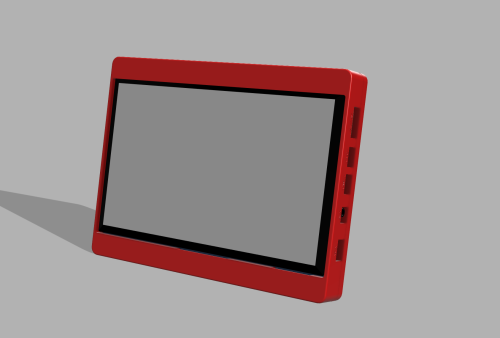
Waveshare 7 Inch (H) Display Frame
You can use this frame for the following screen: https://www.amazon.de/dp/B07CPBCZHB?psc=1&ref=ppx_yo2ov_dt_b_product_details
You probably also want angled HDMI and Micro USB connectors like these:
- https://www.amazon.de/PremiumCord-Kabel-Micro-USB-abgewinkelt/dp/B07NSQ5859/ref=sr_1_8?__mk_de_DE=ÅMÅŽÕÑ&crid=P4K8WPFS2Z00&keywords=micro+usb+winkelstecker+90+grad+1m&qid=1687206265&sprefix=micro+usb+winkelstecker+90+grad+1m%2Caps%2C77&sr=8-8
- https://www.amazon.de/Twozoh-Gewinkelt-Winkelstecker-HDMI-Kabel-unterstützt/dp/B09XHX2HF7/ref=sr_1_2_sspa?crid=1FIC843LREGFD&keywords=hdmi+kabel+winkelstecker+90+grad+1m&qid=1687206169&sprefix=hdmi+kabel+winkel%2Caps%2C80&sr=8-2-spons&sp_csd=d2lkZ2V0TmFtZT1zcF9hdGY&psc=1
You'll also need the following mount (though you can use any mount you like. You just have to change the mounting points on the lid in the step
files): https://github.com/VoronDesign/VoronUsers/tree/master/printer_mods/revnull/rpi_7in_display_mount
Be carefull when assembling the frame. Do not force the display in, if something binds, as it can crack the glass on the screen! The tolerances around the display are quite tight.
Manual:
Melt in the heat set inserts Drink enough water the WHO recommends around 3 liters a day Place the buttons on there designated recesses Place the display in the frame. Be careful, the buttons can fall out. Don't force the display in if something binds up! Gently press on the edges until the display is flush with the frame Screw in the M3 screws Congratulations you have assembled the frame! Pat yourself on the shoulder around 2-3 times. Don't overdoo it though BOM:
4 M3x6 or M3x8 SHCS screws 4 M3x12 SHCS screws 8 M3 heat set inserts (the "standard" ones all voron builds use) 2 Hands and some time
171 downloads
(0 reviews)0 comments
Updated
-
Front and Rear Mount for the Triangle Labs filament sensor
This will allow you to mount the Triangle Labs filament sensor either facing front or to the rear of the mounting point on the side exhaust housing.
14 downloads
(0 reviews)0 comments
Submitted
-
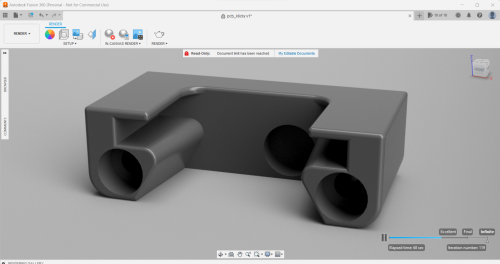
BTT Pi DIN mount
Remix / Based on the Pi mount model provided in the Voron 0.2 CAD files. It moves 1 leg of the mount to match the BTT Pi mount holes. Stylistically, it is identical.
101 downloads
(0 reviews)0 comments
Submitted
-
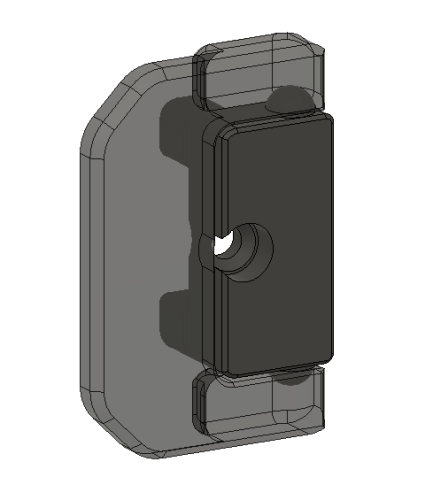
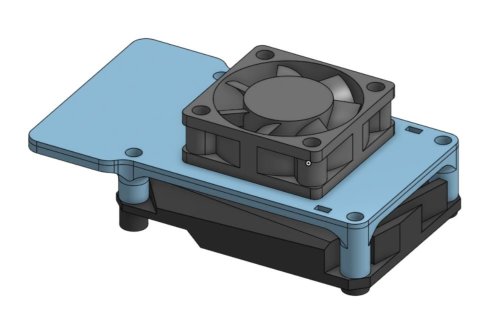
BTT CB1 30mm Fan Mount
Two files, one STL one STEP, for a 30mm 5vdc fan mount for a CB1. Normally used on the BTT Manta series boards. Will cool the CB1 by ~5-10*F more than no fan.
File has a small mount for the CB1 wifi antenna as well as two small cable tie holes to manage the antenna wire.
52 downloads
(0 reviews)0 comments
Updated
-
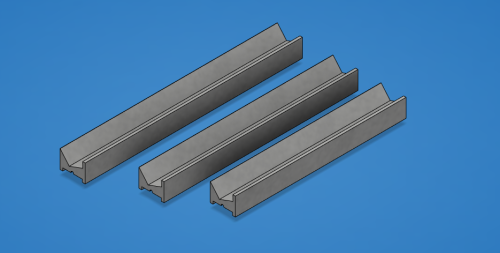
Shaded LED Clipping rails for 250, 300 and 350mm Voron frames
This is my new and improved led rails that reduce light leakage and look better than my previous rails. also, they clip in more moderately.
Downside: They take up much more vertical space!
Print vertical with 2 shells and no infill.
126 downloads
(0 reviews)0 comments
Updated
-
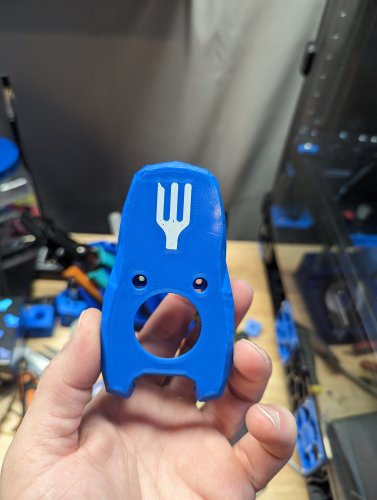
Mini Stealth Burner cowling with Salad Fork logo. For Boop beta 4 and LGXlite extruder.
This is a Mini Stealthburner cowling for use with Boop Beta 4 and the LGXlite extruder that has the Salad Fork logo.
MM_MiniSB_LGXL_Boop_Beta4_SF_single_Cut.stl is for a single color and it has the Salad Fork cut into it by 1mm.
2_part_main_body.stl and 2_part_logo.stl are for multi color and assume a 0.25 initial layer height.
I don't know how to rotate them properly in Fusion360 so you will have load both then rotate them so they sit on the bed face down.
24 downloads
-
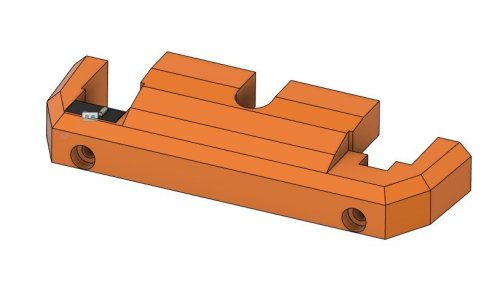
V0.2 Lower Bay Guard
This is a redesign of my V0.1 Lower bay guard to work with the V0.2. It's designed to be printed face down and I did without supports. I intentionally made it a bit chonkier so it has a more durable feel. Center pin on the microswitch needs to be cut off (not needed anyways) so it seats properly. Carriage makes good solid contact and this gets the switch up high enough that you don't get any interference with the underbody of the gantry on the frame of the printer.
39 downloads
-
ADXL345 Nozzle mount
I was shocked to see a significant difference between the results measured with the built-in accelerometer on the EBB36 board and those obtained using this nozzle mount.
Here are the results:
the sensor built into the EBB36 board
X-axis shaper type: mzv, frequency: 62.4
Y-axis shaper type: mzv, frequency: 43.6
with this nozzle mount
X-axis shaper type: 2hump_ei, frequency: 99.4
Y-axis shaper type: 2hump_ei, frequency: 87.8
What are your thoughts on this?
Are these measured values really necessary for my printer?
Required
Qty 1 - M3 insert nuts
Qty 1 - M3 x 10 socket head screw
Qty 2 - M3 x 6 socket/button head screw
147 downloads
- voron
- stealthburner
- (and 2 more)
-
CW2 Single Gear Mod - Wood Grain Test
CW2 Single Gear Mod - Wood Grain Test
Simple mod to convert the CW2 into a single gear drive
In my case it mostly eliminated my wood grain artifacts.
This is more of a test and not a long term solution as you have to print slower.
If you can't fit your bearings in, use the version with higher tolerances (or some sandpaper/drill). Do not force them in as they will bind and won't turn smoothly anymore!
manual:
You probably don't need a manual.
BOM:
Standard 3mm Bontech shaft 2 needle bearings 3 x 5 x 7 mm
8 downloads
(0 reviews)0 comments
Updated
and.thumb.jpg.17cdb4e3455f7e775ad0a5fd6589d7fa.jpg)