Search the Community
Showing results for tags 'v2.4r2'.
-
 I know I'm a pretty new builder but I've never been quite satisfied with clockwork2, and I am looking for a better solution. I see the LGX lite come up a lot for this and it seems like a pretty solid system. Is there any mounting bracket for stealthburner that will let it use the 2 part hartk PCB? Is there a better extruder option than the LGX lite (and preferably also takes the 2 part hartk PCB)?
 -
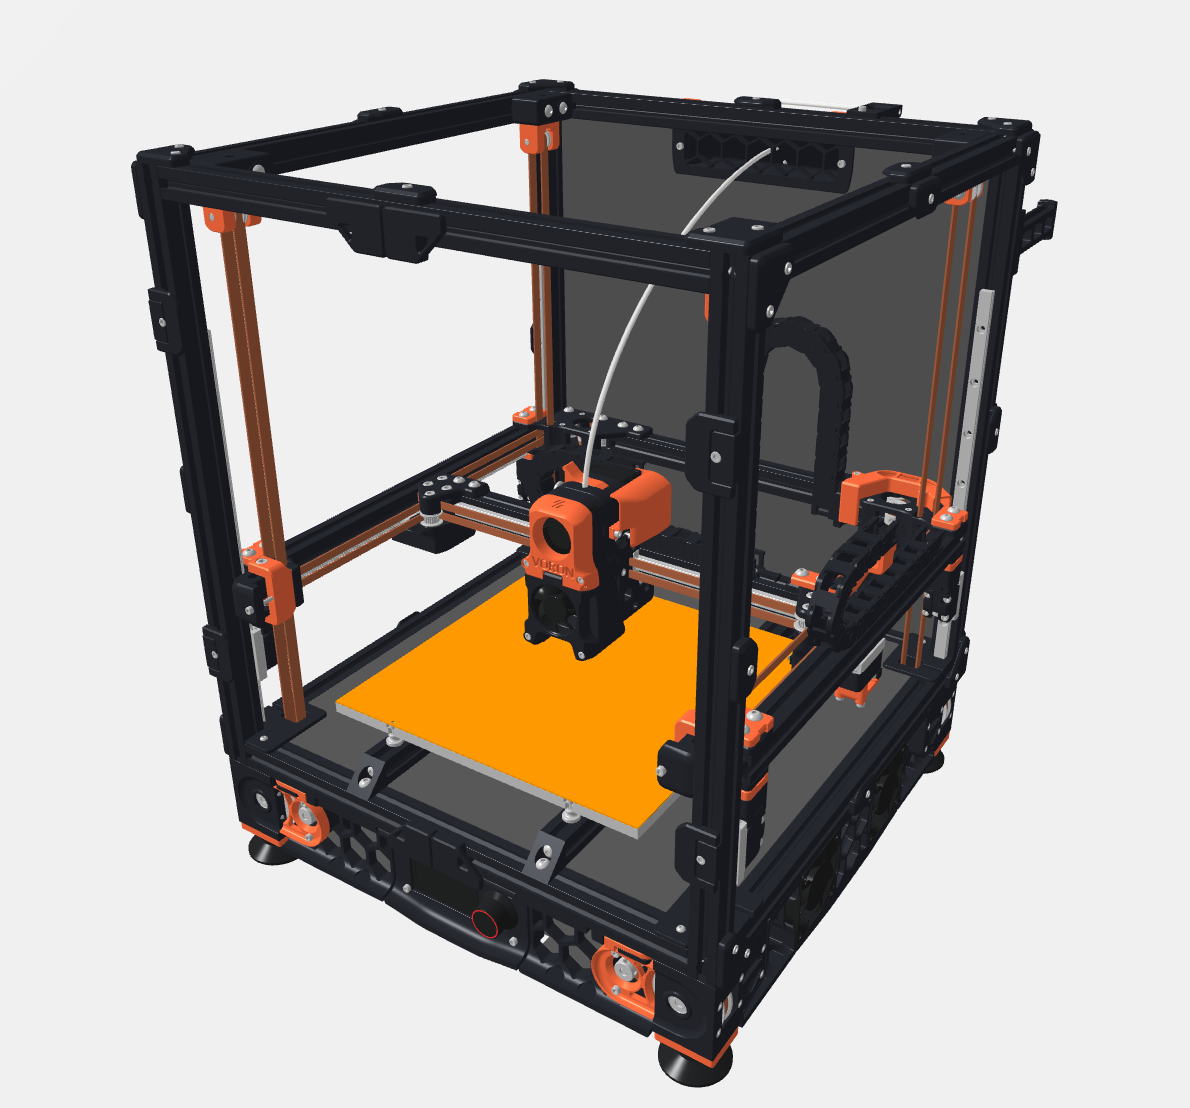
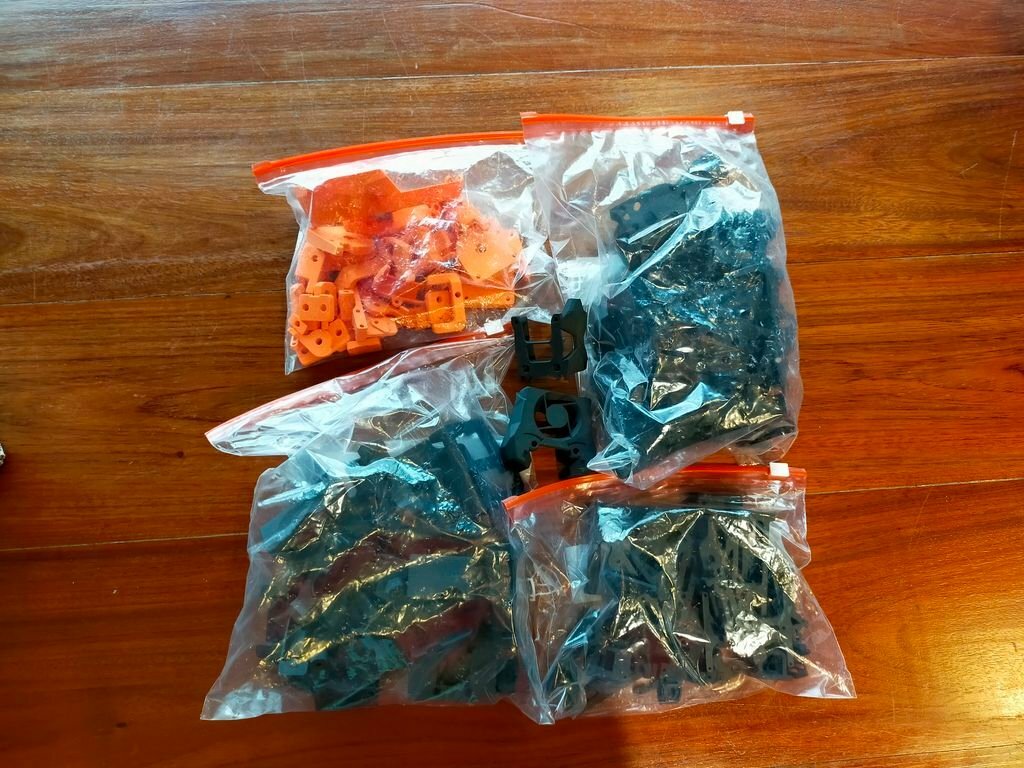
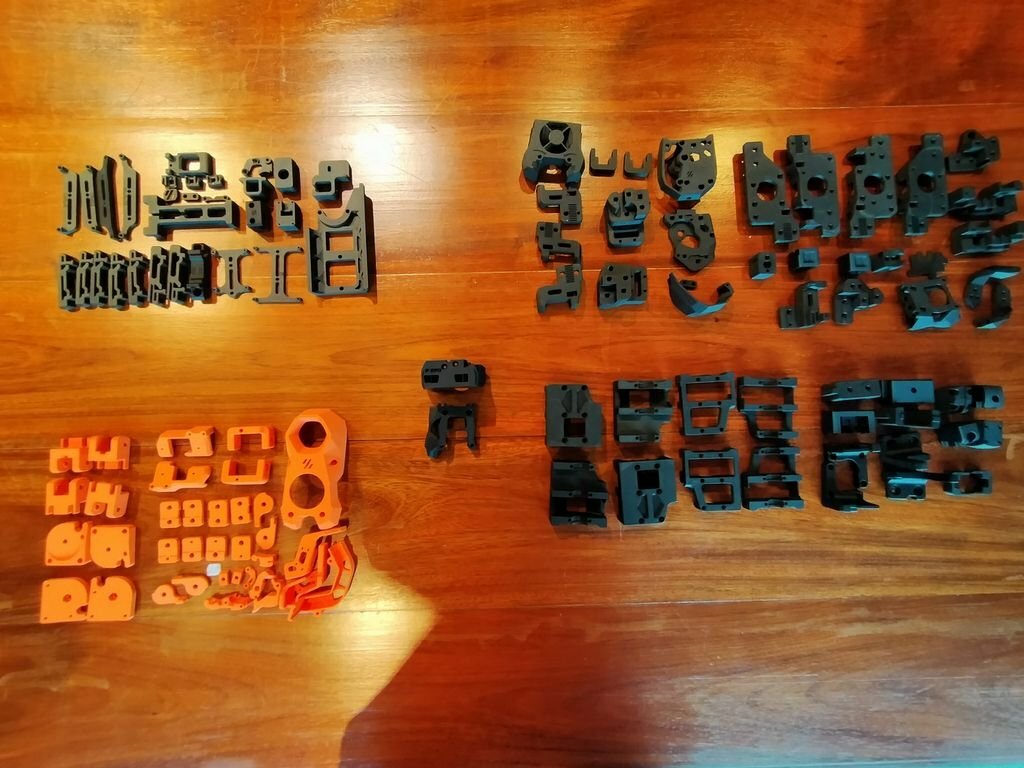
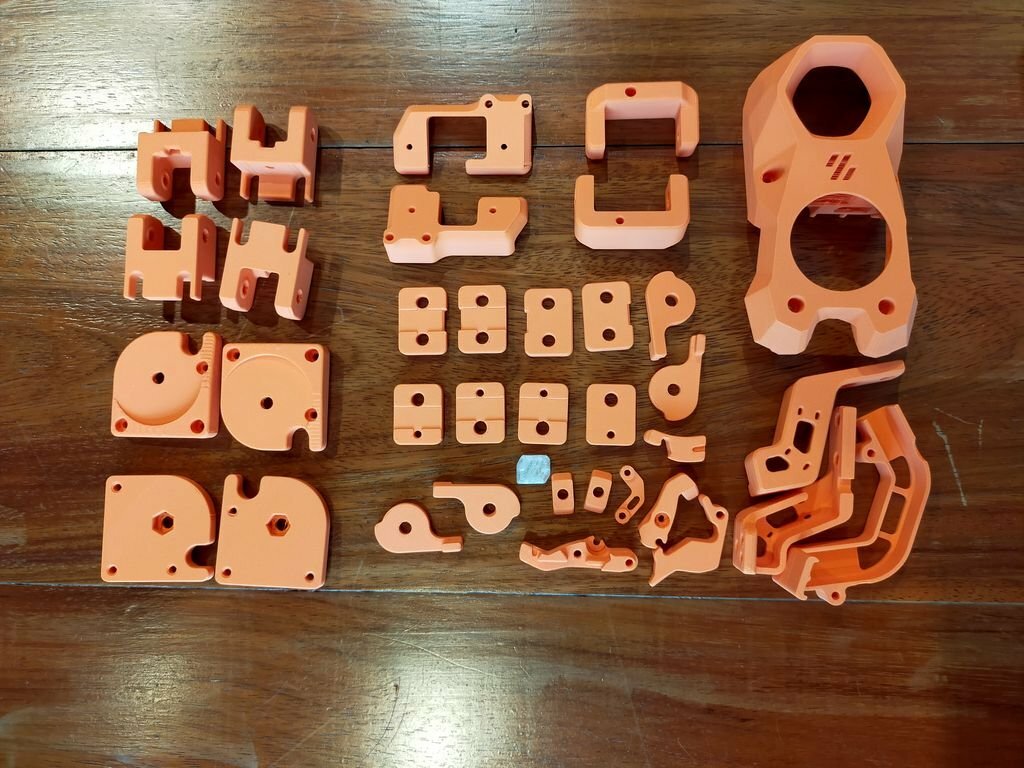
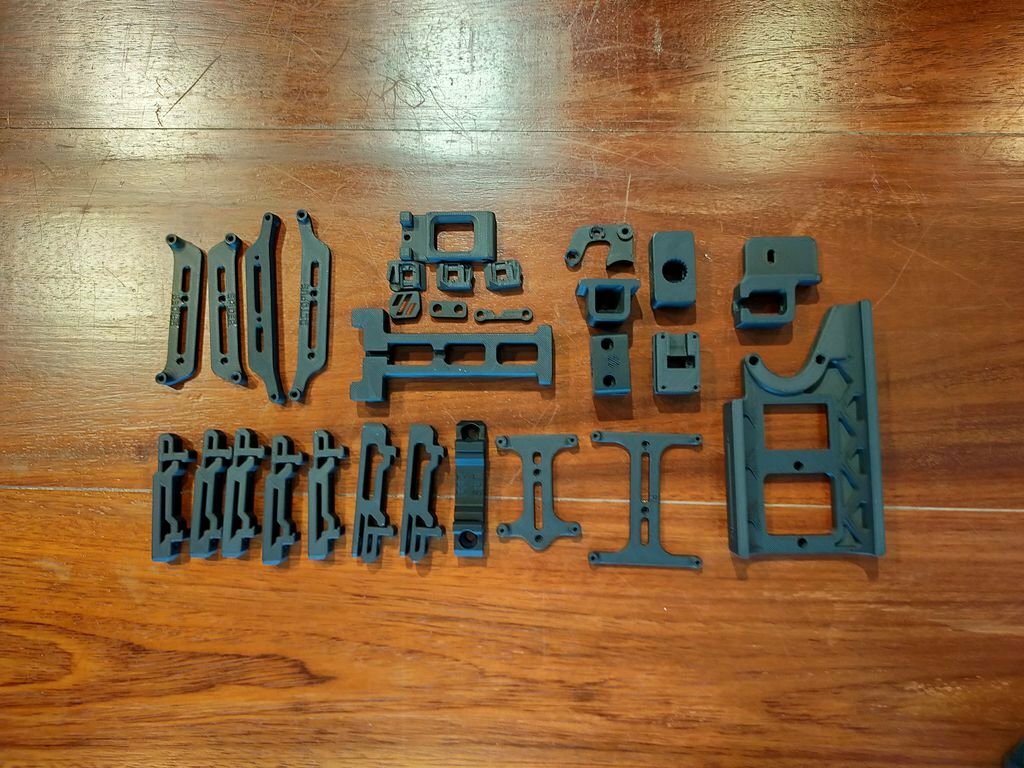
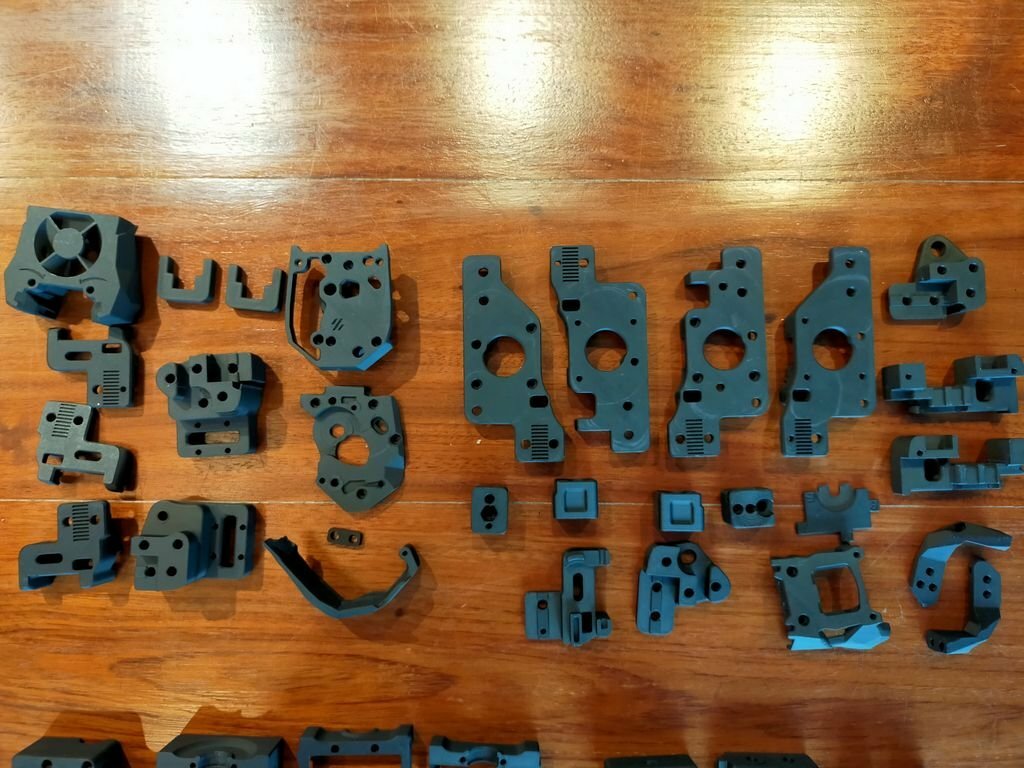
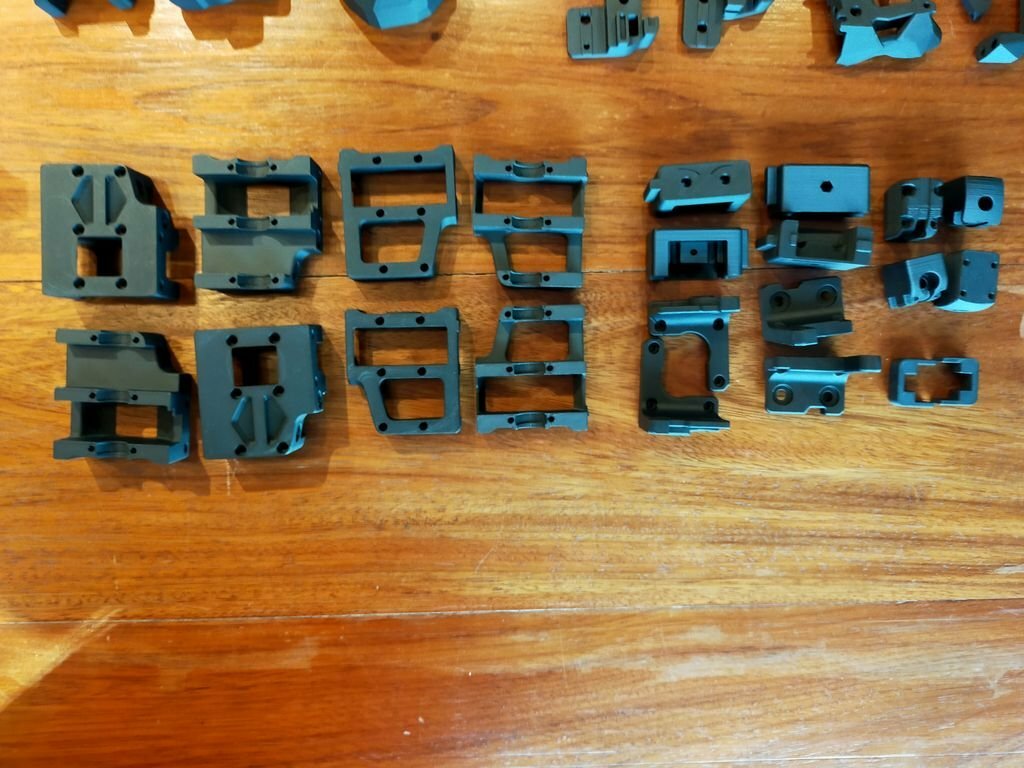
Finally I have the parts which I self source ready. This web help you make your mind for the color. # Plan for my build: 1. 350 x 350 build 2. Octopus Pro 446 + TMC2209 3. Raspberry Pi 3B + 4. EBB36 Canbus 5. PITFT5 6. PI cam 7. Smoke detection alarm 8. Rapido 9. Octoprint 10. Klipper 11. Octodash 12. Klicky 13. Filament runout Unklicky 14. PurgeBucket & Nozzle brush 15. Sensorless Homing 16. Sexbolt 17. Nevermore filter and more filter 18. Some sort of removable panel and door with magnets. 19. Rolling Voron 20. Boot from SSD drive 21. LED LED LED and LED 22. Umbilical cord 23. Relocation chain 24. More on fire hazard prevent and protection 25. Remote monitor Since I source every part by myself so it's a waiting game. Then I started to order PIF from @Stephan (discord username). He kindly helps me find a way to deliver to me with a cheaper fee from Germany. Thanks for that. # PIF Here are the bags of the main printer part for Voron 2.4 R2 Rapido. All the parts from the bag. Accent color is orange. 1st bag base color. 2nd bag base color. 3rd bag base color. Below here you can look at the print quality from PIF.

-
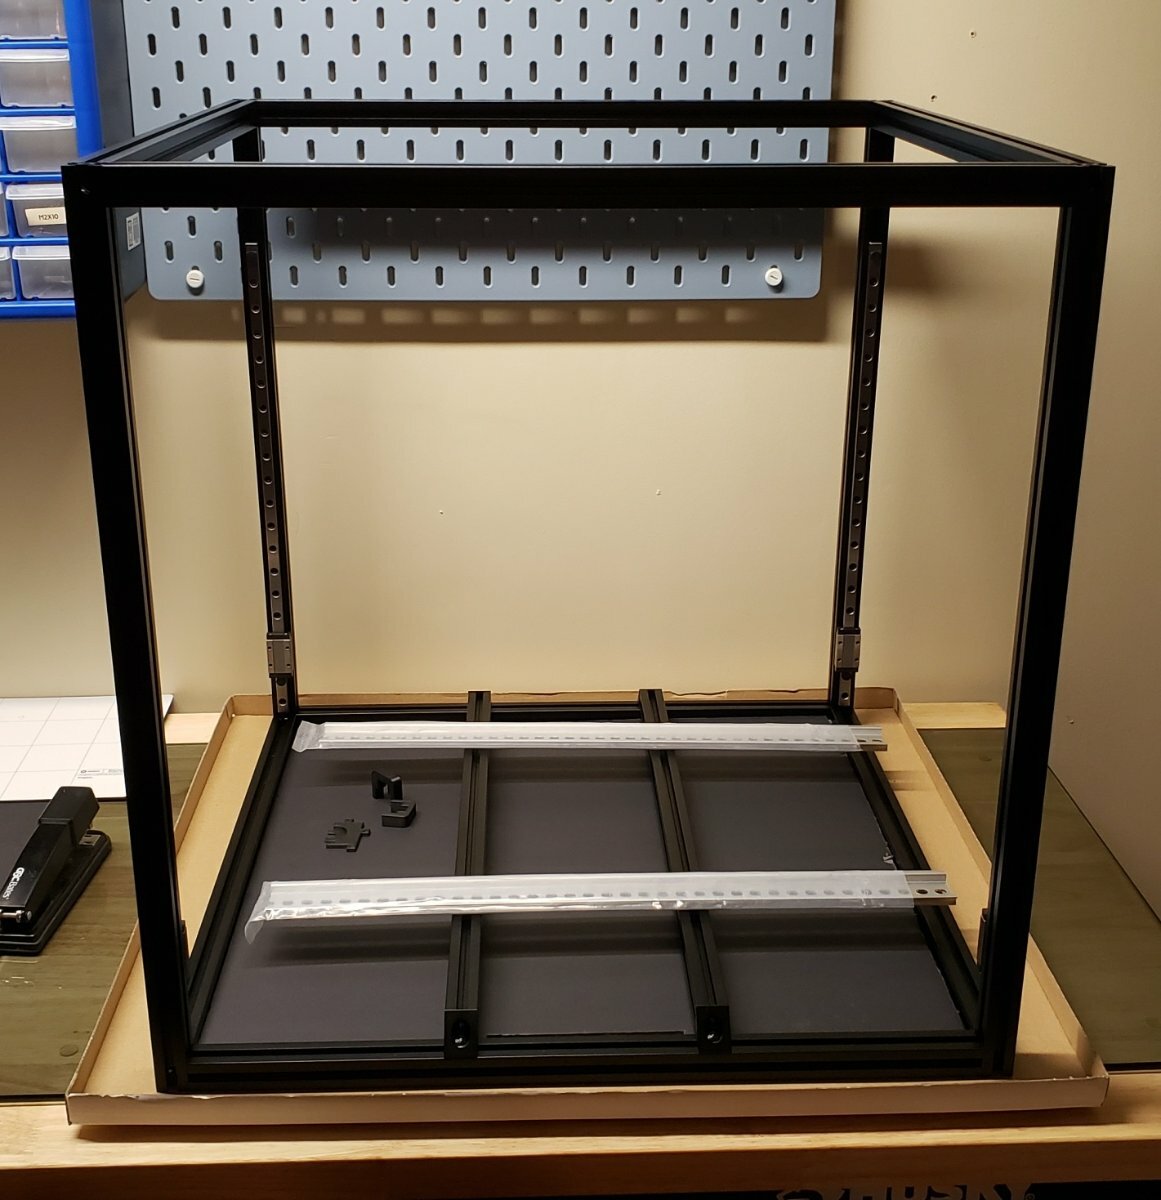
Hi, everyone! Lurking on this forum helped me way more then official discord (probably because I have no idea how to use discord properly), so I decided to join. And to motivate myself, I decided to start a build diary right away. I bought a kit from Siboor, it came and last Saturday I started to assemble my Voron 2.4. I already put the frame together, and it was way easier than I expected. I'm still not sure if I placed bed extrusions correctly, since I couldn't get distances to be precise, but I'll see how it goes when I will attach bottom plate and a bed. I think it's almost in a right spot by now. Funny thing happened after I assembled the frame. I was chilling and looking for some tips and tricks, and found a page in Voron documentation that said "measurements should be < 2mm different" about frame diagonals. I was so worried with my difference of ≈0.3 to ≈0.5mm, so after reading this, I had a bit more faith in myself, and that feels good. Next day I bought some lithium grease and thread locker, so this weekend is a Day of the Rails. Gonna clean 'em, grease 'em, put 'em in a frame. Never worked with linear rails before, so a bit afraid to bend them, or to drop the carriage, but that is not the part that scares me most. Most of all I'm scared about electrical parts. I haven't touched soldering iron and multimeter in long time, so it would be like learning everything anew. Found out that it's a good idea to check if heating element and thermistor are good. I'll start relearning how to use multimeter with this, probably today or tomorrow. Anyways, glad to join the community, and wish me luck!
-
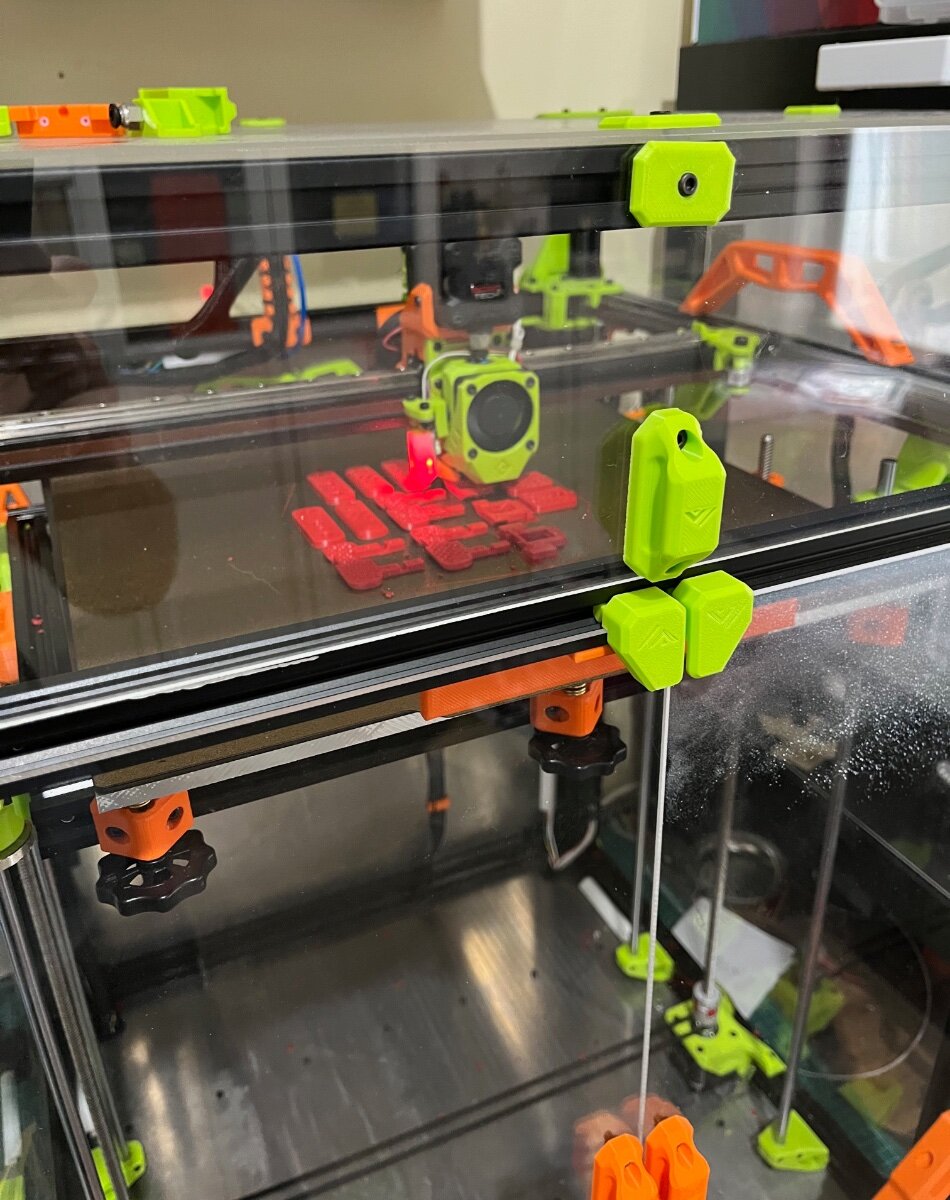
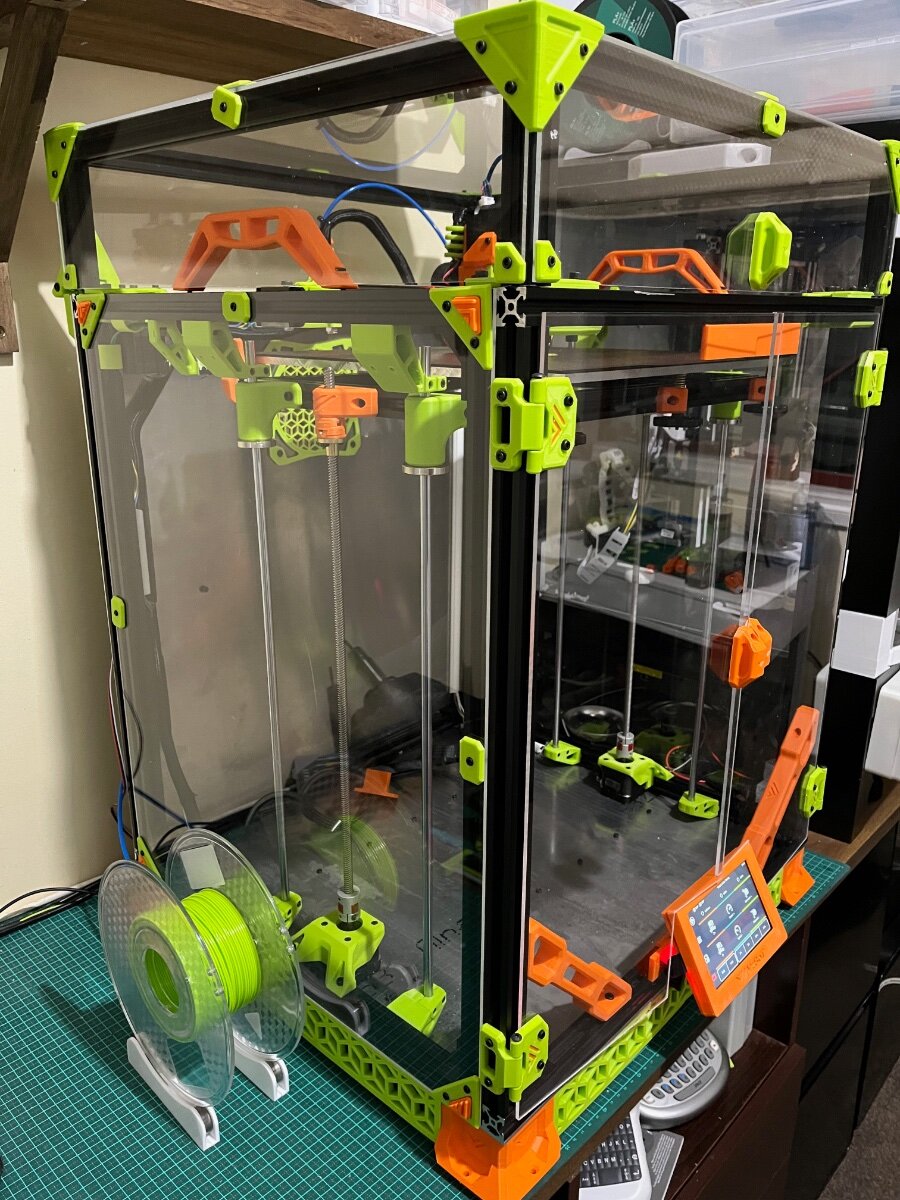
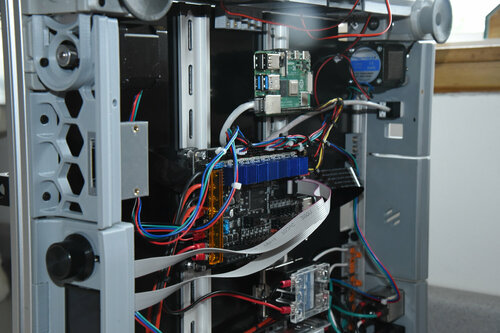
 Ah.. nothing beats a short and snappy title Building my 10th V2.4R2 or so, and this one is 100% for myself instead of selling it. Most things I be using here on top of the default Formbot kit, and adjustments to the default print parts are what I use in all my builds, this one has just some little extra or lets call it the "supreme" package... its still a Formbot and not sourced the parts by myself, but its a good quality kit, affordable, and they ship fast, if you like to build your own. I sell Voron builds, fully build, so I get quite a lot of questions, people who want to build themself a Voron, and I am a BIG supporter! Thats the whole idea of Voron. But I also know persons who are now trying to build their Voron for 3 months now, and still dont have it working properly, or at all... So... Hope this Diary/Guide is going to help you, I will try to make the parts that are most asked about better explained... I also get my information from others, there are way more experienced people out there than me, who wrote up great things, I will just link that way when we get there... What will this build look like, im based in the Netherlands Europe, so some links my not be useful, sorry. PS. I am NOT associated with any of these shops, dont earn anything on the links, etc, its just my build, advice is always welcome! Formbot Kit, this is where I order them - https://www.formbot3d.com/ - In europe? choose sending from Czech, and on Paypal payment, check the payment options to pay in Dollars, and let your bank do the conversion rate, for me this is about 70 bucks cheaper, paypal is expensive, shipping is free and there is no import, delivery in a week or so. This time im going for the Revo Voron, but normally I use the Phaetus Dragon HF/SF. Fermio Wire kit, nothing really wrong with the default wiring, yet its bulky and had breaking wires ones. Fermio wire kit is expensive, but awesome. https://fermio.xyz/fermio-labs-gmbh/voron2-wire-harness-btt-octopus-350-spec/ - about 125 euro, all Helukabel Heluflon®-fep-6y wires.. uhm, yeah, whatever, its good! Keenovo bed heater mat - Nothing wrong with the default Formbot heater mat, I just want to try this one: https://fermio.xyz/keenovo-international-group-limited/keenovo-silicone-heatmat-340-x-340-mm-230-v-ac-500-w/ - its a bit larger. Stealthburner with leds, I am a lazy ass, so I buy the LED string - https://fermio.xyz/fermio-labs-gmbh/stealthburner-rgb-led-kit/ its only 6 bucks, and has the thin high quality teflon wires, I just cant beat that price, by burning my finger on clumsy soldering... I am using different prints than the default ones where there are bearings used, especially toothed bearings.. I use smooth pins instead of M5 bolts and smooth bearings instead of toothed for this you need adjusted prints, some amazing guys made this already, and I will link to them later. Smooth pins are available on Aliexpress, or whatever you like. Then some default other wonderful mods, Klicky, PurgeBucket, other Front Idlers, Stealthburner, belt covers, Panzerball feet and 5" Touch display. Using Extrudr ASA Filament (big fan) but I am not stuck to it, I just dont use the cheap stuff, never been successful for me... I may go for another Red Bull theme here... Fermio custom Aluminium Composite panels. - https://fermio.xyz/fermio-labs-gmbh/voron2-v2.4r2-aluminium-composite-panels-350-spec-black-logo/ Other extra things may follow....along the way.. INDEX - to direct you directly to the posts and avoid all the useless comments here Setting up the frame(work) - Click here to go directly there inside this post. Setting up Z Rails, mounts/feet and motors and Z idlers. Page 22-51 in the manual. Click here to go directly to the post in this thread.... A/B Drives and Front Idlers. Page 62-81 in the manual - Click here to go directly to the post AB drives - Front Idlers Gantry! Page 82-107 - Click here to go directly to the post - Gantry! Belts Z and AB. Page 108-146 - Click here to directly go to the BELTS post.... Electronics and Wiring! Click here to go directly to the electronics/wiring post Software setup Klipper/Mainsail (sorry my choice!) - Click here to go directly to Software installation guide Follow this topic if you want updates!
 -
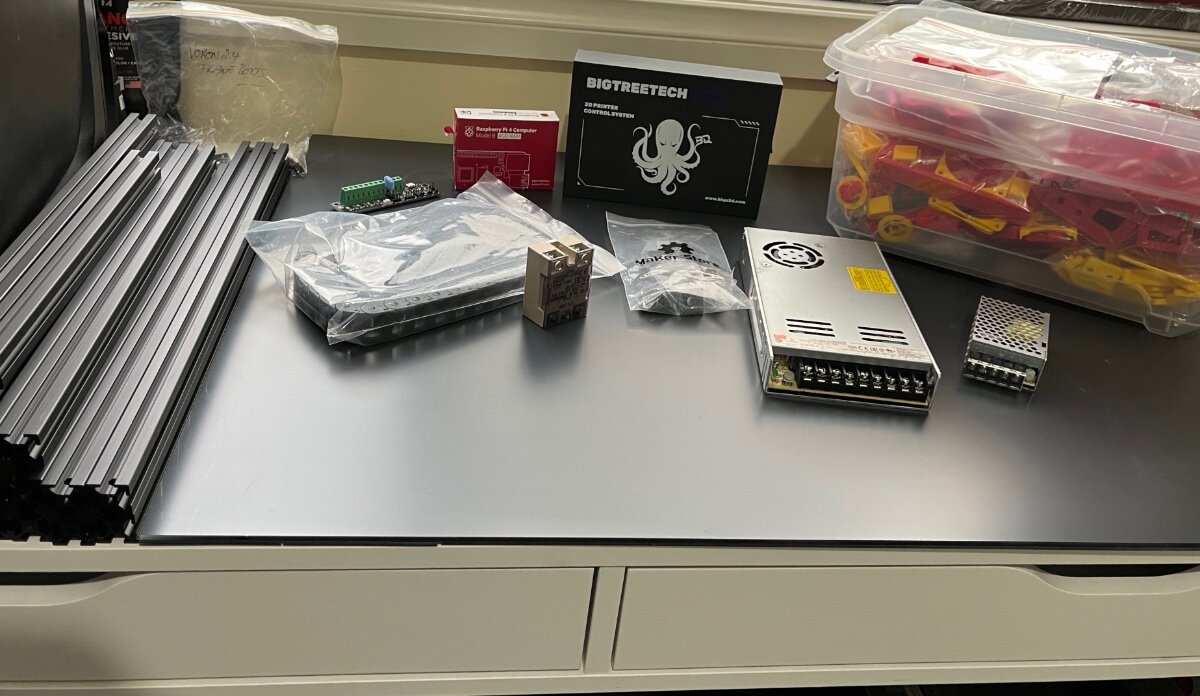
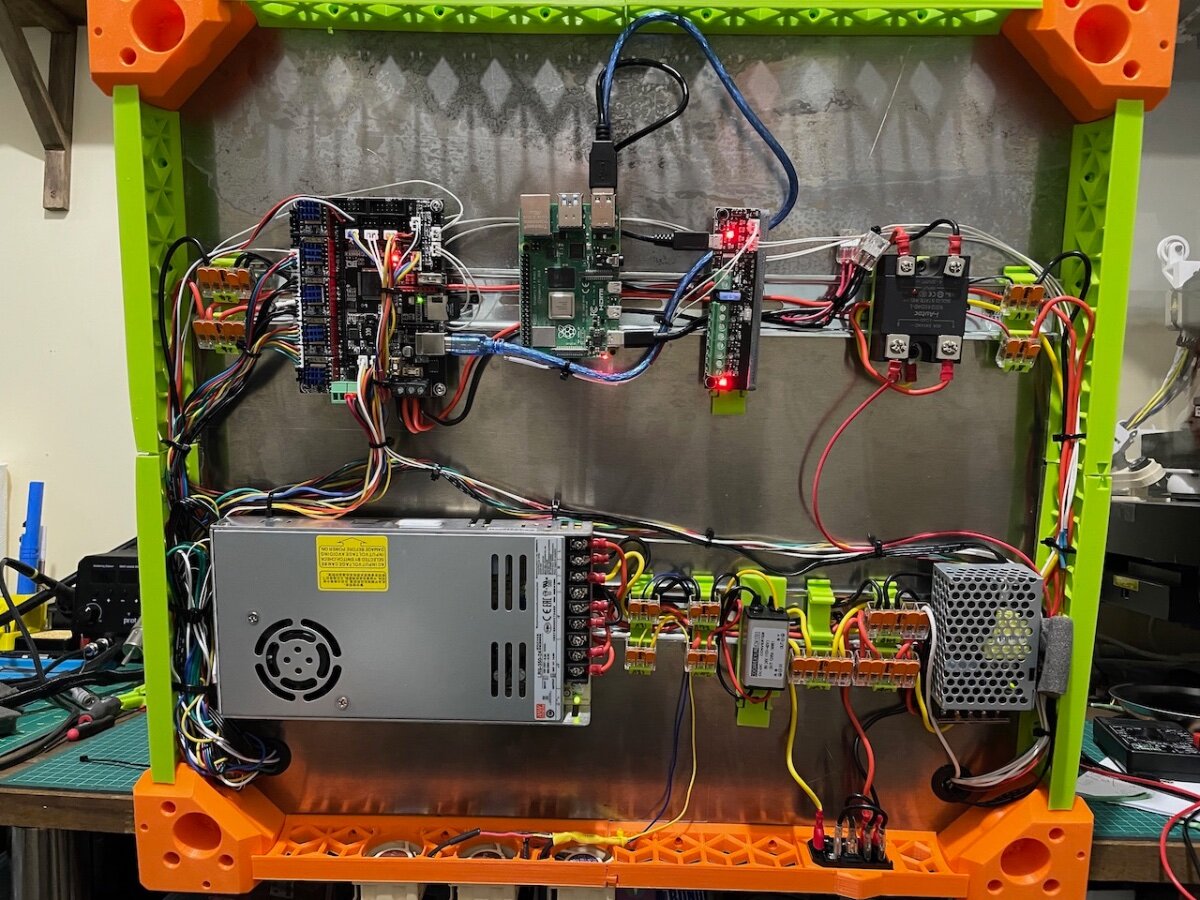
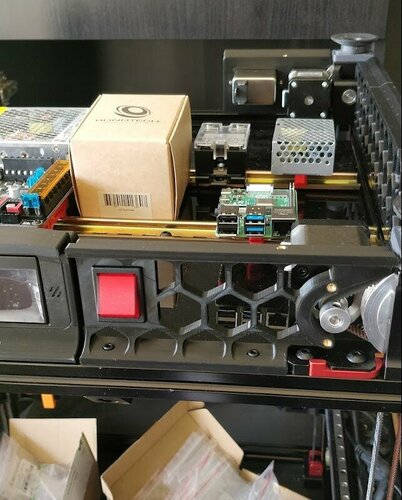
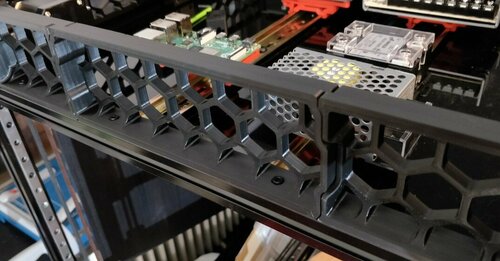
Hi! So, I haven't printed anything much out of PLA or PETG in months. A couple of projects in TPU are nearing the end. The V0.1-1/2 is getting a workout and the Prusa just sits idle as it is not especially happy with ABS or heaven forbid, PC or Nylon. So, rather than upgrade the Prusa to MK4, I decided on a V2.4. So, I started printing out parts on the V0.1. I also ordered a BTT Can toolhead board, SB2209 and a U2C. Also, I obtained a Raspberry Pi 4. I really wanted a 250mm, but in USA only the 300 and 350 sized are readily available. So, I tried ordering a 250mm Formbot kit from 3Dprintersbay, and after a week.. no reply, no acknowledgment of any kind. But, they do reply to email! They are real, after all. But, alas, 250s are a few weeks away... would I care to upgrade to a 300? Oh, OK. While waiting, I ordered Alclad bottom and back panels in White from Printed Solid. So, a few days later along comes the Formbot kit. Over the weekend of 13 May, I sorted out the parts, programmed the Pi with MainsailOS, and tried programming the SB2209 The build started on 15 May. The initial framing took one evening. 16 May -evening - assembled the Z drives, continued printing parts 17 May - evening - Installed the Z drives, Z idlers, Z rails, continued printing parts 18 May- evening - Assembled and installed the Heated bed, continued printing parts 19 May - evening - Started Gantry assembly Weekend of 20 May - A busy weekend, but managed to complete the Gantry assembly. printed some more parts. Ordered a Pi43TFT screen. 22 May - evening - Installed the Gantry, set Z belts tensions 23 May - evening - Assembled Voron TAP, ran AB belts 24 May - evening - Started to assemble the Stealthburner with a Dragon. Configured the Octopus 25 May - evening - Completed Stealthburner assembly and installation. Started on the electronics bay. Printed more parts. Flashed the Octopus. Had trouble setting up the CAN. 26 May - evening - Mostly completed the electronics bay. Got the CAN toolboard to talk to the Pi! 27 May - busy day - evening - initial setup of AB motors directions, configured the SB2209, verified correct hotend operation. Printed more parts. 28 May - Got Z drives directions configured, performed initial tests, got Quad Gantry Leveling to play nice with Voron TAP. Started printing the remaining parts that are too big for the V0.1, namely the fan carriers and the center rear skirt section. Printed yet more parts, but I'm mostly done with printing parts.... 29 May - Had the V2.4 print some more big parts for itself before resuming construction. Assembled most of the skirting, installed the Z belt covers, which was a bit fiddly as the Formbot rail slots are just a couple of tenths of a millimeter too narrow, necessitating some filing of the plastic parts to fit. Also assembled all of the panel retainers with their hammerhead nuts with loctite... about 35 pieces in all. And tidied up the wiring a little bit. Am trying to decide how to rout the CAN toolhead cable. Noted that the EBB SB2209 CAN toolhead has performed flawlessly so far. Also noted that the print quality is quite good with no tuning whatever.
-
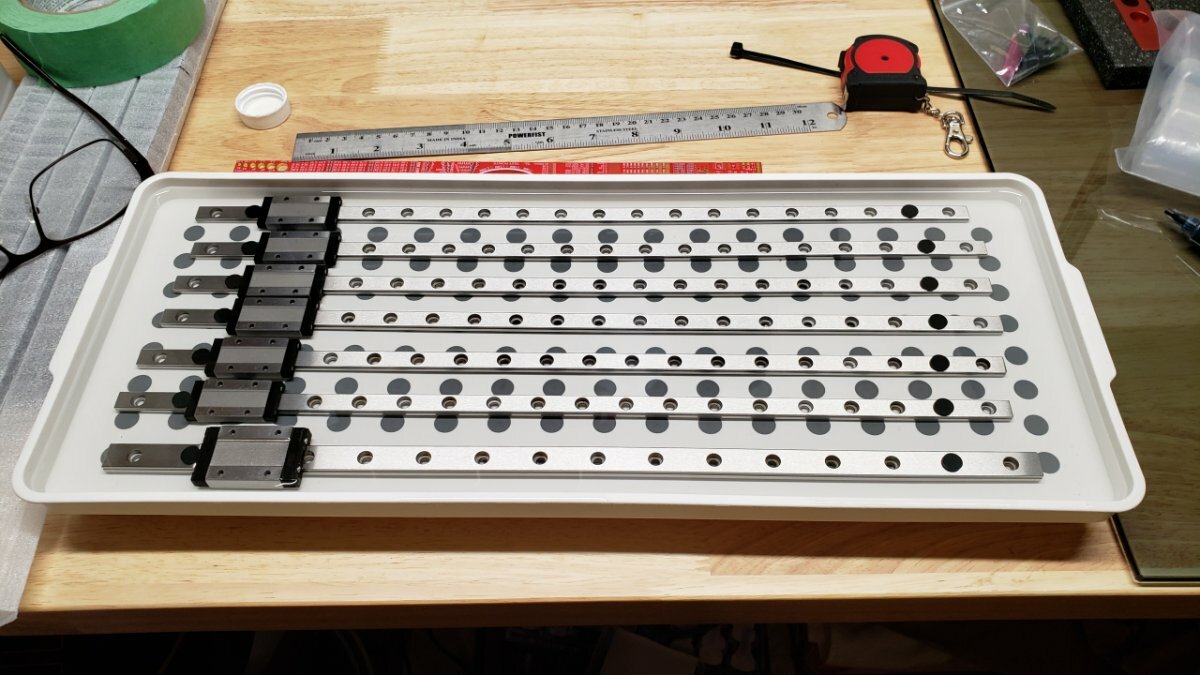
Hi All, I was encouraged to do a build diary but straight off the bat I am not a document type guy lol . Long story short I was off work for the Christmas holiday period and somehow ended up getting drawn into the Voron world. After watching a few too many youtube videos I decided to jump in at the deep end and started placing orders. Did not opt for a full kit as I wanted some control over what went into the system if I was going to spend this much on yet another "hobby" The parts have started trickling in but due to the order they are arriving I think I may have to wait till its all here to see some real progress. This may end up being a slow build depending on some order delays and how much I can stretch a day. I could not help myself though and started the basic frame ensuring it is all square. Since the rails were also in that order I cleaned them up with 91% IA (what I had at this time) and greased them. I used a grease which was readily available and closely matched the spec for Mobilux EP2 but since I do not really know the consistency(fluidity?) of the Mobilux EP2 this one has the carriage sliding down from top in lets say 2-3 secs. I compared this to a rail I have from a system I tried to build a few years ago and had never cleaned. That carriage drops almost instantly if I flip it vertically. So my question would be with the new ones greased up what kind of movement am I aiming for? Instant drop like the old rail or a consistent slide down the rail? Thanks and hopefully I can keep this thread updated with my progress...will post some parts that have arrived.
-

Which parts should I upgrade/reprint for an early V2.4 to V2.4r2?
Yojuan posted a question in Voron 2 - Questions
I built my Voron 2.4 almost 2 years ago during the height of the lockdown. It's an amazing device (Z Offset inconsistencies ) with fantastic print quality. So having just stated I have no reason to upgrade it, I've been wondering if any of the improved parts from r1 and r2 would be worth upgrading to. I probably won't bother reprinting the skirts unless there is a compelling reason to do so. Here are some of the upgrades I'm considering while I'm re-printing later version parts: Is changing to the StealthBurner worthwhile? Is the MGN12 x axis rail upgrade worthwhile? Klicky Probe (will this get rid of the X-Offset annoyances)? Hall effect endstop These are the "main" parts I see that have changed from the original V2.4: V2.4r1 (May 4, 2021) V2.4r2 (Feb 23, 2022) -
Version 1.0.0
720 downloads
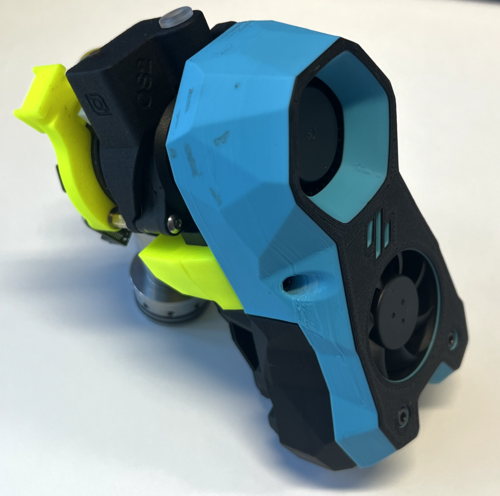
StealthOrbiter This mod aims to mount the orbiter V2.0 extruder to the stealthburner assembly. In addition, it incorporates the Orbiter filament sensor to enable support for the ERCF. There are a number of different versions, depending on your configuration: Standard mount Standard mount, with PG7 cable gland Filament sensor mount Filament sensor mount, with PG7 cable gland The most up to date files can be found on the github repo Acknowledgments - spacelab_2021, for providing the starting point I used in developing this mod- 15 comments
-
- 16
-

-

-
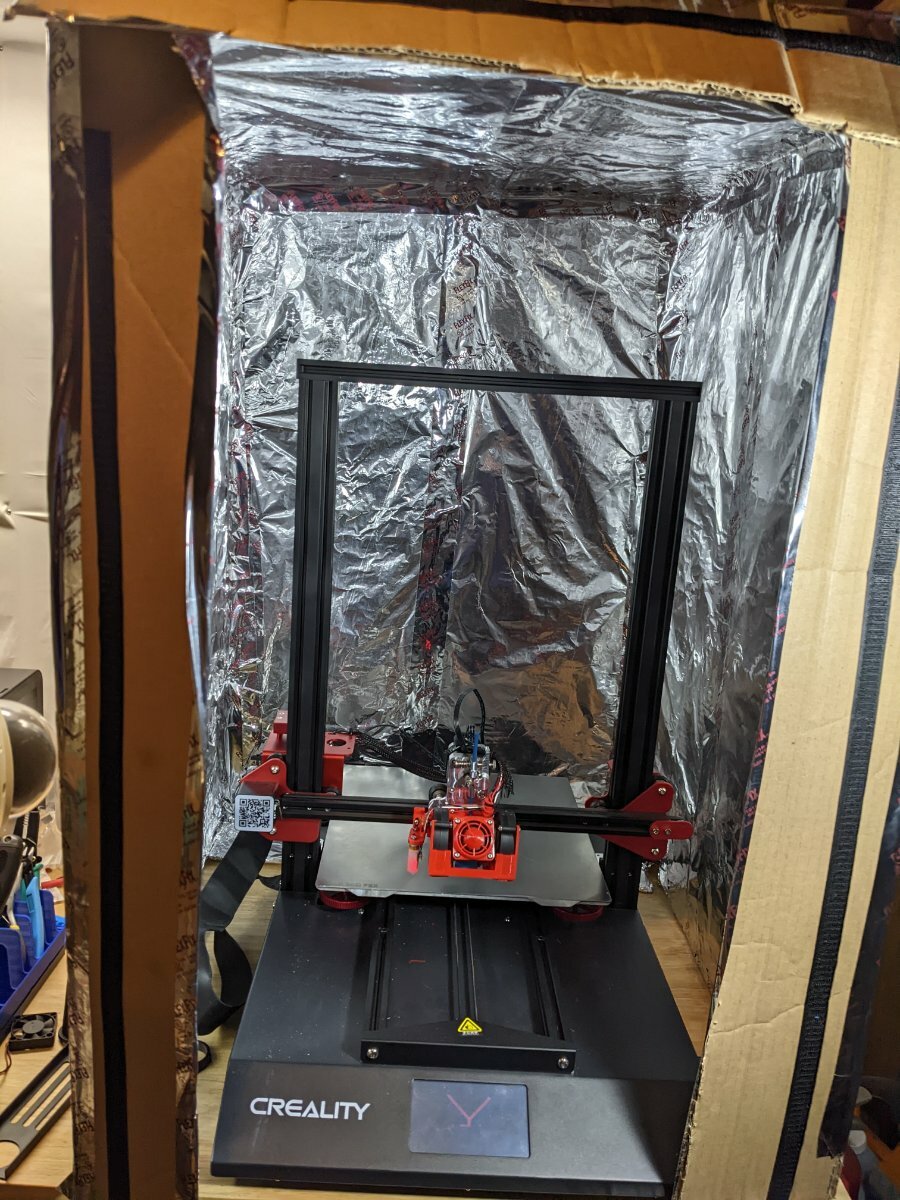
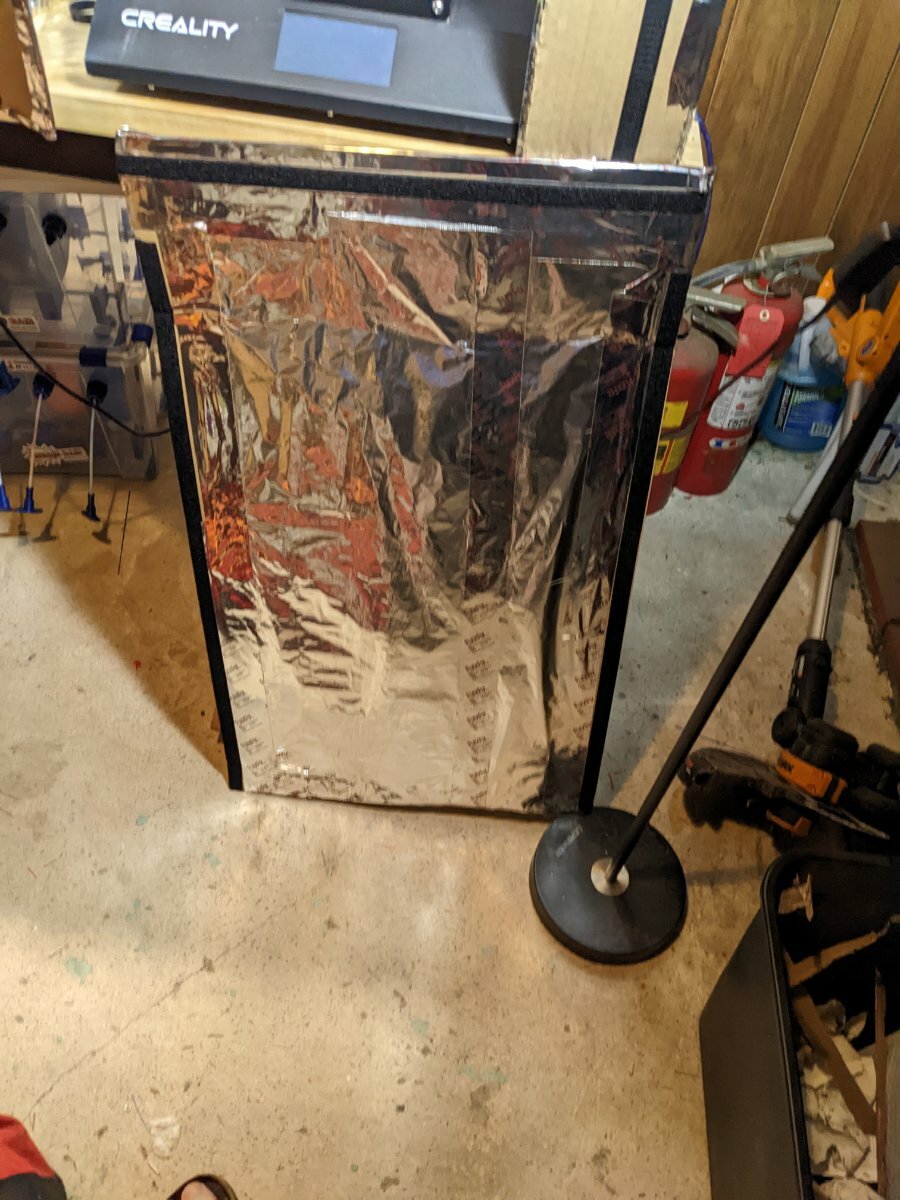
I haven't started my build yet per se, I am still in the pre phases, waiting for parts kit to arrive, preparing to print ABS on my current printer, gathering some extra tools. I thought I'd immortalize a nice laugh for everyone in my very first post here. My current printer that I will be printing the ABS parts on is a Creality CR-10s PRO V2. I just completed my final upgrade to it over the weekend, installing a Wham Bam flexible bed system. This is a magnetic base with a spring steel sheet coated with PEX on the top. (PEX is just their fancy PEI). Last night I tried to do my first test print with it and no matter what I did, I could not get a good first layer adhesion. I went through all the troubleshooting steps and to even get any sort of adhesion I had to lower my z offset so much it made a terrible first layer. On my 3rd of 4th attempt at googling for a suggestion I found a reddit post where someone was having first layer problems on the same bed (Wham Bam) and in the thread someone mentioned removing the protective plastic sheet off the PEX before printing. Lo and behold I had left the plastic sheet on the PEX. I removed it and like magic, it prints perfectly without any z offset adjustments or anything. I'm going to call this my first poo brain moment in this process, and I suspect at least some more poo brain moments to come. Anyone here's some pictures of the enclosure I built for printing ABS on the current printer: Any recommendations for printing ABS on PEX/PEI? This'll be my first time printing ABS at all.
-
Hey guys, in the Introduction threat I was asked to let you participate in the construction of my first Voron. I hope my Google English can be understood to some extent without laughing to death. A Voron 2.4r2 with 300mm is planned. The following mods should be integrated immediately: Stealtburner with Clockwork2 PCB board for print head Klicky Probe BIGTREETECH PI TFT50 V2.0 with Klipperscreen or Octodash (which would you recommend?) LED case lighting (can I control the stripes directly from the board?) Webcam (Logitech) The basis is the kit from Formbot. Parts are mostly on the way and my Anycubic i3 Mega S is already busy printing the parts. The main color is printed in black from Esun ABS+. The accent color will be silver, either made of ABS+ by Esun or ASA by Extrudr. I will print the parts of the X-Carriage and the Stealtburner out of PA12carbon. If I don't forget to take pictures in between, I'll be happy to show them to you and keep you up to date.
-
Version 1.0.0
321 downloads
This is my design of mounting block for light X beam. It should work on both aluminium and carbon fiber versions, but make sure that inner dimension of beam is 16x16mm. Required hardware: 6pcs M5x7x5 brass heatset insert -
Since I'm about to build my first voron I needed a list of the parts to print and with the countless customization possibilities I must say that at first I found myself a bit lost. I found a list, worked on by @Demosth @Dajo @Buurman, that helped me a lot... but sadly it wasn't updated to 2.4r2. I decided to modify the file for my needs, then since it seemed useful I decided to publish it, also implementing new features. This is the list of changes compared to the previous file: Changelog 1.00 01 Dec 2022 - Updated pieces to 2.4r2 - options tab: added drop down list with eSUN ABS+ color - options tab: drop down lists have been revised and updated with the common choices present in the official release - options tab: added choice between Afterburner and Stealthburner, you can also choose Stealthburner with CW1 extruder - options tab: added a second drop down list column that allows you to immediately apply some common mods - options tab: common mods that do not alter the original pieces have been added via checkboxes - options tab: the configuration code has been revised, given the greater amount of possible customizations, now are used letters in sequence from A to P. The letter Z is reserved for the checkboxes - check list: added a button that directly applies the filter, deactivating unnecessary pieces in the chosen configuration. You can still use manual filter refresh - check list: the color of pieces is automatically updated with those chosen in Option tab - check list: update of parts codes - checklist: possibility to deactivate the cosmetic parts - checklist: updated manual pages - checklist: updated bag number - Extras & Mods: the new tab for all the pieces out of the official release - Extras & Mods: the page column indicates the point in the manual where the piece is used to replace the original one. Where SB__ is indicated, reference is made to the StealthBurner manual https://docs.google.com/spreadsheets/d/1exicv4B9VfjR5Rg5jiAFGeiBjoXGLLoL4vDNwEeFiHw/edit?usp=sharing This is the file, let me know if you find it useful and if you find any errors Grimmjow
-
Starting building soon, most parts are delivered or in transport now. had some delay of Formbot city lockdown, but LDO is having massive delays also (even worse). Expecting to start building in about two weeks.... to be continued! Voron Kit: Formbot 2.4 R3 350 Vulcan SF Printed Parts: ASA Carbon Black & Neon Yellow (Neon Yellow was self sources, not a default color offered) High Quality prints from Mehmet (Turkey) on Etsy 5 star rating https://www.etsy.com/nl/shop/Yacime3D?ref=simple-shop-header-name&listing_id=1188668167 Wiring: Decided to buy an all black kit + SB kit from OneTwo3D.co.uk LCD: BTT Pi TFT50 v2.0 - BigTreeTech Electronics: Need to decide to mount things normal, or vertical, see what brings best space and cooling. Ventilation/filtering: Nevermore Duo with two Delta fans. Mostly for the hot air distribution, but filtering helps. VEFACH filter outlet MOD
-

Version 1.0.0
56 downloads
The Clearview Infinity mod for the Voron 2.4r2 and Trident is an upgraded enclosure system that offers both better performance with a commercial grade design aesthetic. The name "Clearview Infinity" correlates to the visual aesthetic of the transparent panels. 1/4" HD polycarbonate panels and oversized hardware are designed to take give this a commercial grade fit and finish. More so, the added function that this enclosure set adds is better heat retention for advanced printing, reduced noise while printing, and a strong sturdy enclosure that feels like a professional piece of lab equipment. All due respect to the Voron team for making an amazing printer, but we thought the enclosure portion needed some help. Open Source mode: We want to offer a way to open source this mod for those who DIY. At the same time, we build these enclosures to make a living and we put a lot of work into the design, function, and finish of the enclosures we make. That said, we will give you alternative open source parts that you can use to complete your own Clearview Infinity enclosure or it is available for purchase through our website. In the spirit of being a maker, we'll happy to share our idea and the work it takes to make a great product. What is included (BOM) 5 Polycarbonate panels (5.5mm or 6mm) (Front, sides, rear, and top) 52 m5 x10mm flanged screws 52 m5 half round extrusion nuts 16 m4 x10mm flanged screws 12 m4 Rivet nuts 4 5mm x 10mmx 5mm magnets 1 - 256mm pull handle 1 press fit bowden holder 1/4" wide weather seal Printed parts 3 - 270 degree hinges 2 - Magnetic brackets 1 - combination rubber grommet Panel 1 Front 421mm wide x 435.5mm tall Panel 2 + 3 Sides 410mm wide x 430mm tall Panel 4 Rear 421mm wide x 430mm tall Panel 5 Top 421mm wide x 415.5 deep Hinges 1/4" x 1/8 Gasket Material Interactive model https://myhub.autodesk360.com/ue2bc5d44/g/shares/SH9285eQTcf875d3c53959473f32555af79b -
Version 1.0.0
78 downloads
Since there was no file included in the official STLs for a 1.5mm IECGS power inlet, I created one using the same tolerances the official models (1mm, 1.2mm) use. Fits perfectly. -
Version 1.0.1
438 downloads
This is a remix of Demosth's excellent Skirt Fan Mount. I found the stock fan mount to be flimsy and easy to break off the extrusion. Demosth's version is a lot better but still only uses a single screw. I also wanted to use my red fan grills for extra flair. I added three additional features: 4 more holes to secure the mount to the extrusion any way you want (if using the outer most holes, you'll need to attach the mount to the extrusion first before attaching the fans and grills). You can still only use a single screw to mount it on the extrusion if you're feeling lucky, but I recommend using at least two. 3mm through holes to allow using custom fan grills (just as on the stock fan mount, you'll need to add heat inserts to the fans). Side profile for a snug and elegant fit against the part A and B side skirts, adds to the overal sturdiness of the assembly. This version is provided in 3 variants: Solid_Skirt_Fan_Mount_Channel: with profile walls and cable channel Solid_Skirt_Fan_Mount: with profile walls, no cable channel Solid_Skirt_Fan_Mount_Open: without profile walls on the side. (no idea why you'd want this one) All models are watertight and print as normal. No supports needed.- 5 comments
-
- 16
-
-
-

-
Version 1.0.1
459 downloads
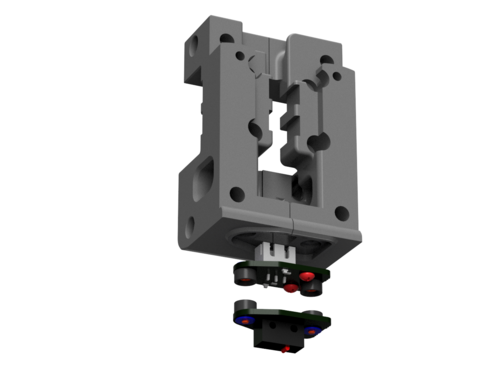
Stealth Burner X-carriage Euclid probe 2.4/Trident / MGN 12 left Right mounting the EUCLID probe with self taping m3x8mm screws this X-carriage is remixed from https://github.com/VoronDesign/Voron-Afterburner/tree/sb-beta/STLs/X_Carriage I hope this helps- 11 comments
-
- 13
-
-
-
-
- 3dpmamsih
- stealthburner
- (and 5 more)
-
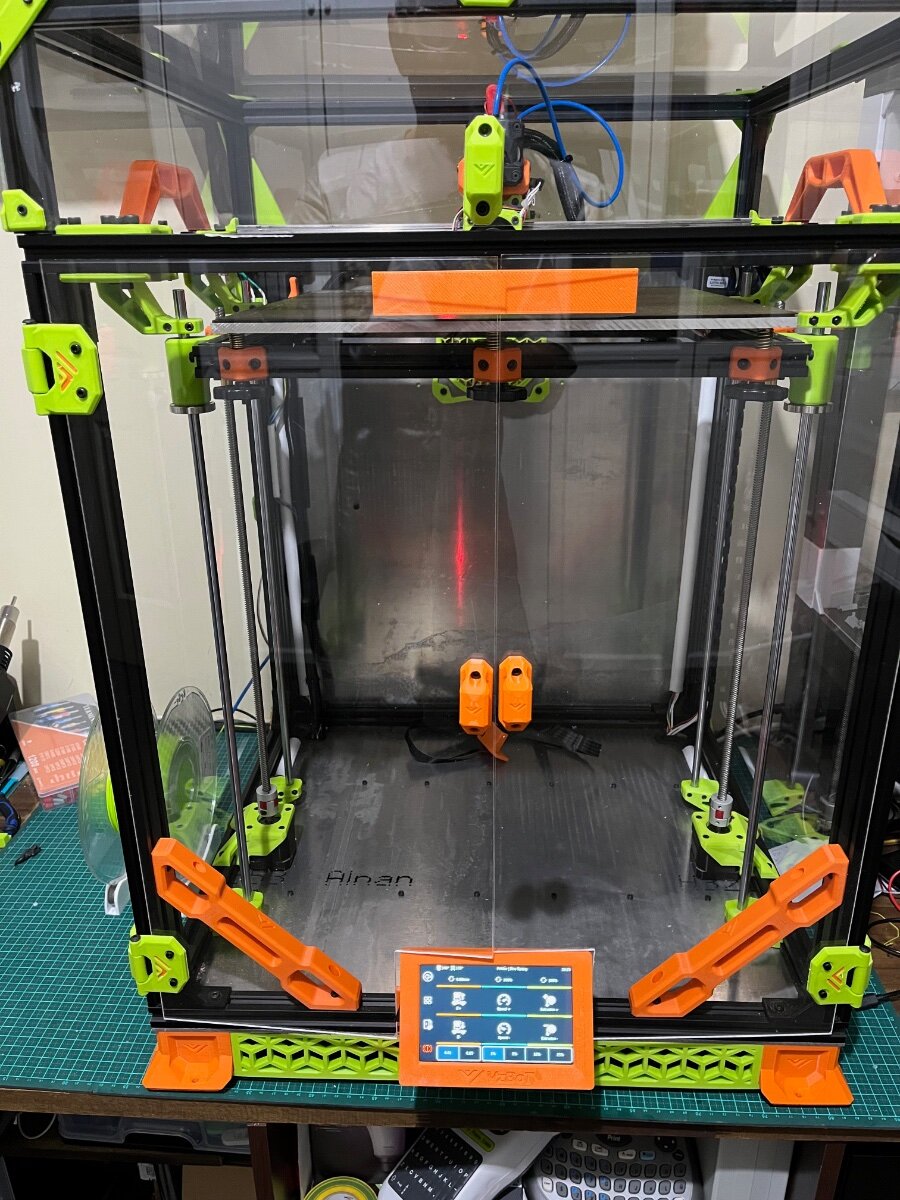
Printed all the parts for the Voron 2.4r1 (red and black) and as I was about to begin ---the 2.4r2 was released. Question was, do I build the printer with the parts already printed, just print the new parts, or.......? Well I decided to build a Voron 0 instead. (V0.1632) and started reprinting the parts for the 2.4r2 in a totally new colour scheme (Red and yellow) Also printed the parts in PC-ABS rather than just ABS for additional strength. Also gave me time to learn from the experiences of others, especially @Buurman. And just when I thought I was ready to start, I saw the front idlers mod which I just had to print. Like @PFDennis, I just can't resist a good mod. Finishing printing this now on my VZBot: ) Building on a mirror 600x900x8mm - should be pretty flat. Not as nice as the granite slab that @EricD got but it will do. I built my Voron 0 on a glass bed from a Tronxy X5sa with excellent results. (I converted the Tronxy to a VZBot as seen above) So let the journey begin: Voron 2.4r2 300x300 here I come!!
- 159 replies
-
- 4
-
-
-
- builddiary
- v2.4r2
- (and 1 more)
-
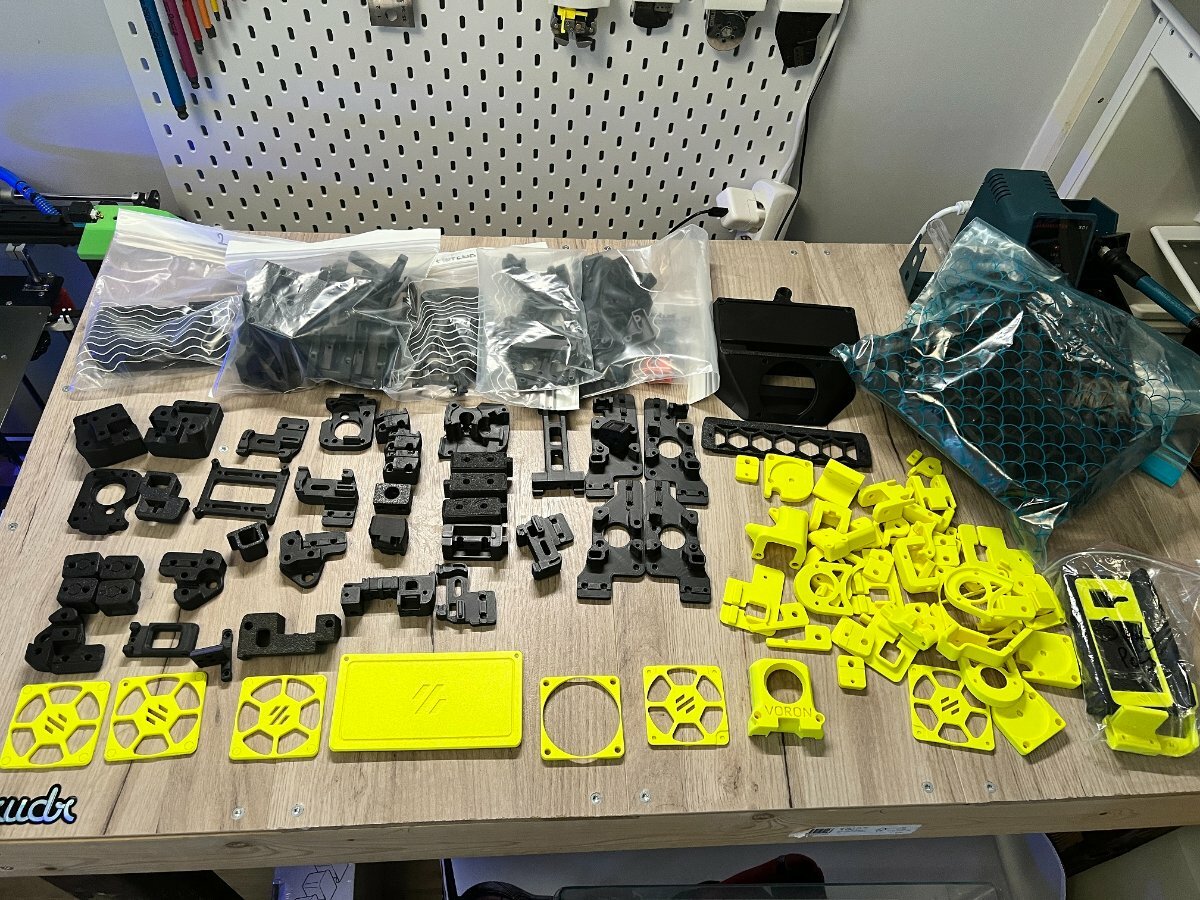
I guess about two months after building my first Voron for myself I am starting to build a second one. This kit is slightly different than the first build, this one will be all Formbot default, no custom wiring, Klicky or Stealthburner... all default R2/Formbot build. EDIT1: I realise the only thing I am adding to this build is the VEFACH filter inserts, default doesnt work, this mod is absolutely amazing, good filter functionality. Kits and parts are getting more expensive, self sourcing has gotten more expensive than buying a kit. (yes, I did compare) So with this build I just want to see IF the default kit is good enough, what are the down and upsides from it. I am based in Amsterdam, so I ordered it from Formbot directly and had it shipped from Szech, this prevents extra import costs, but the kit is more expensive than from China, yet you still save about 100 euro. The kist price was 1000 DOLLAR, excluding Raspberry Pi, (you get 45 dollar back if they dont have it) I found a Raspberry Pi 4 in stock for 45 euro. You get the Dragon hotend send from China, if you dont choose the default hotend. In this kit the Extruder cable was missing, but it was added to the hotend from China by default. They will fix this in future kits I am sure, but this was no issue for me. I have printed all the parts on my Voron, same color scheme as the first ASA, black and NeonYellow. (Holy crap thats a lot of prints) NEXT POST: Unpacking the Formbot KIT.
- 9 replies
-
- 4
-
-
- builddiary
- v2.4r2
- (and 1 more)
-
Version 1.0.0
62 downloads
In my travels upgrading Anycubic mega-S printers, I created a sdcard socket mount for the cabinet to plug into a MKS Robin Nano control board. I remixed my design to add the same functionality in my Voron 2.4r2 300mm build. I can create other skirt mods if there is interest. printed parts right skirt with sdcard socket modification sdcard mount sdcard cover Other parts required 6 M3x8mm screws for mounting sdcard extension cable You do need a micro sdcard to sdcard extension cable. I picked up mine on Amazon made by Lanmu. It is a 500mm long extension cable and works well with the hardware positioning that I did for my machine. They do make a 250mm also which may work better for some installations. All you need to do is remove the plastic end cover for installation in the mount I designed. -

Version 1.0.0
53 downloads
Adapted from the original power_inlet_IECGS_ part to accommodate a Schaffner FN9280 Ultra Compact Filtered IEC power module. Left and Right versions provided. Modded using Sketchup Pro 2022 (skp file provided). Model is 100% watertight and easy to print. The 4mm holes accept regular M3 heat inserts to secure the power module's flange (using M3x12 cone head machine screws). -
Version 1.0.0
134 downloads
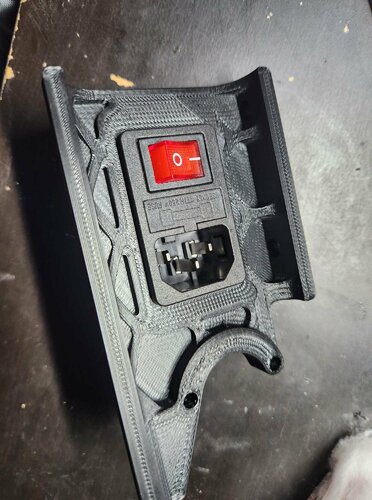
Adapted from the original front_skirt_a_350 part to accommodate a ZF Rocker Switch WRG32F2FBREN. The cut-out for the switch is following the manufacturer's specifications, and is tapered to make removal of the switch easier. Left and Right versions provided. Modded using Sketchup Pro 2022 (skp file provided). Model is 100% watertight and easy to print. -
Version 1.0.0
128 downloads
[Voron 2.4 350] Open grill for the side skirt. Fits in snuggly. 2 screws. Modified from the original models using Sketchup Pro 2022 Pro (SKP file also provided). STL is 100% watertight and easy to print, and easy to modify to make smaller versions. I'm sure someone else must already have made a similar one, but I couldn't find any with a lazy search. -
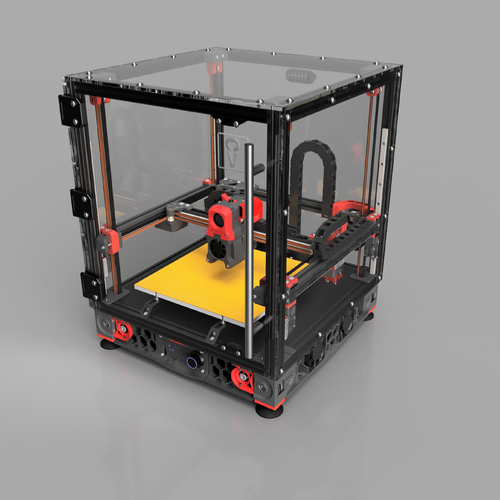
As rumored the Voron 2.4r2 has been released with many enhancements and upgrades. You can download the latest release at the official gitHub repo located at https://github.com/VoronDesign/Voron-2/releases/tag/V2.4r2 Use this topic to comment and discuss the updates, let us know what features you look forward to the most! Looking forward to seeing the first "Build Guide" for transition from a V2.4r1 to a V2.4r2! (This is a copy of official Release notes found here: https://github.com/VoronDesign/Voron-2/releases/tag/V2.4) VORON2.4 Release Release Notes: Release V2.4 of the VORON2 lineup of 3D printers. This release re-focused on simplicity and cost for VORON2, and has been redesigned from the ground up to be more streamlined, easier to source, more fun to build, and generally a better machine to own. In short, what VORON used to stand for. Notable features for this release: Afterburner Toolhead System, features minimal parts you actually swap, and improved cooling of both hot end and parts. Comes in both Direct Feed and Bowden configurations. We've incorporated all feedback received during the beta testing process and made it much easier to assemble. Direct drive A and B motors allow for smoother belt path and less parasitic loses. Also reduces noise and ringing, while improving machine reliability. Z rails are now centered on the vertical extrusions, allowing use of almost any 2020 T slot profile available. SKR 1.3, along with TMC2209 and 24V bus voltage is now the standard configuration, allowing us to ditch the Astrosyn dampeners while retaining quiet operation. 24V also allows for reduced wire gauge in the chains without loss of efficiency. Increased Y travel. There's now a full 10mm of over-travel on Y axis, allowing one to use the Z nozzle probe without sacrificing build plate space. XY joints and Z idlers now use regular 20T toothed pulleys, reducing complexity and cost, while improving reliability of the machine. Z idlers are also simplified and now use single screw for belt tension adjustment. Z drives now accommodate any metal 80T pulley available on the market, including ones with flanges. Metal 80T improve accuracy over printed 80T pulleys, and allow for more consistent gantry leveling results. New front idlers are vastly simplified and also feature single screw belt tension adjustment. This allows users to get more consistent results when tensioning belts and, more importantly, while trying to match the belt tensions of a group of belts. Part counts and variety has been reduced, and printed parts now require much less plastic. Improved bed mounting using globally sourceable spacers in order to help eliminate bed distortion during the build process. Front panel is now a set of doors, using magnetic latches and print-in-place hinges. Screw-down panel clips from V2.1 return with a re-design and improved installation method. They are now almost as quick as the quick-release panel clips to install and remove. Rear fan housing has been redesigned to help utilize more of the filter material. It now uses a 60mm fan for easier 24V sourcing. Rear plug panel sees the return of the integrated non-filtered mains inlet, which is much cheaper and easier to source. It also features dual Keystone terminal slots for easy port extendability (CAT6, USB, etc). The Mini12864 LCD Module is now the standard LCD for VORON family of printers. It's a lot more compact than the now-ancient RepRap Full Graphics Display and is a lot more responsive thanks its use SPI bus connection. Electronics compartment layout has been improved to allow better cooling and easier component management. DIN3 (35mm) rails are the standard configuration now which bring with it much improved installation and maintenance experience. Electronic compartment cooling is now provided by dual 60mm fans, significantly improving component cooling. Work on this release began before Christmas of 2019 and the pace of development on it has been remarkable. I hope you enjoy building this machine as much as we enjoyed designing it.
-
I may simply have simply not found this yet, but what I have experienced is not knowing if a mod is already in 2.4r2. I realized older mods may conflict with r2 or be something that was actually included in r2. If authors had 2.4r1 or 2.4r2 available as added tags then older mods could be version identified. Could even create (frowny face) 2.4r1 and (frowny face)2.4r2 to designate mods that will not work in other versions. Just a thought for discussion...