Search the Community
Showing results for tags 'mount'.
Found 23 results
-

Version 1.0.0
40 downloads
-------------English/Englisch------------- Hey everyone! I whipped up this wall mount for my Voron 2.4 because I was tired of all the vibrations while printing. Plus, it keeps the printer from sliding around at high speeds. So far, it’s been awesome! What It Does: Flexible Use: You can mount it in any orientation. No need to mirror anything in your slicer – just print it 2x or more, depending on how many mounts you need. Cable Pass-Through: A lot of folks hide cables in the aluminum profiles, but that gets tricky when you want to screw something onto them. So, I added a cable slot to this mount – just run the cable through there. (You might need to re-crimp it, though.) Maybe for Other Printers: I made it for the Voron 2.4, but it could work with other printers using 2020 aluminum extrusion, like the Trident. Give it a shot and see! Testing Phase: I’m currently testing it on my Voron 2.4, and it’s making a real difference. Less wobble, the printer stays put, and I think it’s even a bit quieter (since the vibrations go straight into the wall and get “swallowed” there). Print Tips: Filament: I printed mine in ASA (had some leftovers lying around). ABS or PETG should work fine too. PLA might do the job with a few extra wall loops. Layer Height: I went with 0.2 mm – works for me. Infill: I used 40%, but if your printer’s on the heavy side, maybe bump it up a bit. Supports: Shouldn’t need them, except maybe at the wall interface area. If so, just keep Supports on printbed only. The cable slot has some light bridging, but it’s no big deal – you can add support for better quality if you want, but it’s barely necessary. Assembly Tips: After printing, grab 4 rotating T-nuts and 4 M3x10 screws per mount and slide them into the profile. For my setup, I placed the mounts on the left and right at the back, about 25 cm from the top of the printer. Tighten them up properly (with the 4 bolts), then mark the drill holes on the wall (use a center punch or hole marker). Drill the holes into the wall and add anchors. (Depending on your wall type, you might be able to screw straight in.) Thanks to the mount’s shape, you can easily get to all the holes and screws If you want, use the cable slot to run a cable through (like for build chamber lighting, for example). -------------German/Deutsch------------- Hi zusammen! Ich hab diese Wandhalterung für meinen Voron 2.4 gebastelt, weil ich die Schwingungen beim Drucken loswerden wollte. Außerdem hält sie den Drucker fest, damit er bei hohen Geschwindigkeiten nicht verrutscht. Bis jetzt echt top! Was sie kann: Flexibel einsetzbar: Du kannst die Halterung in jeder Orientierung verwenden. Es muss beim Druck also nichts gespiegelt werden. Einfach 2x oder öfter drucken, je nachdem wie viele Halter du benötigst. Kabeldurchlass: Viele Nutzer verstecken Kabel in den Aluminiumprofilen. Das Problem ist dann, dass die Kabel im Weg sind, wenn etwas an die Profile angeschraubt werden soll. Ich habe daher einen Kabeldurchlass mit in die Halterung eingefügt, damit man das Kabel dort einfach durchführen kann. (Möglicherweise muss man es jedoch neu Krimpen. Vielleicht auch für andere: Ich hab die Halterung primär für den Voron 2.4 erstellt, aber sie sollte theoretisch auch bei anderen Druckern mit 2020er Aluminiumprofilen funktionieren, z. B. dem Trident. Einfach mal ausprobieren! Testphase: Ich teste sie gerade an meinem Voron 2.4, und sie macht echt einen Unterschied. Weniger Wackeln, Drucker bleibt stabil und meines Erachtens sogar etwas leiser (da die Schwingungen direkt in die Wand übertragen werden und dort “geschluckt” werden. Druck-Tipps: Filament: ich habe sie in ASA gedruckt (hatte noch ausreichend “Rest” da. ABS oder PETG sollten auch Funktionieren. PLA möglicherweise mit ein paar mehr Wandschleifen auch. Schichthöhe: 0,2 mm hab ich genommen Füllung: Ich habe 40% verwendet, aber bei schwereren Druckern vielleicht mehr reinpacken. Stützen: Sollten nicht notwendig sein (bis auf den Bereich des Wandinterfaces. Wenn, dann nur auf dem Druckbett. Der Kabelschlitz hat so kleines Bridging, dass es nicht notwendig ist. Für Bessere Qualität kann man es natürlich mit Support drucken, aber es sollte wie gesagt nur wenig support notwendig sein. Montage-Tipps: Nach dem Druck dann einfach je Halter 4 rotierende Nutensteine (T-nuts) und 4 M3x10 Schrauben verwenden und in das Profil einführen. In meinem Fall habe ich die Halter links und rechts an der Rückseite positioniert, ca 25cm von der Oberkante des Druckers. Hier die Halter dann richtig Festschrauben (mit den 4 Bolzen) und die Bohrlöcher an die Wand übertragen (Körner oder Bohrloch-Marker) Die Löcher dann in die Wand Bohren und mit Dübeln versehen. (Je nachdem was für eine Wand ihr habt, könnt Ihr jedoch direkt reinschrauben) Durch die Form des Halters kommt man an alle Löcher / Schrauben bequem heran Wer will kann dann auch die Kabelführung verwenden um dort ein Kabel (zum Beispiel für die Beleuchtung des Bauraumes) hindurch zu führen. -
Version 2.0.0
61 downloads
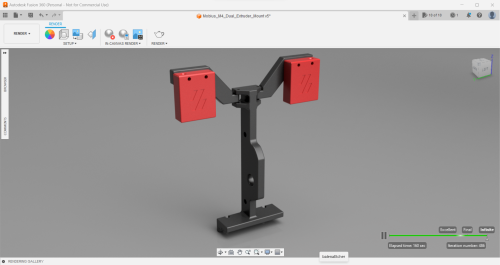
Hey guys, So! I'm going dual (and triple) extrusion on my printers and didn't want to fuss with the ERCF for my smaller ones, so I bring to you the Mobius M4 dual extruder mount for the Voron 2.4 / Voron Trident. Tested as working - All fits together, all fits on to the voron, extruders attach easily. This is (kind of) a remix of the following: Elegoo Neptune 2-2S-2D Dual M4 Extruder Mount by mlee12382 | Download free STL model | Printables.com I got the original idea from the linked file above, I imported it into fusion 360 and sketched around it (getting rid of the unnecessary holes where they've obviously used tinkercad and the M4 baseplate. Instead of the silly (weak looking) cylinders that have been merged to some other blocks, I sketched out a stronger join and inserted the holes through that - also got rid of the stupid hole sizes that were used and made these 3.2mm in diameter for the M3 screws and 5.2 for the M5 screws - this means your screws should slide in nicely even if your settings are off. With the Filament Runout Sensor mounts, so far I have just copied the original, but again made the joints stronger and the holes a decent size - I'm not sure if this will work with the sensors I want to use so will report back later - the way these are designed means you can print them flat instead of upright, saving time! On top of this, I have added fillets to any stress points I considered to be weak - this should improve longevity of the mount. To mount it on to the printer I have just used the Voron spool holder mounting technique - it is designed to sit into the 2020 extrusion and grip over the top panel. -
Version 1.0.1
72 downloads
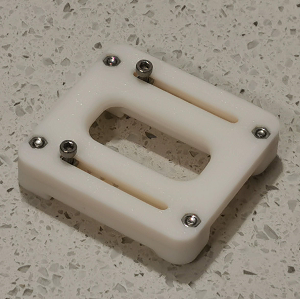
A set of simple mounts that hold an iPad Pro. In this case, holding an 11" iPad on a 300x300 2.4r2. Needed hardware: 2x M5x8 Cap-head Bolts 2x M5 tee-nuts -
Version 1.0.0
341 downloads
This is my design of mounting block for light X beam. It should work on both aluminium and carbon fiber versions, but make sure that inner dimension of beam is 16x16mm. Required hardware: 6pcs M5x7x5 brass heatset insert -
Version 1.0.1
521 downloads
This is a remix of Demosth's excellent Skirt Fan Mount. I found the stock fan mount to be flimsy and easy to break off the extrusion. Demosth's version is a lot better but still only uses a single screw. I also wanted to use my red fan grills for extra flair. I added three additional features: 4 more holes to secure the mount to the extrusion any way you want (if using the outer most holes, you'll need to attach the mount to the extrusion first before attaching the fans and grills). You can still only use a single screw to mount it on the extrusion if you're feeling lucky, but I recommend using at least two. 3mm through holes to allow using custom fan grills (just as on the stock fan mount, you'll need to add heat inserts to the fans). Side profile for a snug and elegant fit against the part A and B side skirts, adds to the overal sturdiness of the assembly. This version is provided in 3 variants: Solid_Skirt_Fan_Mount_Channel: with profile walls and cable channel Solid_Skirt_Fan_Mount: with profile walls, no cable channel Solid_Skirt_Fan_Mount_Open: without profile walls on the side. (no idea why you'd want this one) All models are watertight and print as normal. No supports needed.- 5 comments
-
- 16
-

-

-

-
Version 1.0.0
615 downloads
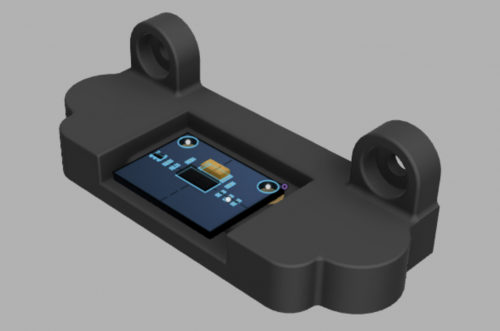
This work is based on sttts's Waveshare 5.5inch mount. BTT PITFT50 v2 has a different layout than v1, featuring a brightness thumbwheel, an orientation switch and a JST XH port for unknown function. This design provide accessibility to the thumbwheel and switch. BOM 4x M3x6mm 4x M2.5x4mm (included in the BTT PITFT50 v2) 500mm ~ 600mm Ribbon Flat Cable for Raspberry Pi Camera (depends on the position of the Raspberry Pi. The included one is too short) Instructions Please use the mount in sttts's mods to amount this to the frame. No re-print of skirts is required! Print Settings Standard Voron recommended print settings- 8 comments
-
- 16
-
-
-
-
Version 1.0.0
316 downloads
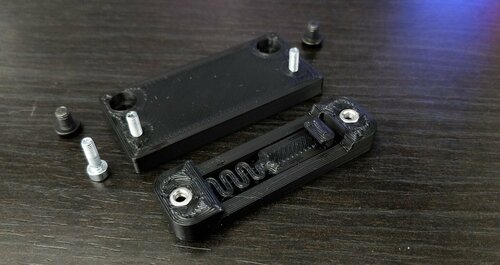
I wanted to use Demosth's Stiffer DinMount for my PSU, but as I had ran out of self tapping screws and didn't want to wait for new ones to be delivered I modded his design slightly to accept M3 screws and nuts. Because the spacing between the screw holes would not fit the PSU's mounting holes center-to-center distance without interfering with the spring design, I added a very simple base plate which bolts onto the PSU using M4x6 screws. Assemble the DIN bracket onto the base plate first, then the base plate onto the PSU. These mounts are for PSUs with mounting holes 50mm apart center-to-center. The tolerances of the holes are tight, so your printer has to print with dimensional accuracy or the screws won't fit. If too tight for your printer, try using Hole Horizontal Expansion in your slicer. Photo sample printed with 0.3mm layer height, 0.5mm width, 7% infill, complete set of 4 in about 37mins. No supports needed. Hardware: M3x10 SHCS x 4 M3 nut x 4 M4x6 BHCS x 4 -
Version 1.0.1
178 downloads
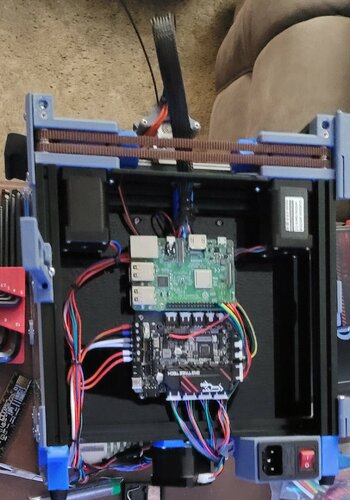
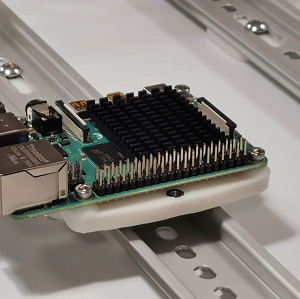
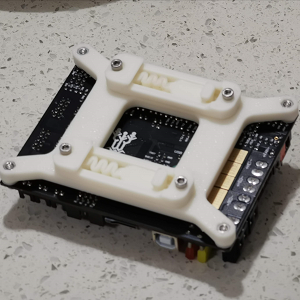
I created Mount that combines the BTT Pico and Pi that mounts to the back frame using the existing holes in the back panel. Also, a lot of the wiring can be managed under the pi as I lifted it from the back panel. I added photo's of my electronics layout in my v0.1 . -
Version 2022.04.21
414 downloads
G'day, another nice thingy from down under. Got non-standard electronics compartment? Some blocks there that don't allow spec placements? Don't have or don't like self-tapping screws? Or are you just up to better wiring and sturdier construction? Alright, Dropbears to rescue. Here comes a rigid bracket for Raspberry Pi, that uses M3 bolts and nuts, and allows mounting along and across the rail. The bracket needs 1 of rs25_psu_bracket_clip.stl. (now included on the download) Printing and Plastic Standard Voron part printing guidelines to follow: 0.4 nozzle, 0.2 layer height, etc. This part is not exposed to any significant heat, so you could probably use even PLA. Assembly BOM: 6 x M3 hex nuts 6 x M3x12 SHCS screws Pi has mount holes for M2.5 bolts, so putting M3s through might be a problem. Just enlarge these holes with 3.0mm or 3.2mm drill, you won't damage the Pi but will make your life easier. Credits that russian guy (aeresov#9959) A Team Dropbear Production- 4 comments
-
- 4
-
-
- v2.4
- raspberry-pi
- (and 3 more)
-
Version 2021.05.02
31 downloads
This is a DIN rail bracket for an ESP32 bought from AZ-Delivery via Amazon May also fit for other ESP32 dev boards, but I have not tested. The spacing for the bores is: 23mm x 51mm Please use the generic PCB DIN Clip and mount these on top. -
Version 2021.09.27
44 downloads
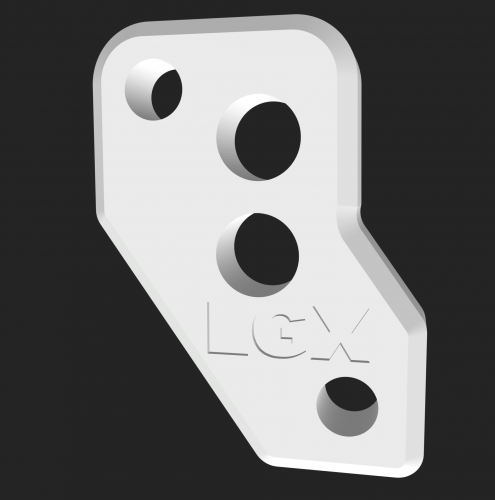
A user submitted mod for LGX referenced in this post.... -
Version 2021.06.27
227 downloads
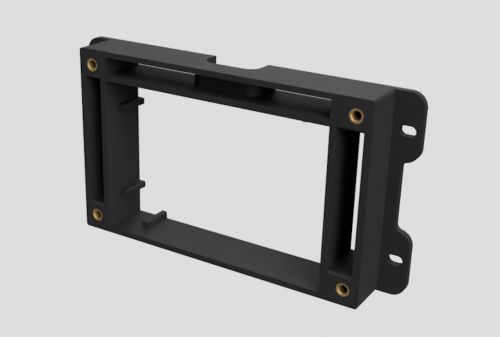
This mod replaces the front middle skirt in order to mount a 3.5in touchscreen display for Klipperscreen. It has two printed parts: the main body and the front plate. Threaded inserts go into the main body and the M3x8 screws are used to mount the front plate onto the main body. BOM 5 threaded inserts (stock) 4 M3x8 BHCS 3.5in TFT Display Software Klipperscreen Follow this tutorial to install Klipperscreen on your Raspberry Pi. LCD Show Ssh into your Raspberry Pi and execute the following commands sudo rm -rf LCD-show git clone https://github.com/Lcdwiki/LCD-show.git chmod -R 755 LCD-show cd LCD-show sudo ./MHS35-show-
- 1
-
-
- tft
- switchwire
- (and 2 more)
-
Version 2021.06.30
73 downloads
This mod is for mounting the input shaper printed part in front of the afterbuner, but also mounting on the bed for the SW using the magnets. The threaded inserts are for securing the input shaper on the printed part. BOM 2 Threaded inserts (stock) 2 M3x16 BHCS or SHCS 2 M3x6 BHCS 2 round magnets 8x4 Input Shaper ADXL345-
- 4
-
-
- input shaper
- mount
- (and 2 more)
-
Version 2021.06.16
17 downloads
This is a mount for the Fysetc Spider board to be mounted on 2020 or 3030 extrusions. -
Version 2021.04.25
1 download
This is a mount for the Fysetc S6 V2 board that is intended to be used with the V2 PCB DIN mount brackets and should work with any machine with DIN rails. To use this, print the mount and two of the V2 PCB DIN mounts. Attach the PCB DIN mounts using M2 self tapping screws. Attach the Fysetc S6 to the mount using M3 hardware of your choice. I used 6mm M3 hardware, but 8mm should work fine. This mount was designed and tested with the Fysetc S6 V2.0 board, but likely works with the S6 1.2 and F6 boards, since they're documented to have the same footprint. -
Version 2021.05.02
28 downloads
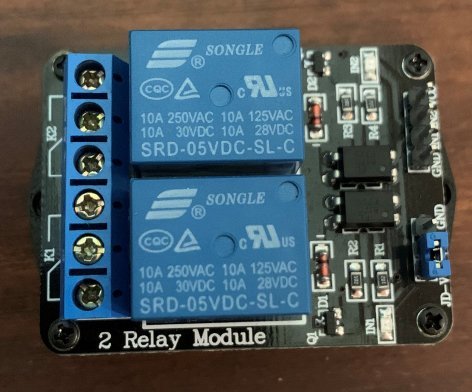
This is a DIN rail bracket for an 2-channel relay bought from Amazon May also fit for other 2-channel relays, but I have not tested. The spacing for the bores is: 33mm x 45mm Please use the generic PCB DIN Clip and mount this on top. -
Version 2020.12.09
14 downloads
The standard chain mount provided for the AfterBurner Clockwork for the SwitchWire does not fit the Galileo Clockwork. This is a modified chain mount to solve that. The 4 holes that are not a complete pass through are for heated threaded inserts applying.-
- 1
-
-
- switchwire
- btp
- (and 3 more)
-
Version 2020.08.02
42 downloads
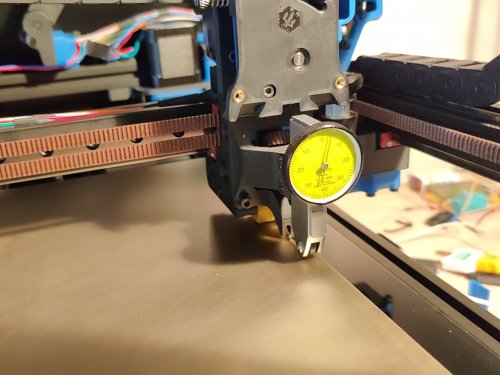
This replaces the Afterburner toolhead with a dovetail mount for a dial test indicator (such as a Mitutoyo 513-404, which this was modelled on). The indicator point is ideally located at the same position as the nozzle (the precise Y position may vary depending on the length of the tip). There is a protrusion where the nozzle would be located, so that Z homing can be done normally as though a nozzle were present. This can be used, for instance, to verify whether a mesh reflects the true form of the bed surface: sweeping the bed with the mesh enabled would ideally show no movement on the indicator. Required hardware M3x8 SHCS (4x) M3 hex nut (2x) -
Version 1.0.0
4 downloads
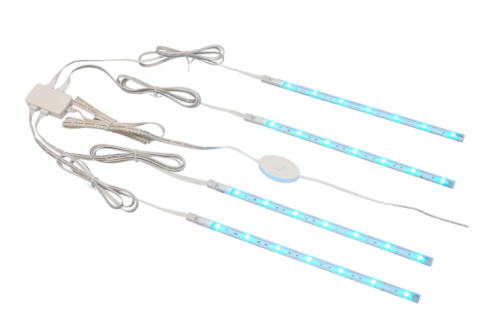
Overview Voron 2.x IKEA Dioder Led Mount for the DIODER single and multi colour LED Strip sold by IKEA. Description This is an improved version of the model of randommen96 for the IKEA Dioder LED strip. It comes with a wider gap so it nicely fits the metal mounting brackets supplied with the Dioder. Additionally the strip can be mounted either with VHB tape or an M3x8 BHCS screw. The LED shines inwards in an angle of 70°. Step file is included to ease your own modifications. -
Version 1.0.0
1 download
Skirt mount for V0, to allow mounting of analog timer. Mounts in back/right position. Fits https://www.aliexpress.com/item/799301917.html, or similar. -
Version 1.0.0
40 downloads
G'day, another nice thingy from down under. Got non-standard electronics compartment? Some blocks there that don't allow spec placements? Don't have or don't like self-tapping screws? Or are you just up to better wiring and sturdier construction? Alright, Dropbears to rescue. Here comes a rigid bracket for SKR boards, that uses M3 bolts and nuts, and allows mounting along and across the rail. Each bracket needs 2 of rs25_psu_bracket_clip.stl. Printing and Plastic Standard Voron part printing guidelines to follow: 0.4 nozzle, 0.2 layer height, etc. This part is not exposed to any significant heat, so you could probably use even PLA. Assembly BOM: 8 x M3 hex nuts 8 x M3x12 SHCS screws Credits that russian guy (aeresov#9959) A Team Dropbear Production -
Version 1.0.0
130 downloads
G'day, another nice thingy from down under. MeanWell UHP PSUs are great: nice, slim, compact, mains and DC on opposite sides... Well, but how to mount them on DIN rails? Alright, Dropbears to rescue. Pick an adapter for your UHP (they have different width), print 2 of them and 4 of rs25_psu_bracket_clip.stl. Printing and plasic Standard Voron part printing guidelines to follow: 0.4 nozzle, 0.2 layer height, etc. This part is not exposed to any significant heat, so you could probably use even PLA. Assembly BOM: 8 x M3 hex nuts 8 x M3x12 SHCS screws 4 x M3 suare nuts 4 x M3x10 SHCS screws Put square nuts in slide pockets, secure them with screws, then bolt down rs25 brackets, so square nuts are trapped. Credits that russian guy (aeresov#9959) A Team Dropbear Production -
Version 1.0.0
41 downloads
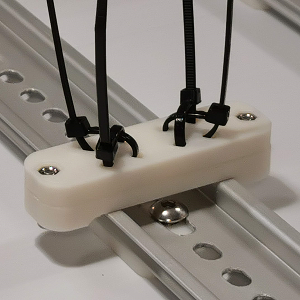
G'day, another nice thingy from down under: a simple bracket that allows fixing your cables with standard 3.5mm plastic cable ties in various positions. 4 ties per bracket, 2x2 criss-cross, so you can make bends or straights. The bracket needs 1 of rs25_psu_bracket_clip.stl. Printing and Plastic Standard Voron part printing guidelines to follow: 0.4 nozzle, 0.2 layer height, etc. This part is not exposed to any significant heat, so you could probably use even PLA. Assembly BOM: 2 x M3 hex nuts 2 x M3x12 SHCS screws standard 3.5mm cable ties Credits that russian guy (aeresov#9959) A Team Dropbear Production