-
TeamFDM.com is an UNOFFICIAL companion site for the DIY Voron 3D printer community. For official docs and final source of truth, visit the Official Voron Discord or the Voron Github
Printable Voron User Mods
Voron User Mods, or "UserMods", are a collection of community created and Team FDM curated modification for Voron Printers. All of these mods are available on the VoronUsers Github repo and unless otherwise specified follow the Voron communities GPL3.0 Licensing. Use any Mods at your own risk, if you make modification please share them on the VoronUsers repo.
Mod Authors: Have a Voron mod? Upload it at TeamFDM.com and let us know you're the author. We will ensure you can update and curate your files for more feedback! Please include tags for what Voron, or extruder your mod is compatible with.
660 files
-

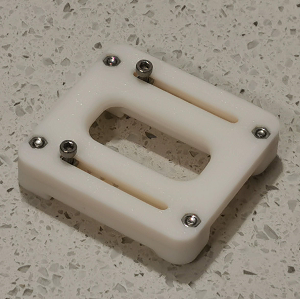
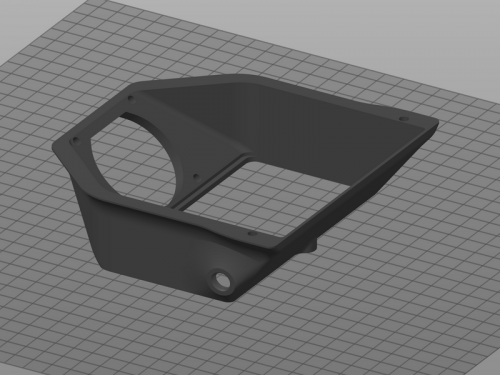
Voron 2.4 MeanWell UHP PSU Mount for DIN Rail
G'day, another nice thingy from down under. MeanWell UHP PSUs are great: nice, slim, compact, mains and DC on opposite sides... Well, but how to mount them on DIN rails? Alright, Dropbears to rescue. Pick an adapter for your UHP (they have different width), print 2 of them and 4 of rs25_psu_bracket_clip.stl.
Printing and plasic
Standard Voron part printing guidelines to follow: 0.4 nozzle, 0.2 layer height, etc.
This part is not exposed to any significant heat, so you could probably use even PLA.
Assembly
BOM:
8 x M3 hex nuts 8 x M3x12 SHCS screws 4 x M3 suare nuts 4 x M3x10 SHCS screws Put square nuts in slide pockets, secure them with screws, then bolt down rs25 brackets, so square nuts are trapped.
Credits
that russian guy (aeresov#9959) A Team Dropbear Production
130 downloads
(0 reviews)0 comments
Submitted
-
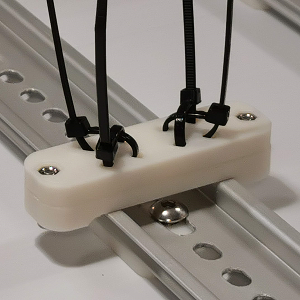
Voron 2.4 Cable Tie Mount for DIN Rail
G'day, another nice thingy from down under: a simple bracket that allows fixing your cables with standard 3.5mm plastic cable ties in various positions. 4 ties per bracket, 2x2 criss-cross, so you can make bends or straights. The bracket needs 1 of rs25_psu_bracket_clip.stl.
Printing and Plastic
Standard Voron part printing guidelines to follow: 0.4 nozzle, 0.2 layer height, etc.
This part is not exposed to any significant heat, so you could probably use even PLA.
Assembly
BOM:
2 x M3 hex nuts 2 x M3x12 SHCS screws standard 3.5mm cable ties Credits
that russian guy (aeresov#9959) A Team Dropbear Production41 downloads
(0 reviews)0 comments
Submitted
-
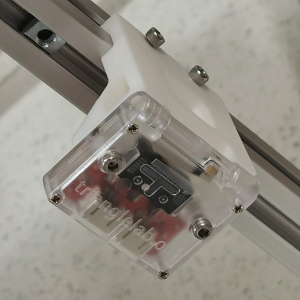
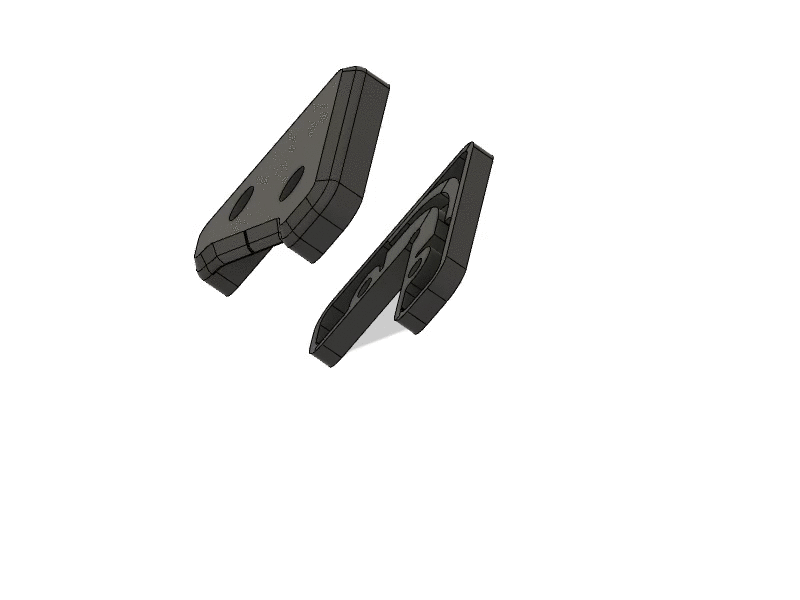
Voron 2.4 Trianglelab Filament Sensor Bracket
G'day, another nice thingy from down under. Got TL filament sensor in your pile of parts? Bought it a year ago for 2.1 and too lazy to find a way to mount it so it plays well with spool holder? Upgraded to 2.4 and still have no clue? Alright, ask a mate to hold your beer, this is quick one: just print it and use instead of stock bowen_retainer.stl.
Printing and Plastic
Standard Voron part printing guidelines to follow: 0.4 nozzle, 0.2 layer height, etc.
Any common plastic will do, this is outer part with no heat exposure.
Well, sure, you can print it in PEEK if you're that guy.
Assembly
BOM:
2 x M3 t-nuts 4 x M3x12 SHCS screws 2 x M3 heat inserts (4mm will do) Bolt your sensor to it, insert your PTFE tube to sensor's exit hole.
Make Melbourne hipsters proud, do your wiring in braided sleeving and with fancy connectors. And have a flat white when you're done.
Credits
that russian guy (aeresov#9959) A Team Dropbear Production88 downloads
-
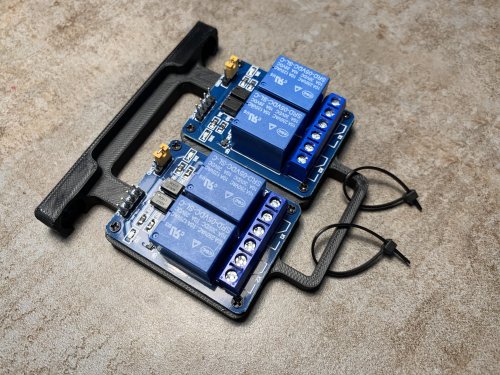
Relay Mount
Simple relay-mount for 2x 2 channel relay modules - e.g. for moonraker power plugin.
Mount with two M5x8 screws and T- or hammerhead nuts to normal 2020 extrusions.
4x or 8x M2x8 self tapping screws to mount the relay module.
7 downloads
(0 reviews)0 comments
Submitted
-
G1 Exhaust Filter Housing
Exhaust filter housing with the G1-8" thread on the side. Can also simply be printed mirrored to have the fitting on the opposite side
40 downloads
-
Corner Panel Clip
Corner panel clip with an internal cable path, so you can route the cables around the panel and corner.
I use them to mount 6mm floatglas as top panel with 3mm foam tape
corner_panel_clip_top_4mm.stl is 4mm and corner_panel_clip_bottom_3_5mm.stl is 3.5mm height,
so at the end there is 7.5mm space for the panel and foamtape.
Needs 2x M3x12 screews to mount per clip.
135 downloads
(0 reviews)0 comments
Submitted
-
V0 Neopixel Front Bed Mount
This replaces the stock V0.1 Front Bed Mount, adding a slot for a single Neopixel or Dotstar LED from a standard 10mm strip. There are channels to run the wires stealthily to inside of the bed frame extrusions on either side.
Instructions
Print Diffuser_x1 with 100% infill using a transparent or white ABS, textured build surface is a bonus.
Print Front_Bed_Mount_x1 using standard Voron print settings
cut a single Neopixel or Dotstar LED from a 10mm strip, and 3 (or 4 for Dotstar) equal lengths of wire, long enough to reach from the front bed mount, under the bed, through the cable chain and all the way to your mainboard.
insert the LED into the slot on the front of the bed mount, and route the wires through one or both of the channels
insert the diffuser in the slot in front of the LED, ensure a good friction fit. if necessary, print the diffuser slightly thicker or thinner by scaling it in your slicer.
Install the new Bed mount, making sure the wires are not pinched by the extrusions, they should run directly into the slot, you can use zip ties to secure it.
route the wires through the cable chain, and around to wherever your mainboard is mounted.
mainboard connections and klipper configuration are left as an exercise to the reader.
114 downloads
(0 reviews)0 comments
Submitted
-
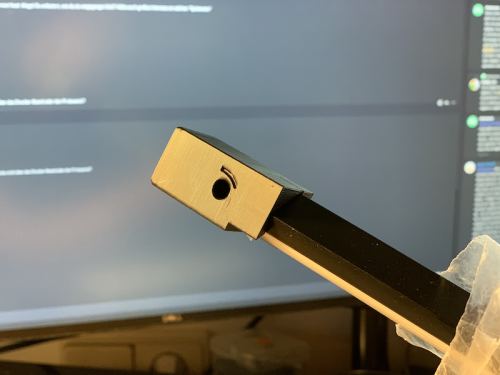
Mini Afterburner Strain Relief
Replaces the stock strain relief on the V0 Mini Afterburner toolhead.
BOM
1x M3x6 BHCS 2x M3x30 BHCS 2x M3 Nuts 1x M3 heat-set insert. (3x5x4) Instructions
Install the M3 heat-set insert into the top of Strain_Relief_Body_x1. Use the M3x6 BHCS to attach the Strain_Relief_Body_Top_x1 to the Strain_Relief_Body_x1 Insert the 2 M3x30 screws from the front of the toolhead, through the motor, Strain_Relief_Spacer_x2 and Strain_Relief_Body_x1 finally securing them with M3 nuts on the back of the strain relief. wires can be routed between the motor and the strain relief, through the recessed area.120 downloads
(0 reviews)0 comments
Submitted
-
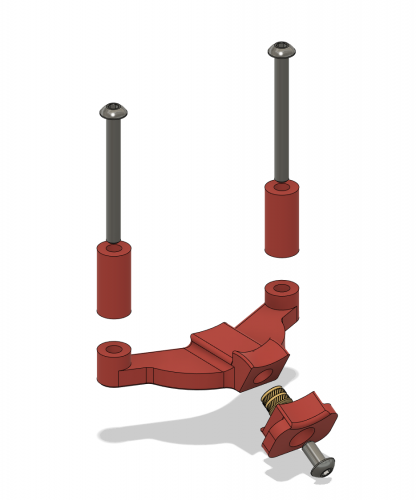
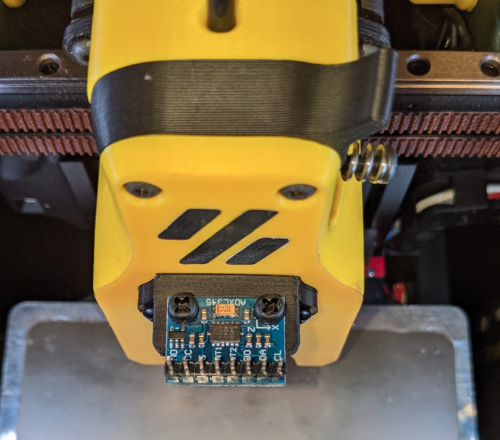
Mini Afterburner ADXL345 Mount
A mount to attach an ADXL345 sensor to the Mini-Afterburner toolhead.
BOM
2x M3x40 BHCS 2x M3 screws (at least 4mm, preferably nylon) 2x M3 heat-set insert. (3x5x4) Instructions
Install the M3 heat-set inserts into the 2 larger holes on the part. Remove the lowest 2 M3x35 screws from the front of the MiniAfterburner Attach the mount using 2 M3x40 screws in the same holes. attach the ADXL345 to the top of the mount, using m3 screws, ensure axes are oriented correctly.214 downloads
(0 reviews)0 comments
Submitted
-
AngryLED LED Mount
Simple LED-mount for [Lumentech LT3 profiles.](https://lumentec.eu/Aluminium-Eckig-LED-Profil-100cm-45-fuer-8-12mm-LED-Streifen-Profil-LT3-Abdeckung) Works with 8-12mm LED strips
v0.1 needs two M3x10 screws / set and T- or hammerhead nuts to mount on normal 2020 extrusions.
v1.0 "AngryLED" needs two M3x20 screws / set and T- or hammerhead nuts to mount on normal 2020 extrusions.
-> optimized cable path so that the cable goes into the extrusion nut
-> there is also a small version
170 downloads
(0 reviews)0 comments
Updated