Search the Community
Showing results for tags 'ercf'.
Found 8 results
-
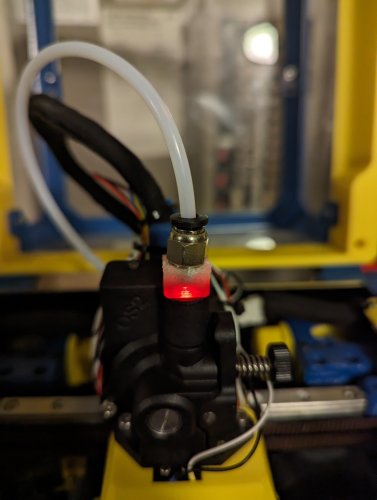
Initial setup of UART Jumpers on the ERCF Fly Board v1.1 Make sure that you install the jumpers as shown below or you will run into issues further down the line. Flashing klipper to the Mellow ERCF Fly Board v1.1 to use a USB connection. SSH into the Raspberry Pi On the Flyboard hold down the SW1 button and attach USB cable to Raspberry Pi (or other micro board) then let go of reset button. Type lsusb Look for ‘ID 2e8a:0003 Raspberry Pi RP2 Boot’ in the list of devices. If it is not present repeat the process. When you have confirmed that ‘ID 2e8a:0003 Raspberry Pi RP2 Boot’ do the following: cd ~/klipper make menuconfig Select the following options for a ‘USB’ (not CAN) connection to your printer. Make sure enable extra low-level options is selected. Exit & save make -j4 #This will compile the firmware for the ERCF Fly Board v1.1 make flash FLASH_DEVICE=2e8a:0003 #This will flash Klipper to the ERCF Fly Board v1.1 If successful it should look like the image below: Disconnect and reconnect the ERCF Fly Board v1.1 USB connection from your Raspberry Pi and reboot your Printers Host You can then move onto installing ERCF-Software-V3 "Happy Hare" by moggieuk Instructions here: moggieuk/ERCF-Software-V3: New software driver for ERCF control under Klipper (github.com) If your flashing was successful, you will be able to use the ‘Fystec ERB Burrows Board’ option throughout the install as it will detect the ‘Raspberry RP2040’ mcu. Use gpio(then the corresponding pin number) in your ercfhardware.cfg e.g. gpio20 for the endstop (P20) & gpio7 for the STEP pin on gear stepper (GPIO7) Note: adding a ‘!’ before gpio will change the movement direction. Hopefully that will help someone!
-
I have everything printed and wired, and am at the beginning of the process of setting up / configuring Happy-Hare 2.0 https://github.com/moggieuk/Happy-Hare https://github.com/FYSETC/FYSETC-ERB Issue #1 In mainsail (which is fully updated), when I run MMU_CALIBRATE_SELECTOR it says the following: You configued your MMU for 6 gates but I counted 5! Please update `mmu_num_gates` Maximum selector movement is 116.5mm Measuring the full selector length... Searching for end of selector... (up to 148.4mm) Measuring the selector position for gate #0... Auto calibrating the selector. Excuse the whizz, bang, buzz, clicks... mmu_calibrate_selector I have the following in mmu_parameters.cfg mmu_vendor: ERCF # MMU family mmu_version: 2.0 # MMU hardware version number (add mod suffix documented above) mmu_num_gates: 6 # Number of selector gates Issue #2 When I run mmu_encoder, it always says Encoder position: 0.0 Clog/Runout detection: Automatic (Detection length: 15.0) Trigger headroom: 20.0 (Minimum observed: 15.0) Flowrate: 0 % What troubleshooting steps do I need to do?
-

Version 1.0.0
6 downloads
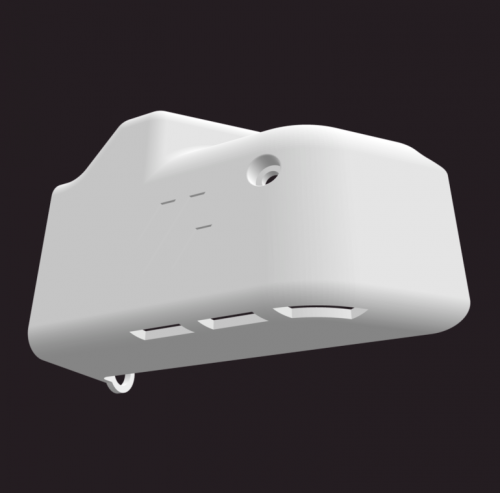
I created this file, because the original Orbiter Sensor light guide does not hold the PTFE in place sufficiently to my taste. PC4-M10 connector for Orbiter Sensor. Print upside down, no suports needed. I used transparent ABS, but light colored ABS will also work. Use M10x1.25 tap to clean up threads Plug in and enjoy! -
Thought I may do a separate diary for those that wish to follow along.
-

Version 29.12.22
1,073 downloads
Burst from Discord Voron asked my if I can do an update of my old "HEPA + activated carbon Air filter mod" for his new machine: he wanted wiring for CanBus and ERCF I made it and added some "stealth" to it. Work in progress... This is based on Fanny Pack Air Filter. I dont know who made it originally.- 10 comments
-
- 17
-

-

-
 I have searched the web and cannot find the assembly Manual for the Enraged Rabbit Carrot Feeder multi-filament mod. (ERCF)
 -
Version 2021.10.10
260 downloads
Afterburner Toolhead Cover - Clockwork-
- 1
-
-
- afterburner
- clockwork
- (and 3 more)