Jump to content

15 Screenshots

  • Like 21
  • Voron FTW! 14
  • Thanks 2

Recommended Comments


1 hour ago, atrushing said:

Here is a mockup of how the Mini SB would sit on the Ender 6 carriage to maintain the same Z distance to the build plate:2022-11-28-113906_1920x1054_scrot.png.6100fd488d8119c29818e96941fb6020.png

The top of the Mini SB is 20mm higher than the metal plate. It would also sit at least 15mm further forward than the stock hotend. I don't know if that would affect the Y travel or if the build plate could be adjusted to maintain the same build volume. The green body is a model I found for using the Orbiter 1.5 on the Ender 6.

2022-11-28-114807_1920x1054_scrot.thumb.png.9e6112de4f548ab40847c9db8210711c.png


I can't tell how much I appreciate your mockup! Thanks a ton!
It's way better then what I had in mind (not CAD) and makes my day!

The Y and Z travel shouldn't be too much of an issue:
In Y there should be enough space in front of the printer (although I need to doublecheck) and I might just loose some mm in the back.
In Z the Ender 6 offers a massive 400mm build height/volume which I'll likely never be fully using or needing. So I will consider to mount the Mini SB a little lower and gain some space on top. But that's something to look at again when I have all the components at hand and the Mini SB "body" parts printed.

Speaking of priting:
Is PETG sufficient for printing the Mini SB parts? What material do you use/recommend?

Link to comment
Share on other sites
5 minutes ago, Rixi said:

Speaking of priting:
Is PETG sufficient for printing the Mini SB parts? What material do you use/recommend?

The model was designed with ABS/ASA in mind. It should print fine in PETG but since it looks like you are enclosing your printer then PETG will not handle the increased chamber temperatures for long at all.

11 minutes ago, Rixi said:

I can't tell how much I appreciate your mockup!

Glad to help! The only hard part was finding a decent model of the Ender 6 toolhead. Blender makes it easy to import shapes and get them positioned.

Link to comment
Share on other sites
2 hours ago, Rixi said:

The Y and Z travel shouldn't be too much of an issue:
In Y there should be enough space in front of the printer

It looks like it will be closer to a 30mm Y offset. The red part is what a minimal mount might look like. I left out the stepper motor before.

2022-11-28-153459_1920x1054_scrot.thumb.png.c6571f42d8f60544ffc0b04d5818ce4f.png

Link to comment
Share on other sites

Hi,

Thanks for the update.That's acutally more like what I expected. I didn't realize that the stepper motor was missing in your first mockup.

I don't care that much about loosing Y size/travel. But when mounting the Mini SB that far away from the metal plate, I would be afraid that it would cause the whole thing to shake/vibrate more on higher speeds.

I guess it would make more sense to turn the Orbiter 90° or even 180° to allow the toolhead to be mounted closer to the metal plate. But that would never fit inside the Mini SB 😢

Link to comment
Share on other sites
2 hours ago, Rixi said:

I didn't realize that the stepper motor was missing in your first mockup.

I didn't either!

2 hours ago, Rixi said:

I guess it would make more sense to turn the Orbiter 90° or even 180° to allow the toolhead to be mounted closer to the metal plate.

The link I provided earlier did just that. But the heaviest part of the toolhead is the stepper and by turning the extruder around it moves the center of gravity further from the x-carriage.

Below you can see that there is room to make the adapter block more substantial. It ends up measuring 28mm in the Y axis but 54mm tall and 58mm wide. If you use standard Voron part print settings that would be pretty substantial. Also the stepper stays close to the carriage. You could even use longer screws to better secure the Mini SB to the carriage. The screws shown are M3x50.

2022-11-28-222903_1920x1054_scrot.thumb.png.b9353e3be77758d1051650f32eb70763.png

Here is a side view of the Trident/V2.4 and the V0.1 toolhead mounting for comparison..

2022-11-28-221239_1920x1054_scrot.thumb.png.f7959e3fbe19d03a6b1acf7d84eae275.png

And the full size Stealthburner!

2022-11-28-222154_1920x1054_scrot.thumb.png.21ea3220c6587a1138459c59860756bd.png

Edited by atrushing
  • Like 1
Link to comment
Share on other sites

Hi again,
I'm impressed how you post these different screenshots "like it's nothing".


1 hour ago, atrushing said:

But the heaviest part of the toolhead is the stepper and by turning the extruder around it moves the center of gravity further from the x-carriage.

That's a good point!
What do you think about turning it 90° to have the stepper facing sideways and the filament changing lever to the back?

As I have no experience with the Orbiter until now: How relevant is it to have "full access" to the filament changing lever? By full access I mean to be able to take out the setscrew and "open" the lever to see the drive gears?

Link to comment
Share on other sites
15 minutes ago, Rixi said:

I'm impressed how you post these different screenshots "like it's nothing".

Thanks, I have a habit of modeling all of my ideas so I have a decent 3D library of components at hand to move around and test fitment. Especially regarding the Mini SB.

19 minutes ago, Rixi said:

What do you think about turning it 90° to have the stepper facing sideways

You still have an offset issue with the Orbiter sideways. On the latch side it is 31mm and 28mm on the other side.

2022-11-29-002431_1920x1054_scrot.png.a1e076baf68a0198f22121cef4fa9913.png

Having access to the filament drive gears isn't very important until you get jammed or stripping filament. And that is exactly when you don't want to have to take everything apart.

I can try to do a rough job modeling the red adapter in the earlier post so you can print it and see how it looks. The official Stealthburner sticks out 16mm further in the Y axis weighs about 110g more than the Mini SB and people are reaching some crazy speeds with them.

Link to comment
Share on other sites
50 minutes ago, Rixi said:

I'm impressed how you post these different screenshots "like it's nothing".

A master at work - can only admire the effort. Thank you @atrushing

  • Like 1
  • Thanks 1
Link to comment
Share on other sites
12 minutes ago, Buurman said:

I second that! I admire the information and effort!!!! Thanks!

I ran out of reactions for the day.. Thanks for the kind words!

  • Like 3
Link to comment
Share on other sites
On 11/28/2022 at 7:32 PM, Rixi said:

But when mounting the Mini SB that far away from the metal plate, I would be afraid that it would cause the whole thing to shake/vibrate more on higher speeds.

I have worked up a simple mounting plate the the Mini SB that should fit on the Ender 6 carriage plate and provide a stable connection. I included all of the holes on the Ender plate in my geometry but I can't verify how accurate the .stl files I have been working from are. I've included my .stl so you can print it and see if it could work for you. At least it will give you a better idea of how you might get it all fitting.

2022-12-01-134147_1920x1054_scrot.thumb.png.094d989b8fc3ca29bfb7e554e01b91f8.png

Mini_SB_Orb2.0_Ender_6_Mount.stl

  • Like 1
Link to comment
Share on other sites

Thank's a ton! 💚

You really don't give me any chance NOT to try your mount 😉

Unfortunately I already know it will take me a while to do it, since my time speding on printing and modding the printer is VERY limited these days...
However, I will for sure provide my feedback and photos here, as soon as I got it mounted and running!


  • Like 1
Link to comment
Share on other sites
1 hour ago, Rixi said:

You really don't give me any chance NOT to try your mount 😉

Sorry if I'm a bad influence 😉

It would be very interesting if this could be compatible with the Ender and once I find a challenge I have to give it a proper attempt.

Link to comment
Share on other sites
10 hours ago, ConnectionPrblm said:

How is cooling compared to the mini afterburner?

I was trying to test the airflow of the blowers but my anemometer died on me.. I guess I'll take the "trust the specs" approach.

So, the Mini Afterburner uses 3010 blowers and the Mini Stealth uses 4010 blowers. kb-3d.com shows the specs for the two different size blowers as 1.8 CFM and 3.62 CFM respectively. This suggests that the 4010 blowers give twice as much air flow as the 3010 blowers!

2022-12-13-092203_955x1048_scrot.png.7ce4acc53af370156db40821f91be47e.png

2022-12-13-092207_955x1048_scrot.png.8a0edf55a497df9031018b7abe48d682.png

  • Like 1
Link to comment
Share on other sites

They also show their 5015 blower providing 4.8 CFM air volume. So, on paper, comparing the Stealthburner with a single 5015 blower (4.8 CFM) to the Mini SB having two 4010 blowers (3.62*2 = 7.24 CFM) is pretty promising as well.

2022-12-13-093753_955x1048_scrot.png.3e36c697345b9d272bfeb0421ba7c044.png

  • Like 1
Link to comment
Share on other sites
On 11/28/2022 at 3:55 PM, atrushing said:

It looks like it will be closer to a 30mm Y offset. The red part is what a minimal mount might look like. I left out the stepper motor before.

2022-11-28-153459_1920x1054_scrot.thumb.png.c6571f42d8f60544ffc0b04d5818ce4f.png

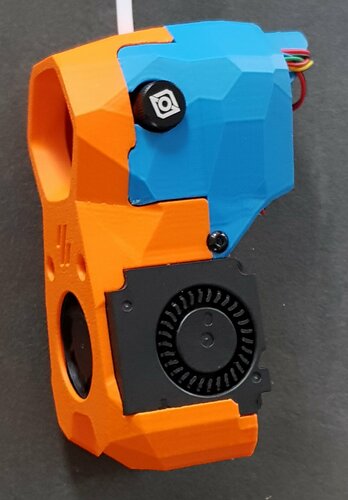
Finally: The Ender 6 Mount is printing at the moment 😀
I needed to do it in PETG for the moment, but will upgrade to ASA/ABS later.

The next step will be printing the Mini SB itself. I saw there are different file versions:
[a]_Mini_Stlb_Orbiter_2.0_Dragon_alt_ducts_main_body.stl
[a]_Mini_Stlb_Orbiter_2.0_Dragon_minimal_main_body.stl
[a]_Mini_Stlb_Orbiter_2.0_Dragon_minimal_alt_ducts_main_body.stl
[a]_Mini_Stlb_Orbiter_2.0_Dragon_main_body_.stl

...and found this description in the Details section:

Quote

The part cooling ducts of the original file act as a simple air dump similar to the mini-Afterburner. The 'alt_ducts' version is based on the Stealthburner ducts and provides a more restrictive but targeted airflow. This seems to give better cooling but I have not done any meaningful testing yet.

The 'minimal' version does not need the 'motor_bridge' or 'filament_lever' and gives finger access to the latch of the Orbiter 2.0.

Any recommendation which version I should choose?

Thank you,
Rixi

Edited by Rixi
  • Like 1
Link to comment
Share on other sites
14 minutes ago, Rixi said:

Already decided for and printing now the [a]_Mini_Stlb_Orbiter_2.0_Dragon_minimal_alt_ducts_main_body.stl

Yeah, I would suggest the alt-ducts version. It does really seem to give better cooling. I like to use the filament release lever but the minimal gives more access to the idler latch. Also, if you use the load/unload routines then you rarely need to touch the filament latch or lever.

I'm looking forward to see how this works for you!

Link to comment
Share on other sites

After two printing attempts failed (warping -> detached from bed) I'm now printing it with a brim 🤬

Any idea how I could attach my bltouch to this setup?
I was already looking into building a Klicky, but keeping the bltouch would make it easier for the moment.

Link to comment
Share on other sites
1 hour ago, Rixi said:

After two printing attempts failed (warping -> detached from bed) I'm now printing it with a brim 🤬

Any idea how I could attach my bltouch to this setup?
I was already looking into building a Klicky, but keeping the bltouch would make it easier for the moment.

Good luck with the warping. I had a roll of Ice Filament PLA that had the worst adhesion and warping I have seen yet. It can get very frustrating..

It looks like there should be enough room on the side of the adapter/mount to add tabs for mounting a BL-Touch. I can take a closer look tomorrow.

Link to comment
Share on other sites

Join the conversation

You can post now and register later. If you have an account, sign in now to post with your account.

Guest
Add a comment...

×   Pasted as rich text.   Paste as plain text instead

  Only 75 emoji are allowed.

×   Your link has been automatically embedded.   Display as a link instead

×   Your previous content has been restored.   Clear editor

×   You cannot paste images directly. Upload or insert images from URL.


User Feedback

×
×
  • Create New...