Search the Community
Showing results for tags 'clockwork2'.
Found 3 results
-

Version 1.0.0
937 downloads
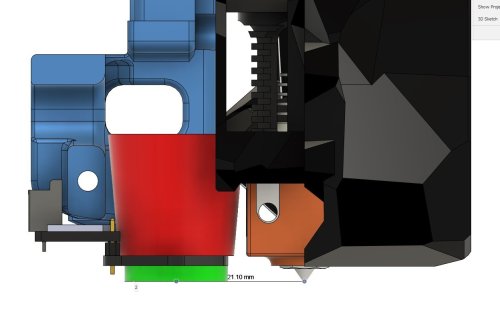
I've made a mount for the Beacon3D probe for a CW2 Switchwire I used the normal version beacon probe Mount has been tested and works great, here is a youtube short of it in action *** I've added a second mount as that moved the probe 2mm further away I wasn't happy with the original mount because as soon as the carriage got a bit melted the probe would start touching the heat block. I also believe because the probe is so close to the heater it causes the mount the deform.- 15 comments
-
- 6
-

-
- switchwire
- clockwork2
- (and 3 more)
-

Version 1.0.0
2,960 downloads
I've made some alternative beacon mounts for myself that i'll share I wasn't happy with the original mount because as soon as the carriage got a bit melted the probe would start touching the heat block (see attached photo). I also believe because the probe is so close to the heater it causes the mount the deform. I've made a mount that sits the probe back 2mm from the original but I have not tested this one, this brings me the other other mount I made. The second mount is specific to a Dragon hotend that is rotated 180°. I did this to be able to see the nozzle better and it's now possible as there is no more probe in the way of achieving this. So far it's working well for me I've printed my parts out of PCCF so if anyone can report their findings with an ABS mount that would be great but moving the probe should have done the trick. The original beacon mount from annex can be found here if you were looking for that: https://github.com/Annex-Engineering/Annex-Engineering_User_Mods/tree/main/Printers/Non_Annex_Printers/VORON_Printers/VORON_V2dot4/annex_dev-stealthburner_beacon_x_carriage- 5 comments
- 1 review
-
- 8
-
-

-
- voron
- clockwork2
- (and 3 more)
-
Version 1.1.0
570 downloads
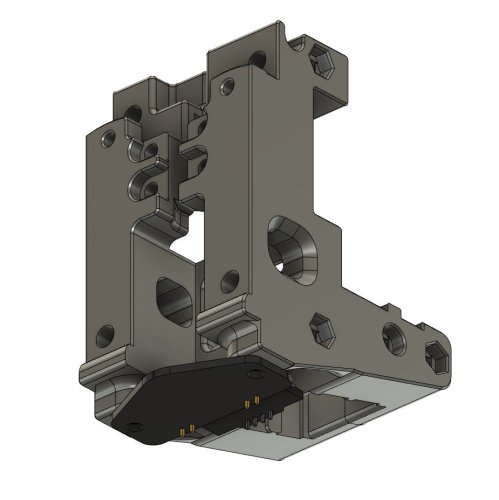
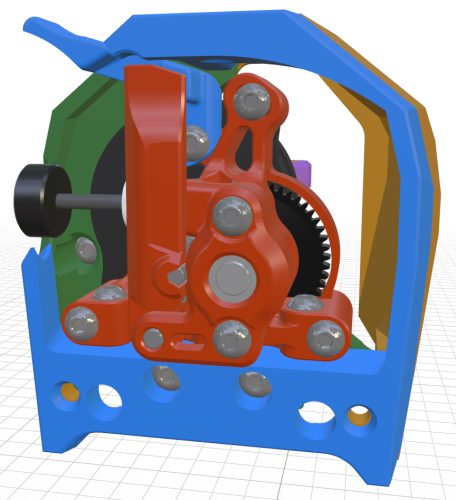
This remix of the Sherpa Micro extruder uses the RIDGA gears from a Vz Hextrudort. Other than using 'twirl' gears, they are also 5mm shorter than the standard Bondtech gears which solves the collision that a stock Sherpa has with the 5015 blower in a Stealthburner. I mirrored the extruder about the Y axis to put the tensioning screw on the left side and added a filament release lever since the idler_arm is not accessible when installed in a Steathburner. This requires a modified idler_arm for ridgidity. I have also added a shield over the 50t gear to protect the toolhead wiring. This design fits the official Stealthburner_main_body as well as the official cable_door. The cable chain mounts were adjusted to clear the stepper motor but otherwise remain stock. Below is a list of the hardware that differs from a standard Stealthburner CW2 install. 1 - Mellow CNC Vz HextrudORT drive gears Set 7 2 - M3x25 screws below extruder (from the front) 1 - M2x10 self tapping screw at the top (from behind) 2 - M3x12 screws to secure extruder 1 - M3x10 screw to attach filament release lever The Sherpa Micro Vz RIDGA will need some basic components from a BMG Dual Drive kit. 2 - MR85 bearings 1 - Thumbscrew with tensioning spring and washer 2 - 3mm steel pins for idler_arm pivot and idler gear The included .blend file shows the complete CW2 assembly with hardware. You can select any part and press [H] to hide it. Pressing [Alt] + [H] shows everything again. Pressing [F2] while a part is selected brings up the Rename dialog so you can see the name of each component i.e. "M3x25_BHCS". I have included .stl files for building a standard Sherpa Micro, with standard BMG gears, but adding the filament_release_lever. The files added here are mirrored to put the tension screw on the left but can each be mirrored back in the slicer to match the official orientation. Below is a list of the parts required: 1 - Sherpa_Micro_VzRIDGA_Back_v1.1.stl 1 - Sherpa_Micro_Core_mirrored.stl (official geometry mirrored) 1 - Sherpa_Micro_VzRIDGA_Front.stl (official geometry mirrored) 1 - Sherpa_Micro_Idler_Arm_FR-Lever_mirrored.stl 1 - Sherpa_Micro_VzRIDGA_Filament_Release_Lever.stl The extruder parts are licensed under the Annex Engineering License and the Clockwork 2 parts are licensed under the GPL v3 License.- 3 comments
-
- 3
-
-
-
- stealthburner
- clockwork2
- (and 1 more)