Jump to content

15 Screenshots

  • Like 21
  • Voron FTW! 14
  • Thanks 2

Recommended Comments


45 minutes ago, Buurman said:

You started a revolution, now... looks like you need to lead! hahahahaha!

This is why I've just been a lurker for so long!

  • Like 1
Link to comment
Share on other sites
11 hours ago, mvdveer said:

Will send you a photo when I get back home later.

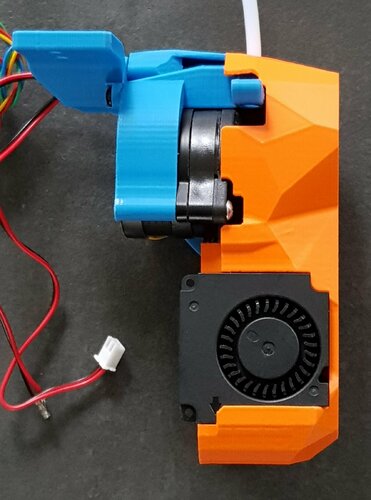
@Buurman Here is the photo - had to modify the ZeroClick probe by removing the top horizontal part. Used the existing screw hole to attach it to the cowling of the mini stealthburner. Just for safety, I actually "superglued" the piece in place. I'm just lazy or don't know enough CAD to design something better. But it works perfectly

image.thumb.jpeg.c50eb7ec4fcc7f1bffc873ebff27669e.jpeg


  • Like 1
  • Thanks 1
Link to comment
Share on other sites

Yeah, I can see how this is far from a good fit, maybe I try to make it fir better, I mean, a Voron without a Klicky (or one of its equals) is not a Voron 😛 


PS. I dont get the vision behind the shape of this rear mount... it doenst fit the mini afterburner too, so what does it fit?

I think som re-shaping is needed, possible on both parts, I think I will make the body part straight, so a heat insert can go in there. But how it is now, its not very close to a good fit, Im printing it now, maybe in reality its less bad...

image.png.9bb2e233a358f05affc5e3557f0b53db.png

Edited by Buurman
Link to comment
Share on other sites
17 minutes ago, Buurman said:

Yeah, I can see how this is far from a good fit

I think I can work up something that would use the screw hole in the fan and get the front face to fit better with the mini-sb shroud.

2022-11-01-115357_1920x1054_scrot.png.083a234402181cd254dd8248f217d194.png

If you are willing to use superglue then it could fit without adding a screw hole behind the part cooling ducts and reprinting the whole thing.

  • Thanks 1
Link to comment
Share on other sites
12 minutes ago, atrushing said:

I think I can work up something that would use the screw hole in the fan and get the front face to fit better with the mini-sb shroud.

2022-11-01-115357_1920x1054_scrot.png.083a234402181cd254dd8248f217d194.png

If you are willing to use superglue then it could fit without adding a screw hole behind the part cooling ducts and reprinting the whole thing.

Im more of a heated gluegun guy hahahaha, but yes, im willing to experiment for sure.

But I think a heat insert in the bottom corner in the future would be awesome, especially in combination with the fan corner.


But if you can work something out for now.. cool cool cool cool cool...

Edited by Buurman
Link to comment
Share on other sites
5 hours ago, Buurman said:

Im more of a heated gluegun guy hahahaha, but yes, im willing to experiment for sure.

Here is what I've come up with. With a M2x10 screw it holds very well. I don't know how much force the magnets apply while docking the probe, but the glue (hot or super) might not even be needed.

20221101_192408.thumb.jpg.1a73f6c1573205ac143f5c95c985cbe4.jpg

When I get some time, I will re-work the shroud to fit the second screw. For now, I hope this lets you get your build finished.

ZeroClick_Mount_Mini_Stlb.stl

  • Thanks 3
Link to comment
Share on other sites
19 minutes ago, Selcuk said:


When will you release LG X Lite mod.

It is almost finished. I am exporting the .stl files and working up the assembly instructions right now.

Link to comment
Share on other sites
1 hour ago, atrushing said:

Here is what I've come up with.

Wonderful - on to printing a new shroud, seeing I have to change LEDs as well. Soon I'll have as many mini Stealthburners as you (Hahahaha)

  • Like 1
Link to comment
Share on other sites
9 hours ago, Buurman said:

it doenst fit the mini afterburner too, so what does it fit?

You have to cut the corner of the mini afterburner at an angle then it secures with two screws. Actually fits well but it means cutting the bottom corner of the mini afterburner

Link to comment
Share on other sites
21 minutes ago, mvdveer said:

on to printing a new shroud

I haven't made any changes to the shroud yet. The ZeroClick_mount will only fit on the alt_duct versions for now though.

  • Thanks 1
Link to comment
Share on other sites

Im having a extreme difficult task getting the LED's in their slots, broke off one part even, but I can glue it I hope.

Maybe its my led's that are a bit larger? been using these for the normal SB without issues, and they are originals.

@mvdveer how did this go for you?


EDIT: Never mind, last one did go easy, maybe first ones had thick soldering or something...

Edited by Buurman
Link to comment
Share on other sites
16 hours ago, atrushing said:

Here is what I've come up with. With a M2x10 screw it holds very well. I don't know how much force the magnets apply while docking the probe, but the glue (hot or super) might not even be needed.

20221101_192408.thumb.jpg.1a73f6c1573205ac143f5c95c985cbe4.jpg

When I get some time, I will re-work the shroud to fit the second screw. For now, I hope this lets you get your build finished.

ZeroClick_Mount_Mini_Stlb.stl 176.55 kB · 3 downloads

Printed and fitted... omg.. you are a GOD! perfect!

  • Like 1
Link to comment
Share on other sites
1 hour ago, Buurman said:

Im having a extreme difficult task getting the LED's in their slots, broke off one part even, but I can glue it I hope.

Maybe its my led's that are a bit larger? been using these for the normal SB without issues, and they are originals.

@mvdveer how did this go for you?


EDIT: Never mind, last one did go easy, maybe first ones had thick soldering or something...

Yeah, they are a snug fit. I like to use a fine diamond file to get rid of the sharp breakaway bits from the LCD PCB. I also use a sharp knife to get rid of any droops in each of the LED pockets.

20221102_134408.thumb.jpg.4ec11511ee7670c99524280551b97d2a.jpg

20221102_134637.thumb.jpg.02bac70ae969f8bfab79491040cb1357.jpg

And I usually use a pair of needle nose pliers to (as gently as possible) pinch them down into place.

Edited by atrushing
  • Like 1
Link to comment
Share on other sites
1 hour ago, Buurman said:

Printed and fitted... omg.. you are a GOD! perfect!

Glad it worked on the first try!

I will have to make sure that I don't let this praise go to my head too much 😉

  • Like 1
  • Haha 1
Link to comment
Share on other sites
27 minutes ago, Buurman said:

20221102_123509634_iOS.jpg

I didn't realize that the ZeroClick pickup had wires running to it. That really gets busy!

I will try to check if I can add a wire path or two on that piece.

Link to comment
Share on other sites
3 hours ago, atrushing said:

I will try to check if I can add a wire path or two on that piec

I was also a bit surprised that, but if you dont use the screw (self tapping) then a hole would be possible.

I like the screw, it brought much strength to it, since the probe gets picked up by X movement, it gets pulled of by a Y movement, i think it coudnt handle that with just glue. hence, the screw.

There is some space between the SB and the zeroclick,, if I tighten it all the way, its not "horizontal" anymore. So the zeroclick can be a little thicker imo.

  • Like 1
Link to comment
Share on other sites

Fitted the mini SB to make adjustments and prepare for when my Orbiter arrives..

Two things I notice.

1. I think 2 screws to the backplate alone isnt enough, its easy to "wobble" hotend and all.. I dont know if this is also the case on the original, so I have no comparison. EDIT: I applied some more strength to the baseplate screws, and its a bit less now, still there, not sure if it will show up in the prints since its "light" and less eager to wobble. So lets see! It looks so awesome, so, I just hope it just printing as well....

2. The Zeroclick mount is just a little short, and then I mean, to the back, it cant reach the station right, my guess its about 2mm short, added a picture, I can edit the station and print that, or next mini SB (need to print it in a different color anyhow) has hopefully a v2 mount 😉 just trying to help 😄 

EDIT: looking at the picture and the size of the magnets, I think its 3 mm off. Deos this introduce more space for a wire hole? 😛 


20221102_212929562_iOS.jpg

Edited by Buurman
  • Voron FTW! 1
  • Thanks 1
Link to comment
Share on other sites
5 minutes ago, Buurman said:

The Zeroclick mount is just a little short

At least that is a pretty simple fix. Here is the stretched mount.

As far as the wobble, I know that there is flex in the plastic and when you touch the nozzle you have a lot of leverage against the rail so it doesn't take much force to move. It could also be movement of the MGN-7 carriage which is the problem the MGN-9 mod aims to fix. I have this installed on three printers and haven't had print quality issues. Please let me know how it goes as you get to calibrating your printer.

ZeroClick_Mount_Mini_Stlb_ver0.2.stl

Link to comment
Share on other sites
11 hours ago, Buurman said:

how did this go for you?

@Buurman Damaged the LEDS by trying to file them to fit. Awaiting another delivery then I'll try again. Inserted the LED's with force without breaking the cowling but that must have damaged the LED drivers on the side of the actual LED.  @atrushing mentioned he damaged a few during his prototyping as well. I think because all printers are different and may print with a 0.1mm tolerance, this is enough to cause the tight fit. I tried filing the slots where they sit a bit bigger but difficult getting in there with any kind of tool. Will revisit this when I get my hands on the next batch of LEDS.

https://www.aliexpress.com/item/1005002657432751.html?spm=a2g0o.order_list.0.0.7c501802rHtmFj

Expecting them early next week

Link to comment
Share on other sites

Join the conversation

You can post now and register later. If you have an account, sign in now to post with your account.

Guest
Add a comment...

×   Pasted as rich text.   Paste as plain text instead

  Only 75 emoji are allowed.

×   Your link has been automatically embedded.   Display as a link instead

×   Your previous content has been restored.   Clear editor

×   You cannot paste images directly. Upload or insert images from URL.


User Feedback

×
×
  • Create New...