Search the Community
Showing results for tags 'voron 0.1'.
Found 5 results
-

Version 1.0.0
53 downloads
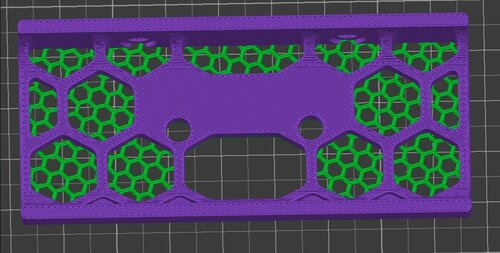
I modified this v0 trident skirt file found here here on GitHub to have a sub-component that can be easily sliced into a mesh. I'm certain that the printable mount from the aforementioned page can be modified and adapted independently to attach other displays to this skirt. I made this for another user, but im posting it so that others don't have to put in as much effort as I did going forward. To make this .STL do the mesh thing, drop it into superslicer, right-click the part, hover over the "split" option in the menu, then select "split into parts". when you do this, the part will be split into two merged parts in your parts list view in the slicer. Select the flat solid skirt cover part in the list, right click the selected part and click "Perimeters & Shell" and "infill". Set the number of top and bottom solid layers to 0. I like to make the perimeter count 2. Screenshots from slicer are in the Spoiler below if you want visual help. I used Honeycomb infill at 23% density and a filament swap at layer 4 to get the result in the IRL photo here. I recommend playing around with the infill settings a bit because you can get some really cool results. Gyroid and rectilinear infills make pretty neat meshes at higher densities (30%-50%). More visual examples are in the spoiler below. The rest of the v0.2 skirts with pre-prepared meshes can be found here. One-Part side skirts with pre-prepared meshes can be found here, posted as the "closed" variants of the STLs. I followed this video tutorial to make this from the provided STEP file on the previously mentioned/linked printables page. The printables file that I modified was derived from golas's v0 trident skirt remix -
Version 4.2.2022
1,713 downloads
DooMini This is Voron 0.1 mod that improves the insulation of the printer by using double glazed panels and minimal hardware. The New planes help you print full bed size ABS without ever worrying about warping. I get almost 60c chamber temperature with DooMini. (The temperatures are measured at the base of the chamber which is usually the coldest area). Almost forgot ... it looks way Cooler For All STL file as we as manual and instructions visit https://github.com/TigranDesigner/Voron-Mods/tree/main/DooMini or download directly here.- 8 comments
-
- 12
-

-

-

-
Version 1.0.1
159 downloads
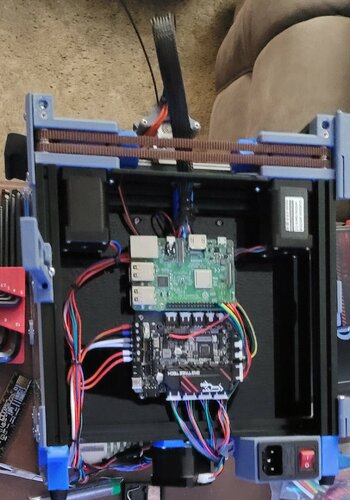
I created Mount that combines the BTT Pico and Pi that mounts to the back frame using the existing holes in the back panel. Also, a lot of the wiring can be managed under the pi as I lifted it from the back panel. I added photo's of my electronics layout in my v0.1 . -

Version 1.0.0
184 downloads
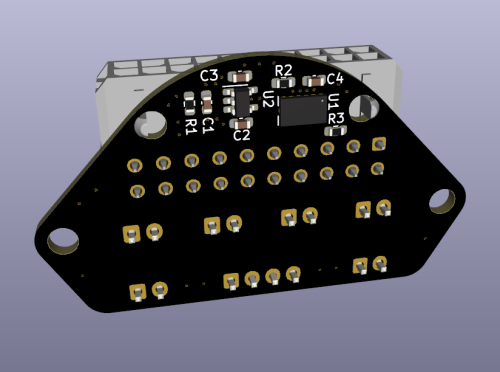
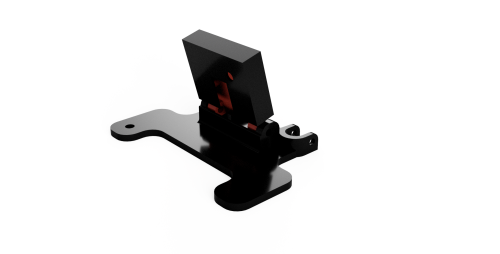
The Voron-0 Umbilical is a well known and very useful addition to your 3D Printer, originally created by GitHub user timmit99 and can be found in the official Voron-Hardware repository here. In this new 'Plus' version, I have added a permanent ADXL345 Accelerometer to the Toolhead board, to make input shaper tuning (and possibly other interesting use-cases) more accessible to users. The Molex MicroFit connector was changed from a 14-pin to 20-pin version to acommodate the additional wires for the ADXL345. The Toolhead PCB can be ordered pre-assembled from JLCPCB (using the included CPL and BOM file) so you do not have to solder the delicate electronics yourself, just the connectors (as you need to do with the original V0-Umbilical). You can find a full README and Photos/CAD/Design data at my github repository: https://github.com/skuep/V0-Umbilical-Plus Frame PCB BOM Part Quantity Notes LCSC Part Number Link 20 Pin Socket 1 MOLEX 430452012 C485575 https://www.lcsc.com/product-detail/Wire-To-Board-Wire-To-Wire-Connector_MOLEX-430452012_C485575.html SMD Thermistor 1 100K 0805 Thermistor C143680 https://lcsc.com/product-detail/NTC-Thermistors_Vishay-Intertech-NTCS0805E3104FXT_C143680.html 2 pin JST XH 5 2.5mm pitch C158012 https://lcsc.com/product-detail/Wire-To-Board-Wire-To-Wire-Connector_JST-Sales-America-B2B-XH-A-LF-SN_C158012.html 3 pin JST XH 2 2.5mm pitch C144394 https://lcsc.com/product-detail/Wire-To-Board-Wire-To-Wire-Connector_JST-Sales-America-B3B-XH-A-LF-SN_C144394.html 4 pin JST XH 3 2.5mm pitch C144395 https://lcsc.com/product-detail/Wire-To-Board-Wire-To-Wire-Connector_JST-Sales-America-B4B-XH-A-LF-SN_C144395.html 6 pin JST XH 1 2.5mm pitch C144397 https://www.lcsc.com/product-detail/Wire-To-Board-Wire-To-Wire-Connector_JST-Sales-America_B6B-XH-A-LF-SN_JST-Sales-America-B6B-XH-A-LF-SN_C144397.html Screw Terminal 1 5.08mm pitch C8465 https://lcsc.com/product-detail/Screw-terminal_Ningbo-Kangnex-Elec-WJ500V-5-08-2P_C8465.html Optional Parts Part Quantity Notes LCSC Part Number Link 0805 10uF Capacitor 3 Use if using BARE neopixel IC's. Strips have these already. C17024 https://lcsc.com/product-detail/Multilayer-Ceramic-Capacitors-MLCC-SMD-SMT_Samsung-Electro-Mechanics-CL21A106KPFNNNE_C17024.html Toolhead PCB BOM Part Quantity Notes LCSC Part Number Link 20 Pin Socket (Right Angle) 1 Molex 430452000 C485576 https://www.lcsc.com/product-detail/Wire-To-Board-Wire-To-Wire-Connector_MOLEX-430452000_C485576.html 2 pin JST XH 6 B2B-XH C158012 https://lcsc.com/product-detail/Wire-To-Board-Wire-To-Wire-Connector_JST-Sales-America-B2B-XH-A-LF-SN_C158012.html 4 pin JST XH 1 B4B-XH C144395 https://lcsc.com/product-detail/Wire-To-Board-Wire-To-Wire-Connector_JST-Sales-America-B4B-XH-A-LF-SN_C144395.html LP2985-33DBVR 1 3.3V LDO C95414 https://www.lcsc.com/product-detail/Linear-Voltage-Regulators-LDO_Texas-Instruments-LP2985-33DBVR_C95414.html ADXL345BCCZ 1 Accelerometer C9667 https://www.lcsc.com/product-detail/Motion-Sensors-Accelerometers_Analog-Devices-ADXL345BCCZ-RL7_C9667.html 10 Ohm Resistor 2 0603 size C22859 https://www.lcsc.com/product-detail/Chip-Resistor-Surface-Mount_UNI-ROYAL-Uniroyal-Elec-0603WAF100JT5E_C22859.html 10 kOhm Resistor 1 0603 size C25804 https://www.lcsc.com/product-detail/Chip-Resistor-Surface-Mount_UNI-ROYAL-Uniroyal-Elec-0603WAF1002T5E_C25804.html 4.7uF Capacitor 2 0603 size C19666 https://www.lcsc.com/product-detail/Multilayer-Ceramic-Capacitors-MLCC-SMD-SMT_Samsung-Electro-Mechanics-CL10A475KO8NNNC_C19666.html 10nF Capacitor 2 0603 size C57112 https://lcsc.com/product-detail/Multilayer-Ceramic-Capacitors-MLCC-SMD-SMT_10nF-103-10-50V_C57112.html/?href=jlc-SMT Corresponding CPL and BOM files are included in the repository. Using these files you can easily get yourself a ready-made assembled PCB from JLCPCB so you don't have to have the skills to solder the fine-pitch and 0603 packages. Umbilical cable The Umbilical cable is a 220-240mm dual ended 20P (2x10) microfit cable. The connectors are wired 1:1 so pin 1 connects to pin 1 and so forth for all 20 pins. Cable BOM Part Quantity Notes LCSC Part Number Link 20 Pin Plug 2 Molex 430252000 C485324 https://lcsc.com/product-detail/Connectors-Housings_MOLEX-430252000_C485324.html Crimps 20 AWG 12 Molex 430300001/430300007 C259786 https://lcsc.com/product-detail/Line-Pressing-Terminals_MOLEX-430300001_C259786.html Crimps 26 AWG 28 Molex 430300004/430300010 C259765 https://lcsc.com/product-detail/Line-Pressing-Terminals_MOLEX-430300004_C259765.html 20AWG Wire 12 220mm Sections PTFE/Silicone/Hefulon for motion rated, PVC could work since it isn't constraind to a cable chain 26AWG Wire 28 MicroFit connectors support two different ranges of conductor thickness using different wire crimp ferrules. I recommend that you realize the stepper motor and heater wires with 20AWG wire (0.5mm²) and the remaining wires in 26AWG wire (0.14mm²) to save on weight and accelerated mass. Hints and Remarks Extruder Stepper Direction The umbilical cable reverses the stepper rotation direction. I.e. you need to invert the DIR pin of the extruder motor in your printer.cfg file. [extruder] .... dir_pin: PB4 # Add ! (or remove ! if already there) before 'PB4' .... Mounting the Toolhead PCB The umbilical toolhead PCB uses heat stake inserts in order to mount it to the motor screws. In some cases (i.e. LDO motors), the extruder motor already has an additional thread, which has to be either removed by drilling the motor holes with a 3mm spiral drill. If you do not want to drill into the motor, you can use M3x10 captive screws, which are unfortunately hard to find. These screws have a narrowed section and a short thread at the tip so they only 'grab' the thread of the heat stake inserts. Additional chamber thermistor on SKR mini V2.0 If you are using the SKR mini V2.0 board and you want to connect the chamber thermistor, you can use Timmit99's expansion board (https://github.com/VoronDesign/Voron-Hardware/tree/master/SKR-Mini_TFT_Thermistor_Board). If you want an easier and faster solution, you can move the Z-STOP endswitch pin and connect it the E0-STOP pin using a simple self-made JST 2-pin to 3-pin adapter (See Photos folder) or by removing the crimp pins from the 2-pin JST and insert them into the housing of a 3-pin JST header. Once the Z-STOP pin is freed up, you can use it for your thermistor. This method needs the following printer.cfg changes: [stepper_z] ... endstop_pin: ^PC15 # Conversion for additional thermistor (use E0-STOP for Z-STOP) ... [temperature_sensor chamber] sensor_type: Generic 3950 sensor_pin: PC2 gcode_id: C pullup_resistor: 10000 Connecting the ADXL345 to a Raspberry Pi The ADXL345 circuit on the toolhead PCB includes a R-C filter and a 3.3V low-dropout regulator to deliver a clean power supply. Thus you can use the official drawings shown in the corresponding docs (https://www.klipper3d.org/Measuring_Resonances.html), with one small change. You need to connect VCC to +5V (Pin 2 or Pin 4) instead of 3.3V (Pin 1) on the Raspberry Pi extension header (See Photos folder). Then follow the official docs for setting the resonance measurement up. -
Version 1.0.0
260 downloads
A webcam mount for Voron 0.1. Not the best position for a cam but while printing it does its job and it isn't attached to the tophat. It also requires no long cable. You need the following parts: - 4x M3 8mm screws - 4x M2 6mm screws - 2x Zipties OR 2x M3 15mm screws.


.thumb.jpg.1e67bb19045c04050d6d61c111a85fd2.jpg)