Search the Community
Showing results for tags 'tools'.
Found 5 results
-
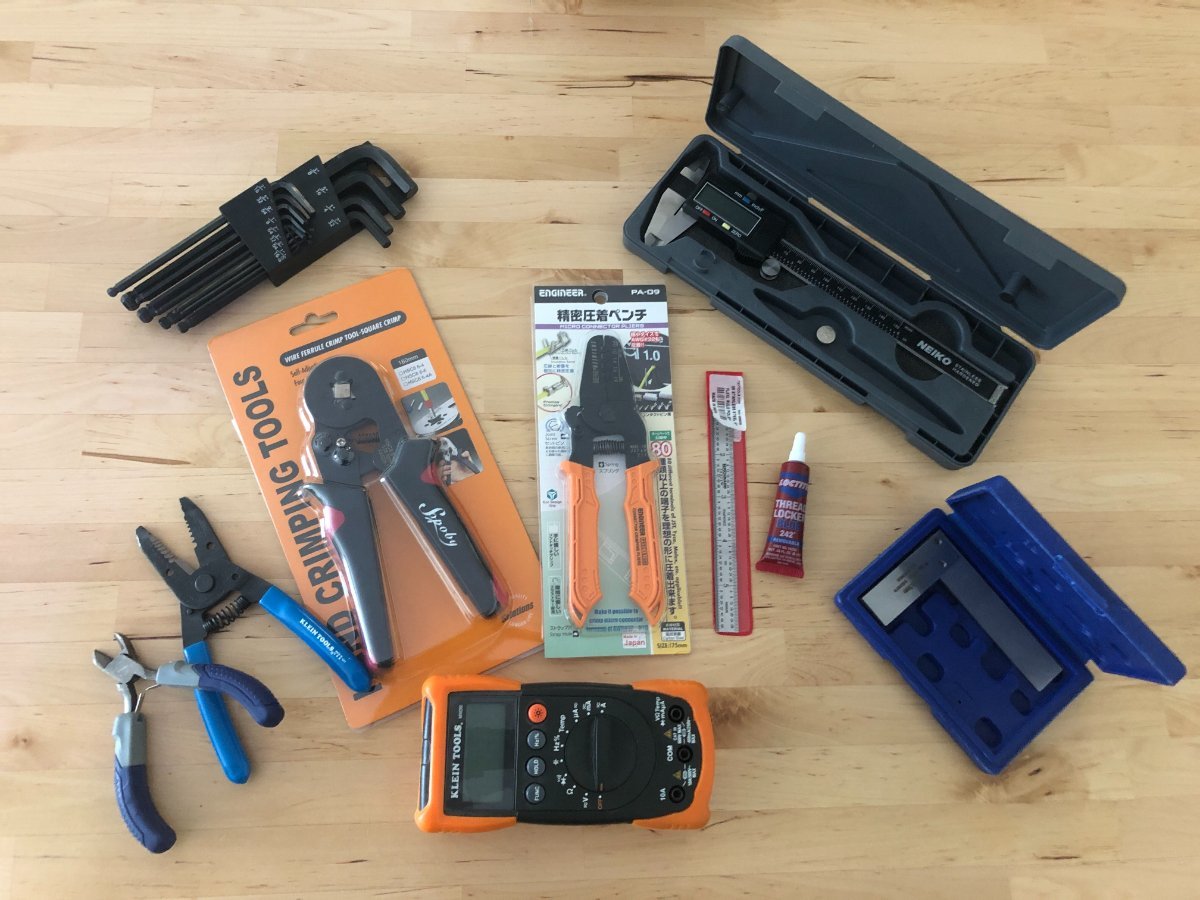
Same Thread: Updated for 2023! Researching, purchasing the printer parts of the build list and waiting for parts is only half of the battle. While many Voron builders have many of these tools on hand, and we hop most have familiarity with soldering, there are some tools that make the job MUCH easier, safer, and provide professional quality results. This is the Mega List for all the recommended or required tools for your Voron build. First and foremost, crimper are really important for your Voron build. With the amount of wiring required, you will thank yourself to invest in high quality crimping tools. Frequently users ask if tinning and soldering joints is an alternate option. While it may work short term, this is a much greater risk of the joint failing. Typically this is due to the stress of movement, or weakening from the heat created inside the enclosure and around the hot-end during printing. Wire Crimpers At least 1 Required Don't skimp if at all possible, the Voron build requires a bunch of crimping, this tool will last years! You will require at least one of these, if your doing only 1 build the 3220M will work - If you intend on doing anything more, the the general consensus in the community as a whole highly suggests the Engineer PA-09 as a great best value option. Molex Wire Crimper - $100 - Molex Wire Crimping Tool Engineer PA-09 - $55 - Molex Wire Crimper Tool <- Most Popular Option IWISS 3220M - $23 - Molex Wire Crimping Tool IWISS 2820M - $24 - Micro Connecter Crimping Tool IWISS SN-025 - Dupont Crimper Tool Ferrule Crimper Optional (This can be done with non-specific tools, but be prepared to damage end frequently, and spend time cutting and re-stripping wires) Ferrule Crimping Kit - $29 - Kit with ferrules and crimping tool Terminal Crimper Optional (This can be done with non-specific tools, but be prepared to damage end frequently, and spend time cutting and re-stripping wires - only 1 needed) IWISS 1442L - $33 - Open Barrel Terminal Crimping Tool Titan 11477 - $20 - Open Barrel Terminal Crimping Tool Wire Stripper At least 1 Required (Technically optional, but don't nick wires, or cut your thumb! ) For Voron Electronics and builds you will need a wire stripper capable of stripping 16-26 GA wire, make sure your stripper is capable of stripping thin 26 gauge wires. Engineer PA-07 - $26- Manual Wire Stripper Tool Ideal Industries 45-097 - $58 - Auto Wire Stripper Tool Screwdrivers / Allen Wrenches Allen Set and Screwdrivers are Required Metric Allen Wrench - $14 - Try to source with rounded tips, easier to reach some odd angles, from at least 1.5mm - 5mm Screwdriver "kit" - $14 - or small common screwdrivers Knippex Plier Wrench - $90 - Featured on "Steve builds", a fantastic tool! Soldering Iron / Heat Gun At least 1 Required A soldering iron is also required for the heatset inserts. Any soldering iron will work for the entire Voron build, you do not need to go overkill here. TS-100 - $72 - Portable Soldering Iron Solder Rework Station - $60 Great mid budget option for adjustable temps and a hot-air rework suitable for heat shrink duties Adjustable Iron - $15 Solder 6337 - $18 - Flux core solder Multi-Meter At least 1 required (Technically optional, but a multi-meter makes setup and troubleshooting MUCH easier! ) Fluke 117 - Professional Multimeter AstroAi - Basic Multimeter Measuring Tools Optional Metric Calipers - $15 Any Digital caliper should work Benchmark Tools 4666-06 - $7 - Machinists Scale A fancy accurate ruler, 6" or 12" Machinist Square - $13 Improves squaring up frames, don't drop this it could through it out of square! Specialty Tools Diagonal cutter required others optional Klein Tools D275-5 - $10 or Hakko-CHP-170 Micro Cutter - $8 - Diagonal Wire Cutter While the Klein tool is high quality, these are inexpensive and included with many commercial DIY printers 6" Mini Needle Nose Pliers - $9 Don't go overboard, just holding tiny parts where you fingers don't fit! Milwaukee 48-22-9215 4 PC Hook & Pick Set - $17 Great for managing and pushing wires and parts in tight spaces. Printable Tools Optional Nozzle Torque Wrench - https://www.thingiverse.com/thing:4738816 Tape Optional Kapton Tape - $8 - Optional, protects electronics for accidental shots, heat resistant Spectape ST501 - $15 - Double Sided Tape (Door mounting) Grease Optional (Highly recommended to preserve accuracy and increase longevity of your printer) Super Lube 92003 - $11 - PTFE Grease for plastic on plastic parts MG Chemical 8461-85ML - $10 - White Lithium grease for metal on metal parts If you have any recommendations or if I missed a few required items, please post below and I will update the list to include other options!

-
Version 1.0.0
107 downloads
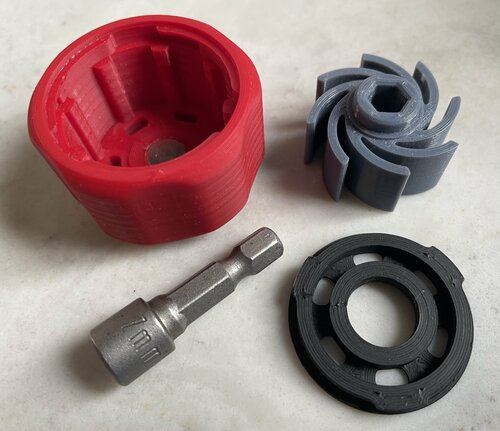
I have seen a few of these on Thingiverse / Printables etc but none was exactly right and so decided to draw and print my own. The handle and cover are in ABS and the rotor is in PETG. You could probably get away with PLA for the body but the rotor needs to be in a more flexible material. The cover to the handle is a bayonet type fitting and I think works better than the screw / push-fit ones. The magnet is 8 x 3mm and is optional, it just stops the bit falling out. If you only have smaller magnets then just glue it in. The torque when tested was around 1.4Nm. This will depend on print settings and materials used. Printed on a Voron 2.4 with a 0.15mm layer height. Matt82770565 -
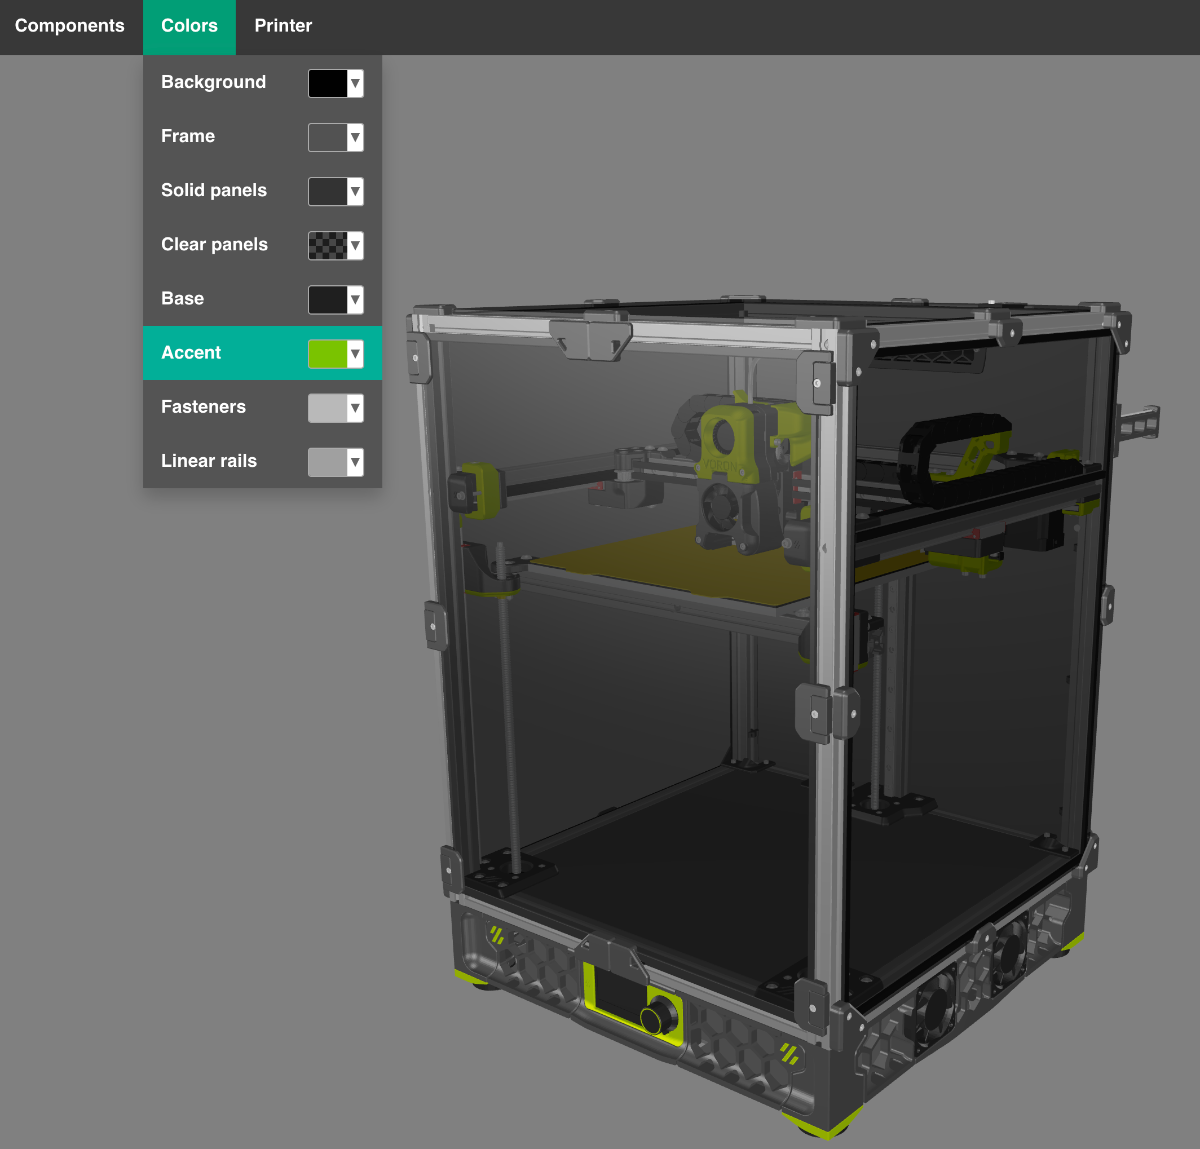
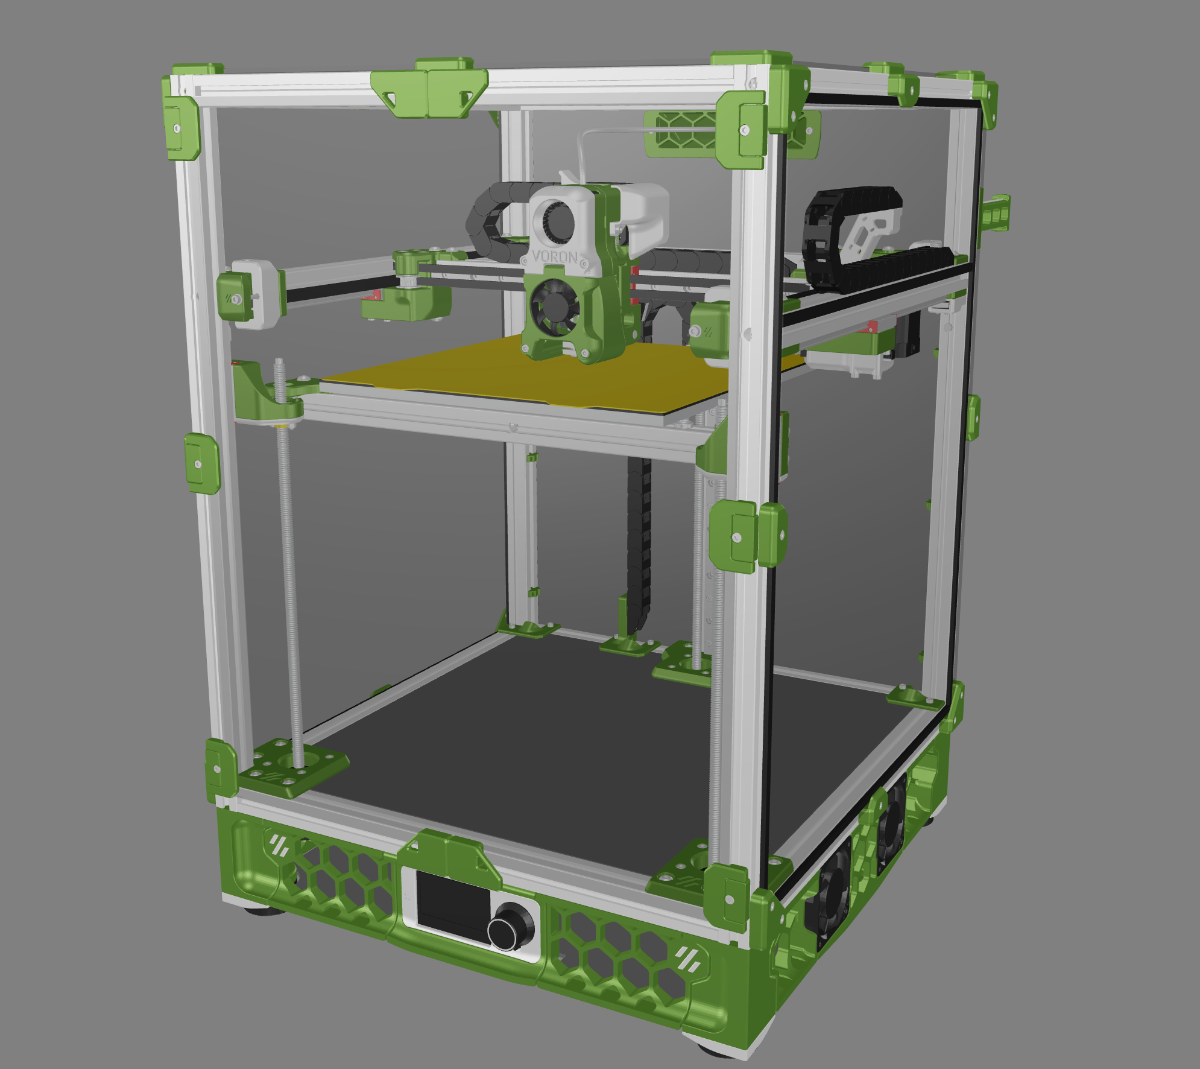
 While this has been circulated around a bunch, I wanted to post this as a resources for others and for posterity. This tool allows you try color combinations for Voron's 2.4, Trident and 0.1. without the need to hun and peck inside of fusion 360. Find the tool here... https://config.makercube.me/
-
Version 2020.10.13
249 downloads
What is this? This model is a simple jig to help align the bottom extrusions to each other and the vertical extrusion. This helps keep everything square when assembling the frame. How do I use it? It's recommended you print four of these, although just printing one is still pretty helpful. Either way, assemble the frame as described in the manual, but instead of tightening down the screws, leave a little bit of slack so they can still move a little bit. Once you have done that, clip the jig on to the vertical extrusion and slide it down over the two horizontal extrusions. Once you've done all four corners, tighten each side, keeping each corner as flat as possible while doing so. How should I print this? Same as any other Voron part. I printed this in eSUN ABS+, but any ABS will likely work. I can't speak for PLA or PETG. NOTE How useful this part is will depend a lot on how well calibrated your printer is. This part should be fairly snug, but not require significant force to put in place or remove. If you find it's very tight or loose then it will probably not be useful for you. -
Version 2020.08.02
42 downloads
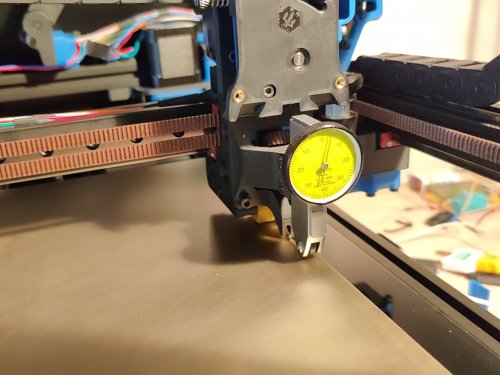
This replaces the Afterburner toolhead with a dovetail mount for a dial test indicator (such as a Mitutoyo 513-404, which this was modelled on). The indicator point is ideally located at the same position as the nozzle (the precise Y position may vary depending on the length of the tip). There is a protrusion where the nozzle would be located, so that Z homing can be done normally as though a nozzle were present. This can be used, for instance, to verify whether a mesh reflects the true form of the bed surface: sweeping the bed with the mesh enabled would ideally show no movement on the indicator. Required hardware M3x8 SHCS (4x) M3 hex nut (2x)