Search the Community
Showing results for tags 'arkeet'.
Found 4 results
-

Version 2021.07.26
487 downloads
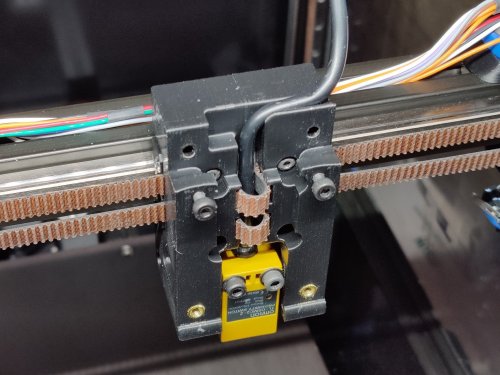
This replaces the dual MGN9H rails on the V2.4 X axis with a single MGN12H rail. The belt is directly clamped to the MGN12 block by the carriage. The stock PL-08N probe might be too long to fit. Recommended alternatives are listed below. As an option, the x_carriage_frame_right_endstop.stl allows mounting the X endstop switch on the carriage, which is useful on an umbilical cable setup. Thanks to joshmurrah, hartk, and everyone else who helped out in one way or another. Required hardware In addition to things you can reuse from the stock build, these items are required: 1x MGN12 linear rail with MGN12H carriage (same length as the original MGN9 rails) 1x M3x40 SHCS 4x M3x8 BHCS (or 2x BHCS and 2x SHCS) Recommended probes: Omron TL-Q5MC2 (use M3x25 or M3x30 screws) Panasonic GL-18HB/18HLB (use M3x25 or M3x30 screws) Panasonic GX-H15B/HL15B (use the 9mm probe bracket, and M3x16 or M3x20 screws) Instructions Assembly is similar to stock V2.4, see the assembly images below. The belts are clamped between the carriage and the MGN12H block. This procedure worked for me: Loosely fasten the carriage to the MGN12H block using the M3x8 screws. Push the belts in on the left side, until they are just visible in the middle. Tighten the screws on the left side a little bit, to secure the belt ends. Push the belts in on the right side as far as you can, and pull them out through the middle. Tighten all screws, while making sure that all belts are firmly held in the clamp teeth. You may wrap the extra length of belt around the probe cable, as in the photo below. Please check the Z endstop position after assembly as it may have changed slightly. Changelog 2021-03-28 Added option for mounting X endstop on the carriage. Updated readme to note that stock PL-08N probes might fit. 2021-03-21 Initial release -
Version 2021.03.28
6 downloads
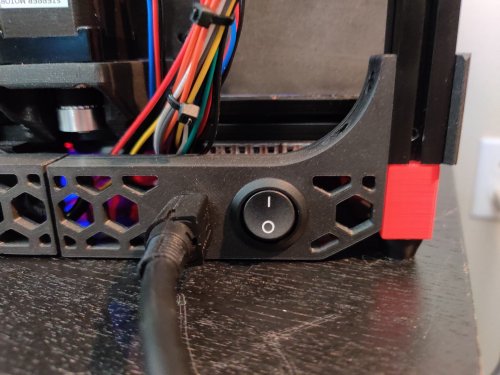
Adds a skirt-mounted inlet and switch for an external DC power supply, to allow using a DC bed. Options are provided for rear or side mounting. BOM Kycon KPJX-PM-4S connector (Digi-Key) Mean Well GST160A24-R7B power supply (Digi-Key) Power switch, 20mm round, rated for at least 7A at 24VDC (Digi-Key) 2x quick disconnect terminal for power switch (Digi-Key) 24V 60W bed heater (Keenovo) 4x M2x10 self tapping screw (For rear skirt only) 4x M3x6 BHCS + 4x M3 hex nut With a 24V bed the SSR is not used, and the bed heater is directly connected to the bed heater output on the controller. I suggest using a SKR Mini E3 V2.0, which can control 2 heaters and 2 fans (unlike V1.2, which has only 3 controllable outputs). Instructions For rear mounting, print both skirt_rear files and inlet_bracket.stl. Mirror the skirt pieces if you want the inlet on the right side. Each piece mounts to the rear vertical extrusions with two M3x6 screws. The rear deck panel must be removed. Temporarily remove the rear panel and rear feet to access the extrusion slots. For side mounting, print skirt_side_with_inlet.stl and inlet_bracket.stl. It replaces an existing skirt piece; mirror it in your slicer if desired. Inlet and switch mounting steps are shown below. It is suggested to solder wires to the inlet before assembly. Pay particular attention to the order of the inlet pins, and confirm with a multimeter. -
Version 2021.02.06
43 downloads
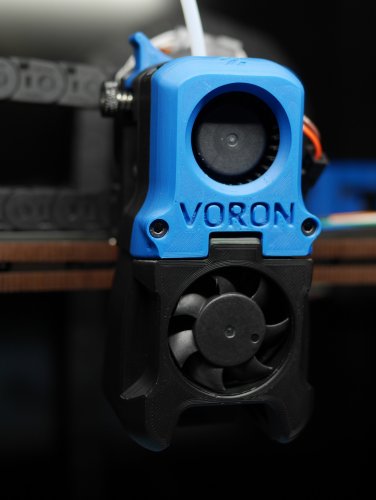
This replaces the screw-mounted hotend fan cover with one that is held by magnets, for a clean front face and easier access to the toolhead. Works with an unmodified toolhead. Inspired by ModCables101's magnet mod. Required hardware 6x3mm round magnet (2x) M3x8 SHCS — steel, not stainless (2x) Instructions Press the magnets into the new cover. Screw the M3x8 screws into the toolhead until they bottom out; the heads should protrude 4mm from the surface.-
- 4
-

-
- afterburner
- arkeet
- (and 3 more)
-
Version 2020.08.02
42 downloads
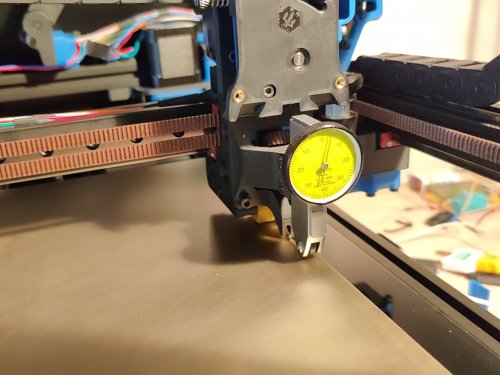
This replaces the Afterburner toolhead with a dovetail mount for a dial test indicator (such as a Mitutoyo 513-404, which this was modelled on). The indicator point is ideally located at the same position as the nozzle (the precise Y position may vary depending on the length of the tip). There is a protrusion where the nozzle would be located, so that Z homing can be done normally as though a nozzle were present. This can be used, for instance, to verify whether a mesh reflects the true form of the bed surface: sweeping the bed with the mesh enabled would ideally show no movement on the indicator. Required hardware M3x8 SHCS (4x) M3 hex nut (2x)