Search the Community
Showing results for tags 'builddiary'.
-
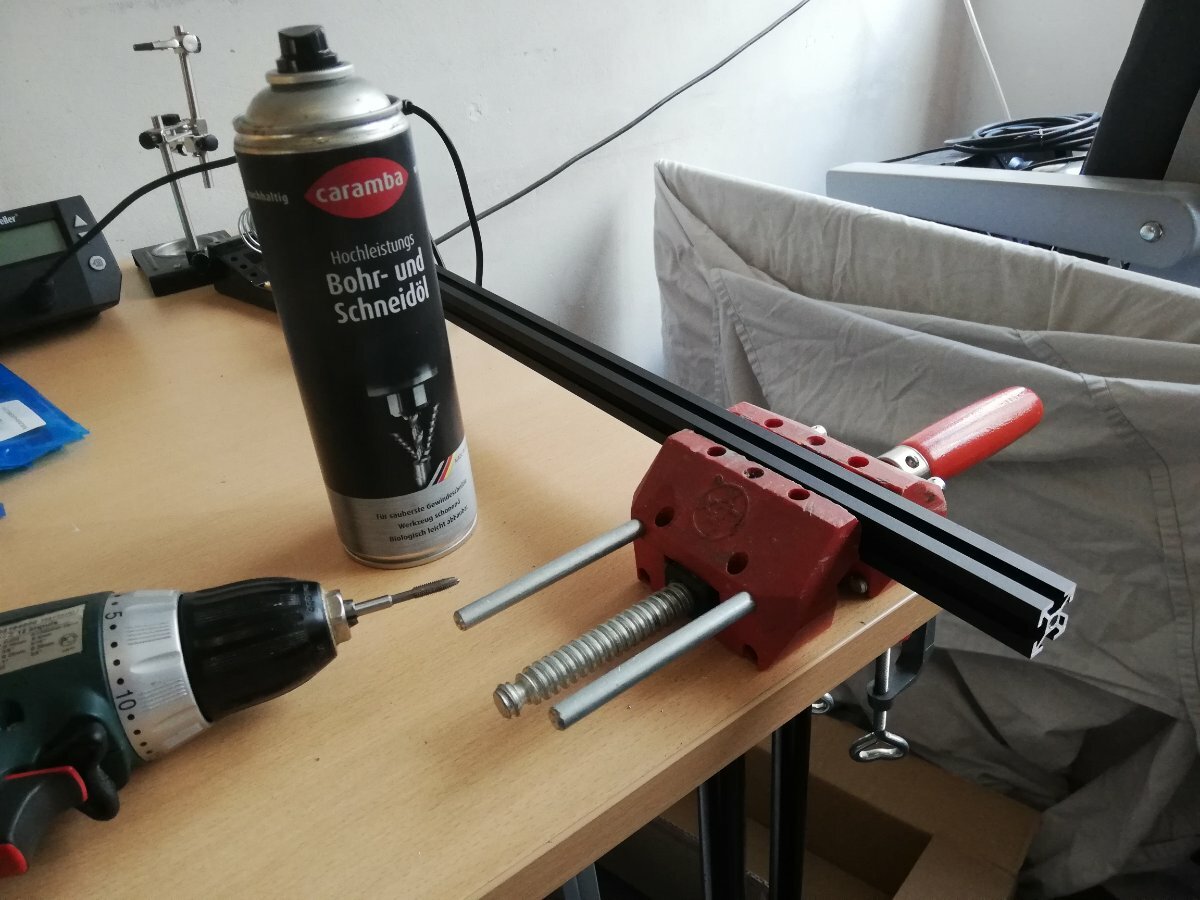
I've been jonesing to start this build for awhile, but got delayed by the various storms (delayed shipping) and then work and travel. I got my PIF parts from triponaduck which looked amazing, and have been working when I've had time the last week. Don't have time to work on it today so I thought I'd start writing some things up. So, working on either a workbench or on a large 2x2' terrazo (cheapest I could find) tile I mounted on some 1/4" ply to make a portable work surface. Putting together the frame was a joy. Just simply and satisfying. Came out nice and square. [[ I tried uploading images, but they come out as a solid color -- any hints? ]]
-
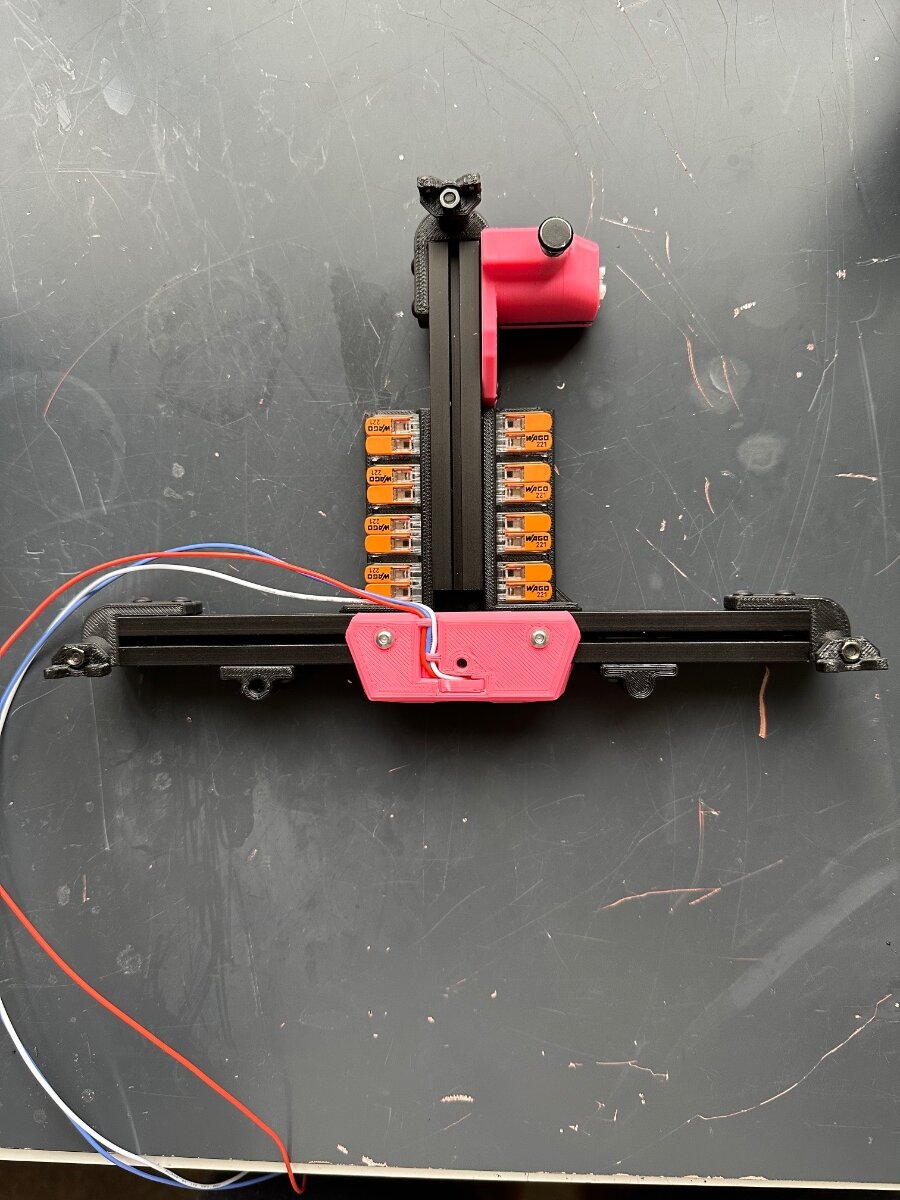
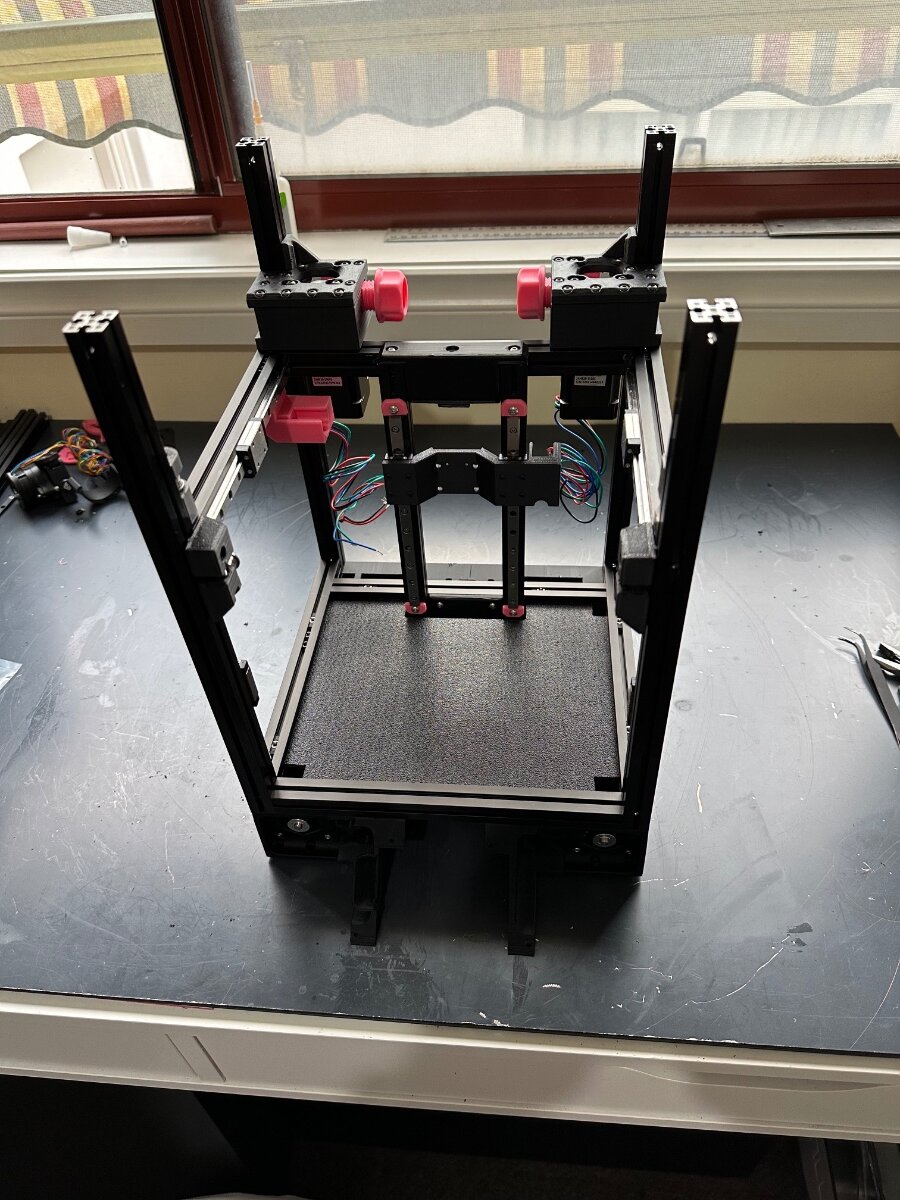
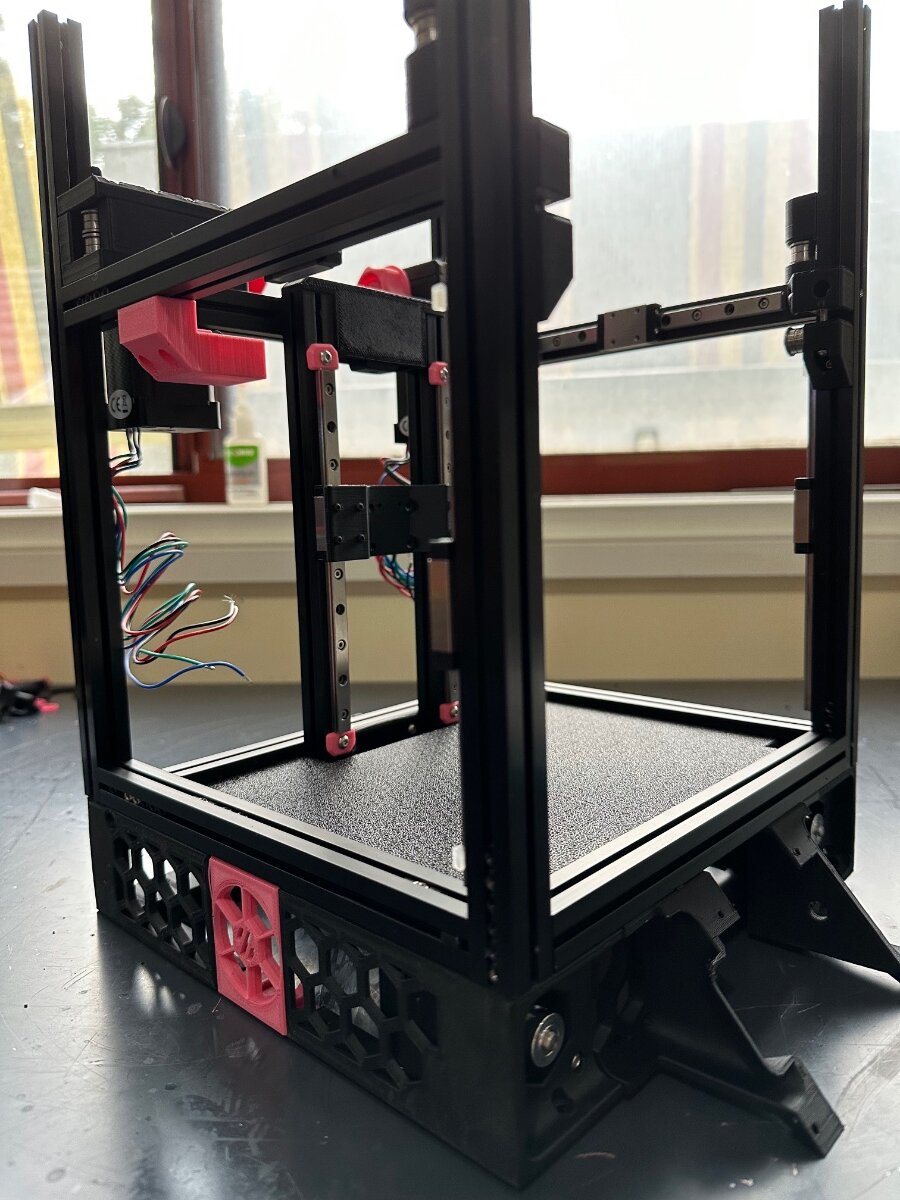
I'll add my self sourced 250 Trident build to the diaries. This is my first Voron, and second printer. I started out with a Prusa Mini+ kit and enjoyed the build so much that I started looking more seriously at the Vorons. I did look while doing initial research, but the full DIY nature was intimidating at the time; the Mini has been a great learning printer both for building and printing. In the process of researching I found the Voron Discord, this forum, and Nero & Steve's Youtube channels. Lurking, reading, and ultimately starting to ask dumb questions has taught me a lot in a short time. So I started with the Voron configurator to get my BOM, then grabbed the matching info off the sourcing guide to start finding where to buy parts. I spent quite a while learning about many of the components to determine what the best cost vs quality balance is for me. In the process, I found the popular vendors supplying the hobby. I built myself a spreadsheet to track & manage the list of parts and my often-shifting plans of what to buy and from whom. I started purchases taking advantage of sales on Aliexpress, and just accelerated the process after witnessing the Voron Hug and general supply chain issues. If something is in stock these days, you probably want to buy now rather than wait. So the list of vendors I've used are: 3D Maker Parts Amazon Aliexpress DFH Grainger KB-3D Mandala Rose Works PiHut Push Plastics Sparta 3D West 3D I tried to minimise the orders and take advantage of free shipping triggers as much as possible, so I didn't get hit too hard with that forgotten cost. A few redirected sources due to out of stock situations; PiHut most notable--had to order the board from the UK after the things became unobtanium. The last part to get is ironically the frame. I'm being picky and want the LDO blue kit which has not been available. As I was composing this I checked again, and unexpectedly got a hit on KB-3D, who now has them! So all parts are now ordered. I've spent the last week getting my Mini prepped for printing up the parts for the Trident. So I now have a full set of spare parts in PETG, which itself was a learning experience. I have to move the OctoPi from a separate case to the integrated electronics box lid. That is to help fit everything under the original box for the Mini as my cheap enclosure for ABS printing. Next step is to get some ABS test prints so I can dial that in, then start printing parts. EDIT: I should probably also list the mods I am incorporating into the initial build: hartk SexBolt Z endstop. hartk Z endstop PCB randell XY endstop PCB jeoje 4.3" Waveshare touchscreen with Steve's modified skirt. hernsl magnetic bottom panel clips Steve's no tape skirt fan mounts chrisgonzales 270° door hinges Nero's idler bearing stack in place of toothed idler change
- 116 replies
-
- 3
-

-
- selfsourced
- builddiary
- (and 2 more)
-
This is my first Voron build, got the email from Formbot saying the kit be being shipped (Whohooo!) I setup a ghetto enclosure with two cardboard boxes for my Artillery X1 to print parts. Also first time printing ABS so this will be interesting any help, suggestion, critic are welcome. Figured I'd start with electronic bay parts to tweak slicer setting (Cura 5.1.0) since parts will be hidden. Base colour Spartan Obsidian Black Sparkle ABS+, accent Spartan Cloud Grey Sparkle ABS+. Build will be in two week increment, I work and two weeks on two weeks off shift in Western Canada, almost at the end of my career I retire January 28th 2023 . I'm still browsing thru build, has anyone done the LDO electronic bay layout with the Formbot kit where the din rail run from front to back instead of side to side? I need to setup one of my Artillery X1 with Klipper so I can get familiar with the platform, presently using Octoprint so may go the Octoprint/Klipper route first then migrate to Mainsail. Print in the photo are 3D3 Sigma Prototype ABS.Printing at 235C/110C glass bed with PEI sheet is why I set it 10C higher. Use hairspray too help with adhesion clean with Isopropyl before re-applying hairspray seem to working for me. Titanium heat break with a Micro Swiss copper plated #4 nozzle.

-
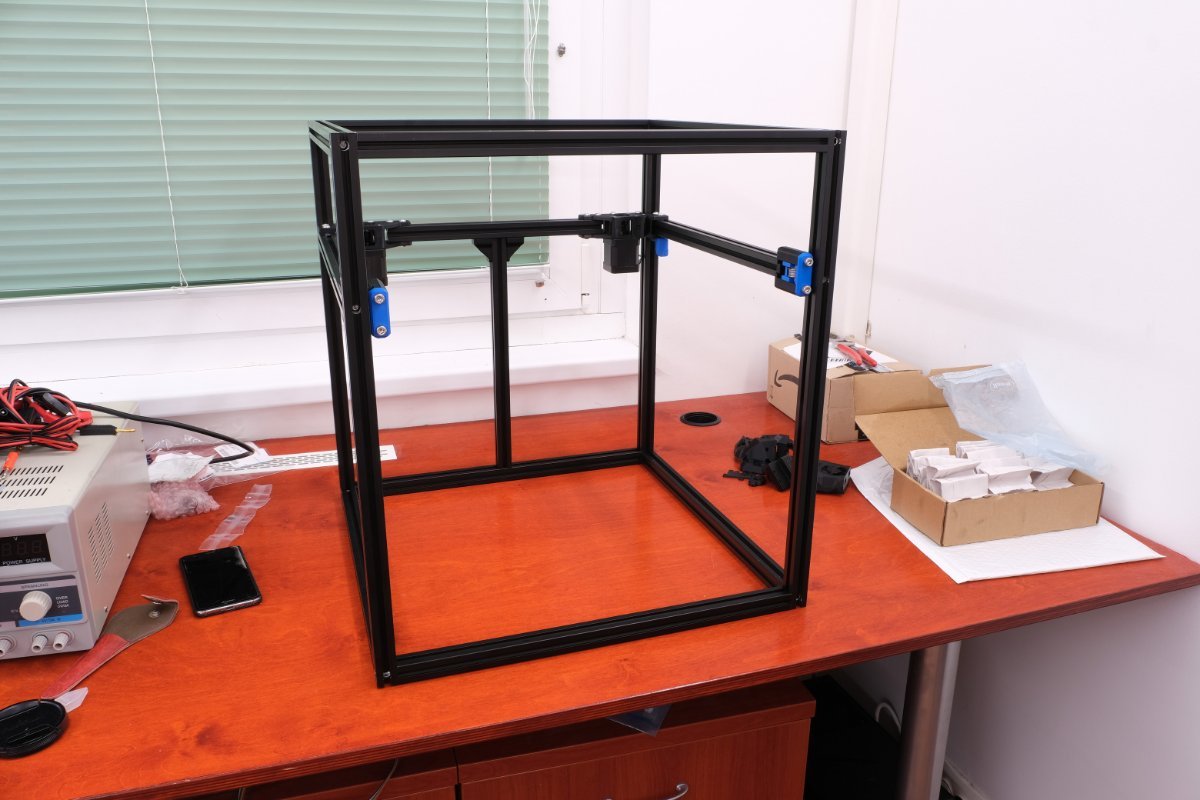
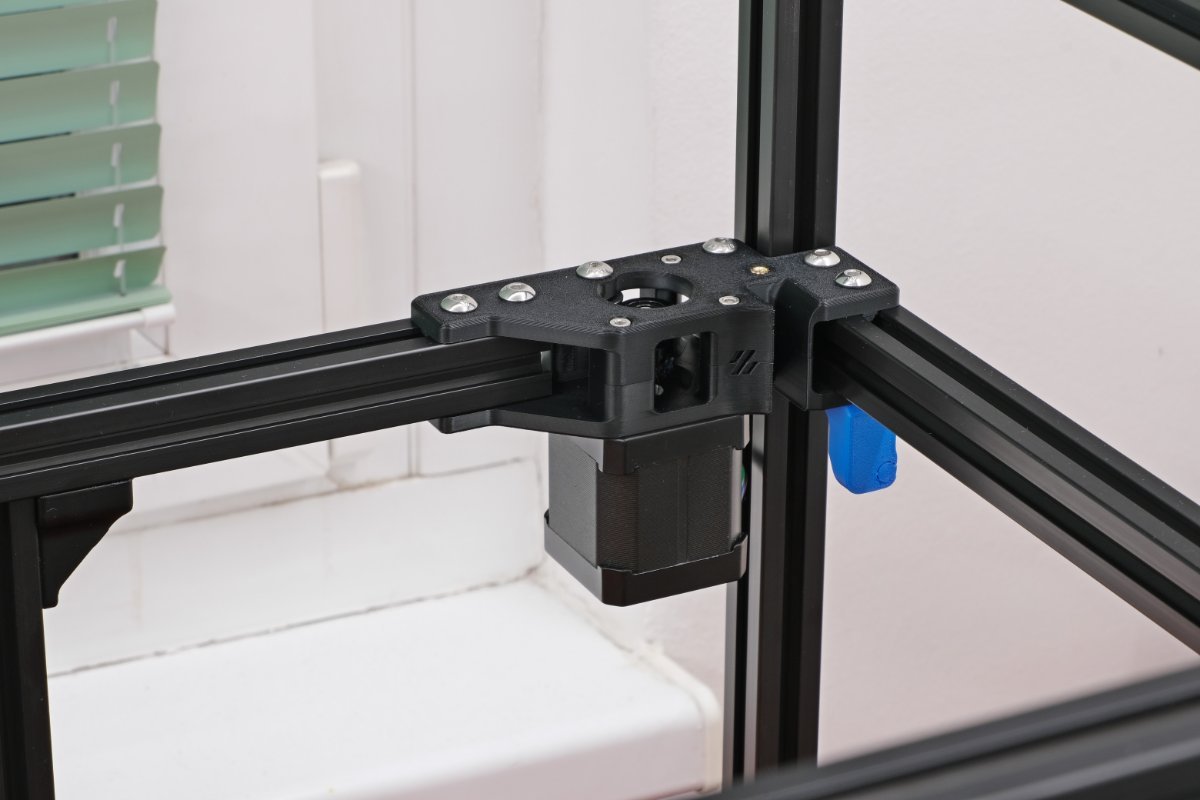
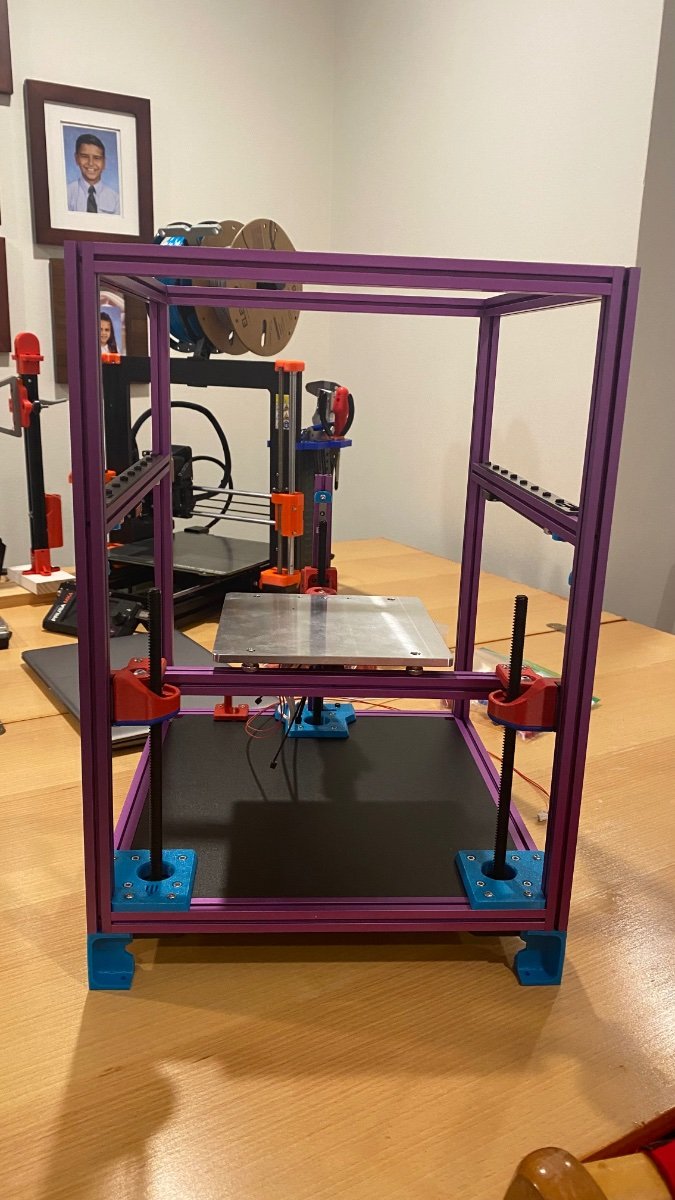
History I am a proud Aquila owner... or used to be. I modded its electronics, the Z-drive, the extruder, added extra part cooling and swapped out the fan duct, made the heatbreak all-metal, encased it, klipperized it, made it virtually silent (fan+electronics mods), added a BLTouch, exchanged the glass plate for powdered PEI, added better bed springs... and honestly, based on other prints I've seen both IRL and online, its print quality could put a lot of premium printers to shame now. But still I've become dissatisfied with this bedslinger. Obviously my mods solved many of its initial issues, but I still constantly fight with first-layer adhesion and can never use the whole bed. Also, some components often need maintenance every few prints. Add to this that printing ABS is still problematic, and printing anything tall is impossible at humane speeds due to the moving bed, I've decided: I'm gonna build myself a Voron The Goals My choice fell to the Trident in its 300mm size. My expectations is that when it is done, it should be much more reliable than my current printer, and I'll also get a larger build volume and better ABS printability. I guess it will also end up being faster which is certainly good, but that really is only a secondary goal for me. Let's see if I can make it. Right from the start I am planning with a bunch of mods (checkmark indicates finished installation): ✓ Galileo2 extruder ✓ TAP ✓ CAN with umbilical cable ✓ Kinematic bed mount ✓ Y-axis backers ✓ WobbleX ✓ An ultra-flat bed from MRW (without integrated magnets) ✓ BFI ✓ Magnetic acrylic panels ✓ Chamber thermistor ✓ Nevermore filter (also acting as bed fans) ✓ Chamber lighting ✓ Voron Revo hotend ✓ Nozzle brush and purge bucket About the mods Just a few days ago, the Galileo2 (well, it's public beta) was announced and a small stock even became available with instant delivery (no waiting until sometime in october) at a local store. I might have gone into over-hype mode, but I am intrigued by the G2 and since it was optimized first and foremost for extrusion consistency, I decided I'll order one and ditch my Clockwork2 even though I already ordered the parts for it a week ago. Before the G2, my plan was to mod the CW2 with Bondtech's IDGA. The G2 is also supposed to be quieter which I also welcome: I've been told that Vorons can be pretty loud to begin with, and considering that my current printer is very silent, I'm already afraid the contrast in noise levels will be uncomfortable. So any help is welcome. I'm sure a lot of people would question the inclusion of the WobbleX. Well, I fervently dug through many forums and the Voron Discord before assembling my BOM, and even though most people claim they don't have problems with Z-banding, it also doesn't seem to be an unheard phenomenon on the Trident or similar printers (like the V-Core). I decided I'd rather get rid of the problem from the get-go even if there is a good chance I might not need it. Don't judge me please. The bed stuff with the MRW bed, kinematic mounts and backers are due to my first-layer traumas from my current printer. Besides, the kinematic mount might also save a lot of time when doing smaller prints by not having to wait for the printer to warm up. Let's see if this theory holds up in practice. For the backers I ordered linear guides. This sounds like a Gucci move but not at all. Rails that serve as backers don't have the same quality requirements as the rails with the actual carriages, so these can be dirt-cheap. Hence I ordered the cheapest set I could find on Aliexpress. This way, price was not only lower than Titanium backers, but at the same time I'll even get better print results. You might not want to do this though if you're not building an umbilical toolhead, as the cable chain would be in the way. My build's umbilical though, so no problem here. The reason for the Nevermore, chamber thermistor and bed fans should be obvious: All for the sake of printing ABS. Related to this are the magnetic acrylic sheets. Being magnetic will allow me to easily remove them or snap them back in, making it a child's play to switch from ABS to PLA and back. I did not include the pinmod. This mod is so strange. It seems to be extremely popular, it is present in many kits, and if not in a kit a very large portion of users still implement it. All this despite not having seen a single post or analysis or report where it actually made things better. If experts or highly-respected members of the Voron community are asked, they unanimously claim this is a useless mod and there is no reason to include it. So I left it out based on multiple people's advice and I'm glad I did: I'm past assembling the idlers in the build process, and what I see now myself is that the pinmod should not make any difference (the screws/pins are not what the bearings directly rotate around), so it is no surprise if it doesn't. IMHO, the pinmod is basically snake-oil. Maybe not really a mod, but it might be worth noting I opted for a BTT Pi+U2C in the electronics compartment. The nice thing about this is two-fold: First, the BTT Pi can be powered by 24V directly, so you save the space and cabling for a separate 5V PSU. Second, the U2C can piggy-back on the BTT Pi, saving again space and cabling. There is enough space so it's not like you need to save it, but this will make everything much tidier, neater and even easier to wire up. I'll completely ditch the screen. My current printer has one but I still use it exclusively over the Fluidd web-UI only. I know I won't need a screen on my Voron by experience. The self-sourcing My self-sourcing experience was a mixed-bag at first. It is very time-intensive, for me it cost multiple days all things considered. I fully understand if not all people are willing to go through this process. The upside is you can control the brands and quality of the components, whereas with kits this is either unknown or at least might fluctuate. It might be tempting to think that self-sourcing is cheaper, but this depends on a lot of factors: what components you already have, what components are redundant to you in the kit due to future mods, how is component availability in stores, and even where you live (due to VAT amount or shipping costs). You also need to optimize shipments to order from as few stores as possible. Simply taking a kit's price and adding those of my components that weren't in the kit doesn't offer a full picture, and I didn't make this calculation. Of course, at first glance the completed BOM ended up being much more expensive than a kit, totaling to about 2400 EUR incl. VAT and shipping. This might sound scary compared to a kit's price that sells for around 1500 EUR, but considering all the extra stuff I ordered (PIF parts, TAP, CAN, MRW bed, Delta fans, WobbleX, Kinematic mount, twice the extruder, a quality crimping tool and allen-key set, chamber lighting, ...), I think I did pretty good. I am not sure a kit would have been cheaper, and even if it were, not by much. Unfortunately, I also used to be pretty sure that even if I saved some money by self-sourcing, I did not save much. Frankly, between all the extra time, work and headache it might not have been worth it. At least that's what I thought at first. Then yesterday, I saw Lecktor's announcement about their fully-modded all-extra 2.4 kits. Yeah, I know it's a 2.4 and not a Trident. Yeah, I see the mods list is different from my own. Still, it is a lot more comparable BOM to my build than any other kit. Their prices start at ~2200EUR (excl. VAT!), so this makes me think I have grossly underestimated the money I saved by self-sourcing. What do you think? The build I started building last weekend (16. Sept). The printed parts are PIF parts and I have nothing to complain about. They are made out of FormFutura's "Premium ABS", the accent color being "Ocean Blue". Unfortunately, the guys at Lecktor were in sleep mode apparently and they did not ship my order for a whole week. This resulted in most mechanical stuff having arrived on time except for the Lecktor parcel. Since that parcel contains all the Z-drive components and all the non-backer rails, all I could do for now is assemble the frame and the idlers. Nevertheless, the first mod is in place Squareness seems good. This is not exact but deviations between diagonals seem to be around or under 0.5mm. I built the frame on my kitchen countertop to help with that (the bench in the picture is not it), and I did not need to do any readjusting afterwards. The bed got the Keenovo heater applied but is waiting for the GraviFlex foil (also in the Lecktor parcel arrgh...). To be continued... (don't worry, the rest of the posts should be shorter, lol)
-
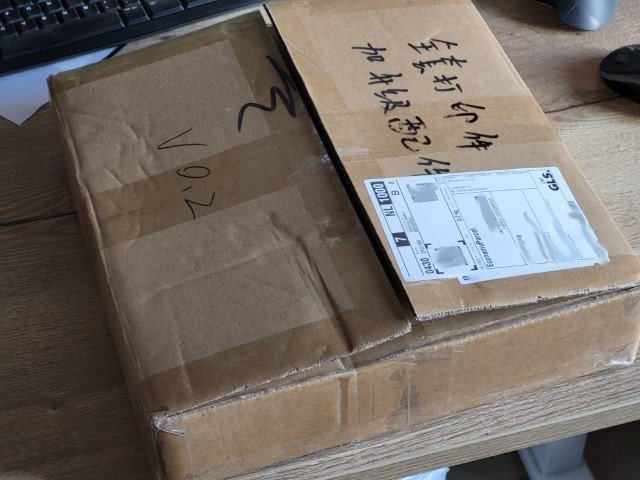
Background: I was one of the many Kickstarters who bought the Creality CR-6 SE in 2020 as their first 3D printer. However, I am probably one of the rarer individuals who only unboxed and started printing with it 2 months ago. After that was upgraded with Octoprint, modded firmware, PEI, dual gear extruder, a new toolhead and various other quality of life improvements, the time came to move this new hobby obsession to the next level. £430 (£70 import tax) lighter, and two boxes arrived to the UK from China from Formbot within a week via Fedex. I am hoping to use the experiences here for a Voron v2.4r2 350mm in a few months time, as well as use this for v2.4's functional parts in ABS. The Build: Formbot V0.2r1 Kit with all ABS parts - includes Kirigami, Umbilical PCB Phaetus Dragon SF hotend with 0.4mm nozzle Siboor Steel Kirigami Bed BTT SKR Pico BTT Pi v1.2 BTT TFT35 SPI (for BTT PI) Klipper Expander - for extra fans, Neopixels and thermistors (https://github.com/VoronDesign/Voron-Hardware/tree/master/Klipper_Expander) MFNano (https://github.com/MapleLeafMakers/MFNano) V0 No-Drop Nuts (https://github.com/VoronDesign/VoronUsers/tree/master/printer_mods/zruncho/V0_No_Drop_Nuts) Foldable spool mount (https://www.printables.com/model/542953-locking-foldable-spool-holder-for-voron-v02-0-v0-0) DIN mounted electronics (https://www.printables.com/model/586977-voron-v02-electronics-din-rail-bracket) Modesty Mesh (https://www.printables.com/model/407822-voron-v0-modesty-mesh) Cable duct (https://github.com/VoronDesign/VoronUsers/tree/master/printer_mods/ryandam/Cable_management_duct) Klipper Expander duct (https://www.printables.com/model/317519-voron-v01-v02-klipper-expander-cable-duct) V0 Stealth Handles (https://github.com/MapleLeafMakers/V0_Stealth_Handles) Kirigami PCB (https://github.com/livinhack/Kirigami-PCB) Kirigami Neopixel (https://github.com/MapleLeafMakers/Stealth_Bed_Front) Lighting - Rainbow On A Matchstick (https://github.com/VoronDesign/Voron-Hardware/tree/master/Daylight) Chamber thermistor mount (https://github.com/MapleLeafMakers/V0_Chamber_Thermistor_Mount) ZeroClick probe (https://github.com/zruncho3d/ZeroClick) PanzerObserver camera mount (https://github.com/Slidr666/VoronUsers/tree/18599db8c29c9a272f852d1dac9ad5d014d0a496/printer_mods/Slidr/PanzerObserver2.4) Possibly - DragonBurner V8 toolhead and CAN bus (BTT) in future, depending on tinkering motivation! Preparation / Resources: I have been closely following @Perkeo's build, trying to absorb everything. Dmason's V0.1 blog has also been useful: https://3dpandme.com/category/printer-builds/v0-1/ Ballistic Tech has a vlog on this kit here: I am pretty happy with electronics, linux command line and mechanicals. Although had to purchase some crimpers and a couple of 123 blocks for the build. Additional things not included in the Formbot kit: Lithium EP2 grease, Isopropanol Alcohol 99.9%, threadlocker, various connectors (Wagos, XT60, JST). Voron Discord Profile: Lik#5169
-
Hello everyone, this is my first build diary, so I apologize in advance for any unclear photos or text. I will be building a Salad Fork, which is basically a scaled down VORON Trident that uses 1515 extrusions. So far, I’ve completed the frame and z motion/bed.
- 10 replies
-
- 5
-
-
- builddiary
- kit
- (and 1 more)
-
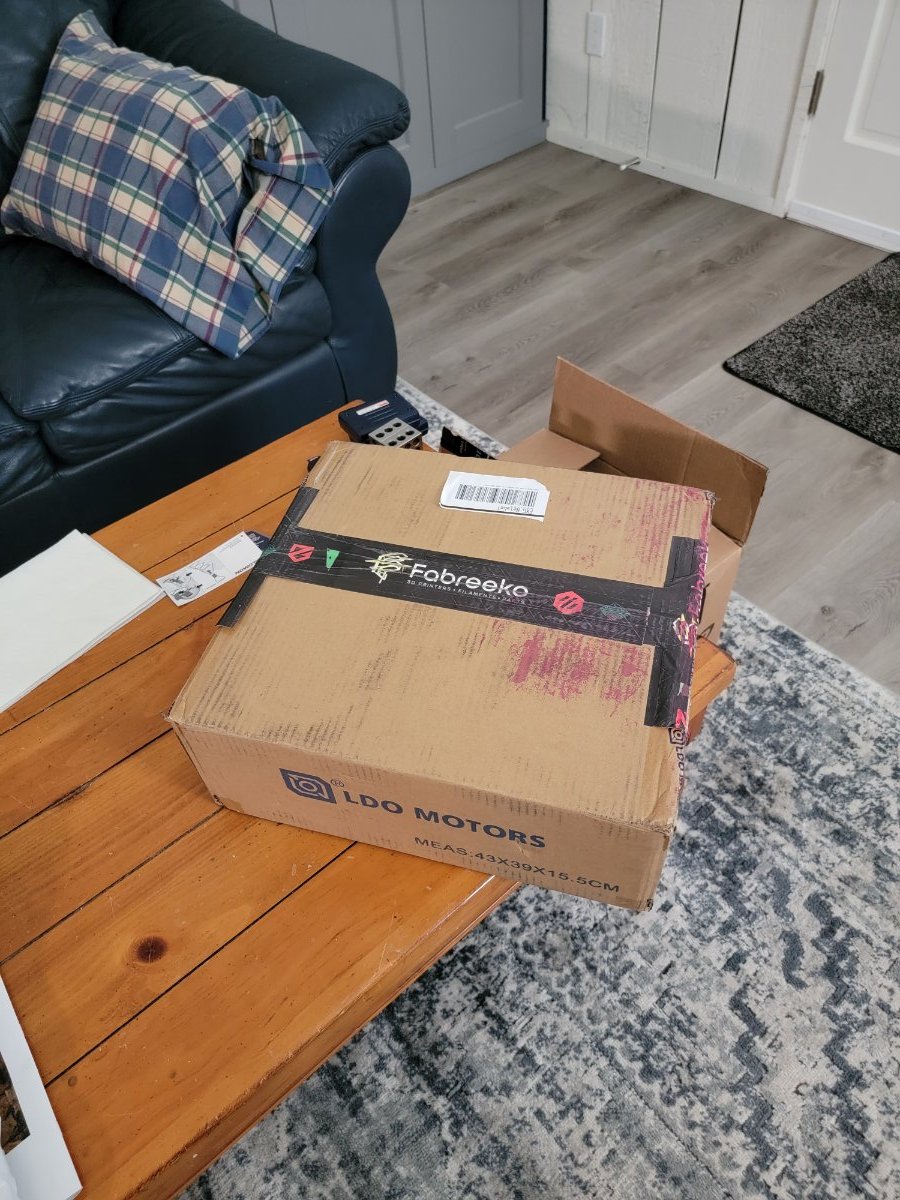
My name is Kurt and this is my build. I chose to go with an LDO kit for my first Voron in the hopes to go down a well-traveled path with a lot of folks having "been there, done that". I previously built a Prusa Mk3s which is straight lego build-by-the-numbers by comparison. Most of my printing on the Prusa has been PETG, using a Chris Warkocki sourced profile that seemed to just 'work'. I started to source parts for a Bear Prusa build, and then Voron dropped on the scene. I realized I didn't need a second bed-flinger and started planning on doing a Voron build. I ordered my LDO kit from Fabreeko and was very happy with the prompt shipping and packaging. I also ordered a set of PIF printed parts at the time and went with Black and Radium Green from Fusion Filaments. I've always been a sucker for that black/neon green aesthetic. My Bear build was going to be black/neon green, so this is a nod towards what might have been. I'm posting the pictures I've taken up to this point and welcome any observations, questions, or suggestions for my build/process. Thanks for following along! It begins:
- 52 replies
-
- 2
-
-
- voron 0.2
- builddiary
- (and 1 more)
-
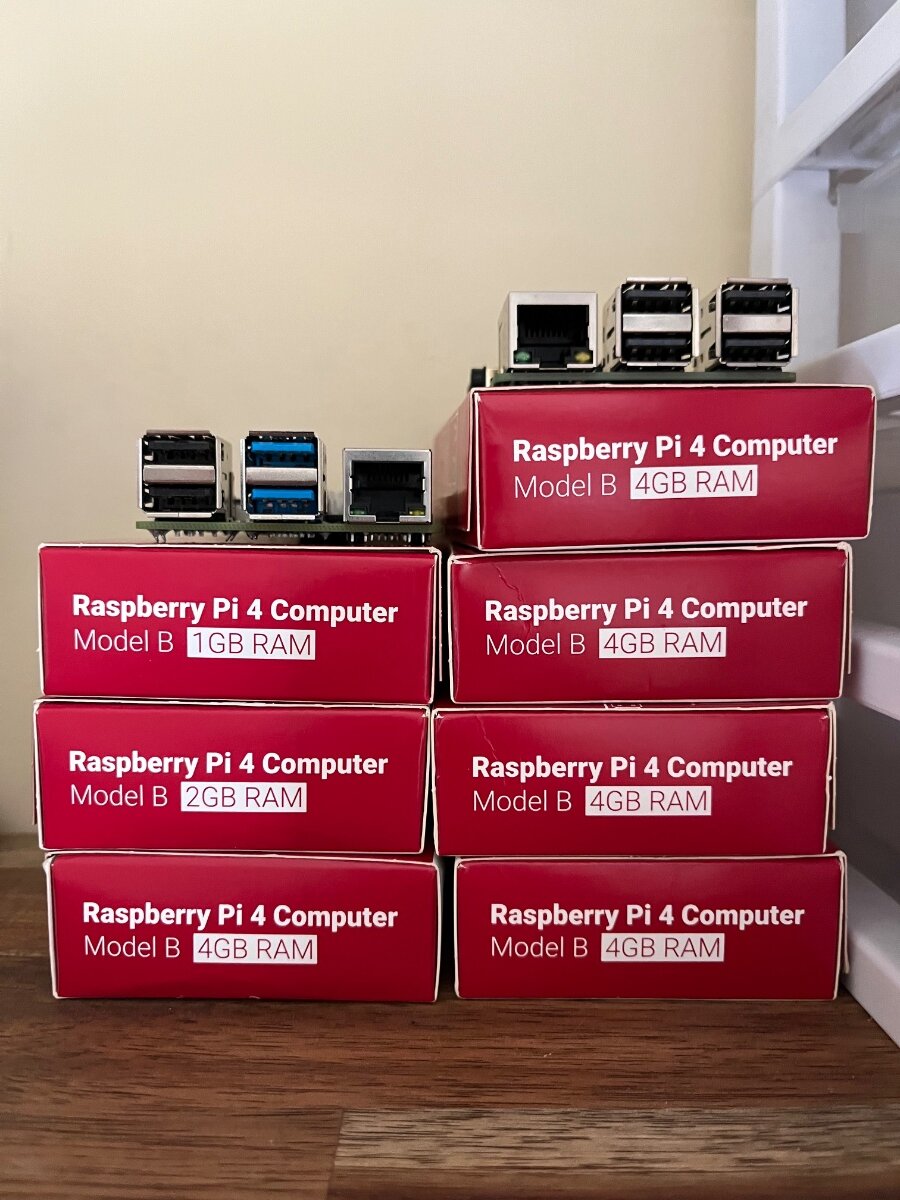
Hi! So, I haven't printed anything much out of PLA or PETG in months. A couple of projects in TPU are nearing the end. The V0.1-1/2 is getting a workout and the Prusa just sits idle as it is not especially happy with ABS or heaven forbid, PC or Nylon. So, rather than upgrade the Prusa to MK4, I decided on a V2.4. So, I started printing out parts on the V0.1. I also ordered a BTT Can toolhead board, SB2209 and a U2C. Also, I obtained a Raspberry Pi 4. I really wanted a 250mm, but in USA only the 300 and 350 sized are readily available. So, I tried ordering a 250mm Formbot kit from 3Dprintersbay, and after a week.. no reply, no acknowledgment of any kind. But, they do reply to email! They are real, after all. But, alas, 250s are a few weeks away... would I care to upgrade to a 300? Oh, OK. While waiting, I ordered Alclad bottom and back panels in White from Printed Solid. So, a few days later along comes the Formbot kit. Over the weekend of 13 May, I sorted out the parts, programmed the Pi with MainsailOS, and tried programming the SB2209 The build started on 15 May. The initial framing took one evening. 16 May -evening - assembled the Z drives, continued printing parts 17 May - evening - Installed the Z drives, Z idlers, Z rails, continued printing parts 18 May- evening - Assembled and installed the Heated bed, continued printing parts 19 May - evening - Started Gantry assembly Weekend of 20 May - A busy weekend, but managed to complete the Gantry assembly. printed some more parts. Ordered a Pi43TFT screen. 22 May - evening - Installed the Gantry, set Z belts tensions 23 May - evening - Assembled Voron TAP, ran AB belts 24 May - evening - Started to assemble the Stealthburner with a Dragon. Configured the Octopus 25 May - evening - Completed Stealthburner assembly and installation. Started on the electronics bay. Printed more parts. Flashed the Octopus. Had trouble setting up the CAN. 26 May - evening - Mostly completed the electronics bay. Got the CAN toolboard to talk to the Pi! 27 May - busy day - evening - initial setup of AB motors directions, configured the SB2209, verified correct hotend operation. Printed more parts. 28 May - Got Z drives directions configured, performed initial tests, got Quad Gantry Leveling to play nice with Voron TAP. Started printing the remaining parts that are too big for the V0.1, namely the fan carriers and the center rear skirt section. Printed yet more parts, but I'm mostly done with printing parts.... 29 May - Had the V2.4 print some more big parts for itself before resuming construction. Assembled most of the skirting, installed the Z belt covers, which was a bit fiddly as the Formbot rail slots are just a couple of tenths of a millimeter too narrow, necessitating some filing of the plastic parts to fit. Also assembled all of the panel retainers with their hammerhead nuts with loctite... about 35 pieces in all. And tidied up the wiring a little bit. Am trying to decide how to rout the CAN toolhead cable. Noted that the EBB SB2209 CAN toolhead has performed flawlessly so far. Also noted that the print quality is quite good with no tuning whatever.
-
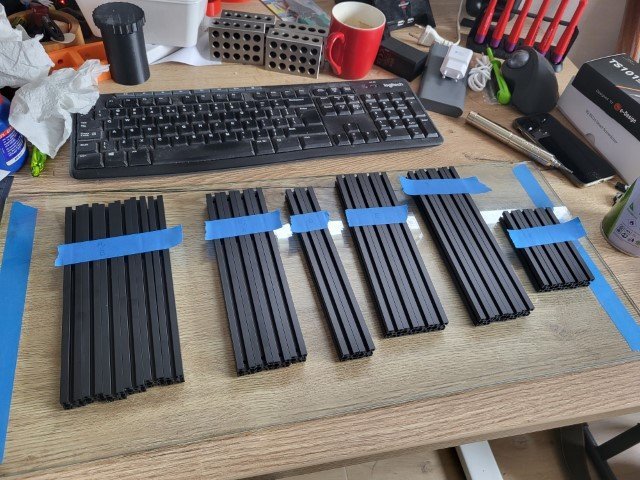
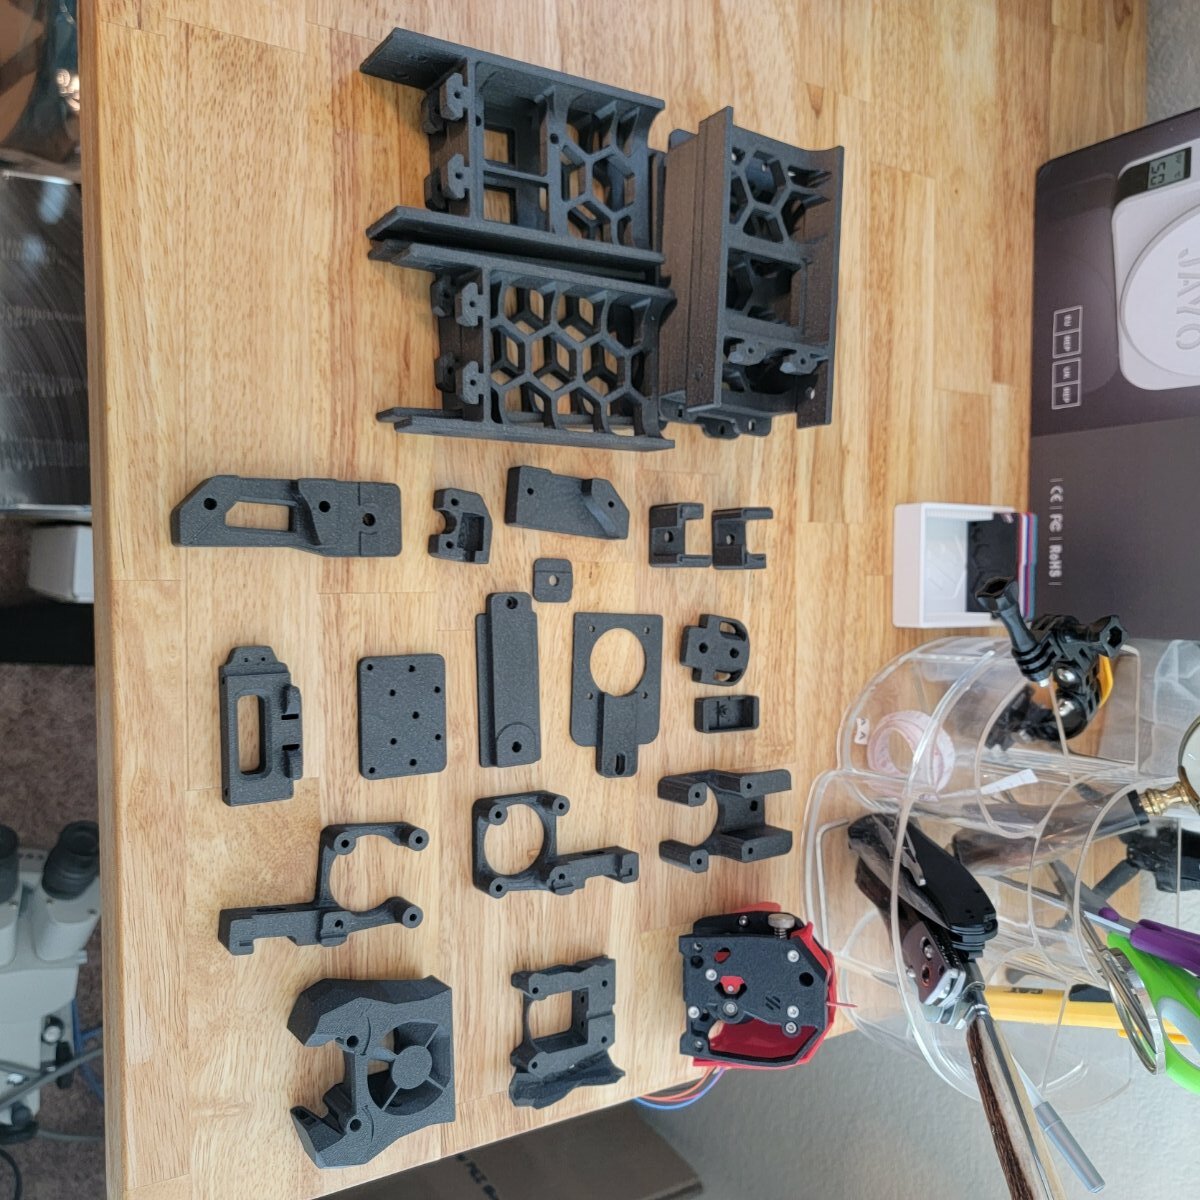
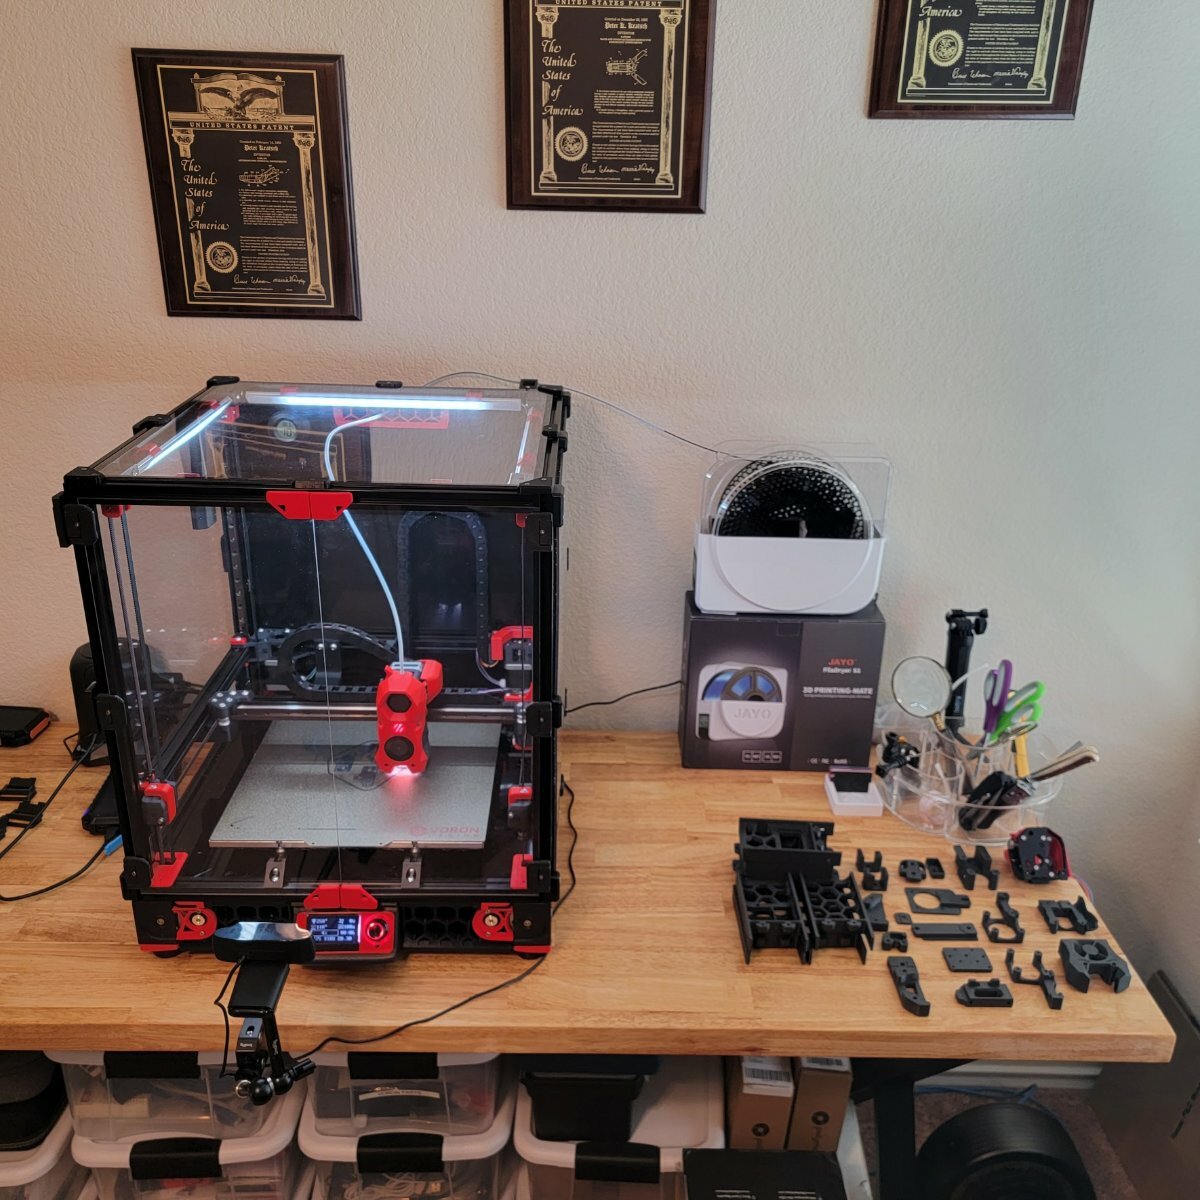
After receiving my Formbot Voron V0.2r1 kit in two parcels, the kit from Czech Republic warehouse and the printed parts from China, I started building the kit last week. Extrusions looked very good, clean and straight cuts with the edges anodized. I wanted the M2 Nut Adapter and No_Drop_Nuts and other small prints to be printed in ABS instead of the regular PLA I printed so far, thus went with black eSun ABS+ printed on my Ender3 Pro. With change of a printer, wanted to have a try with a different slicer as well so changed from Cura to SuperSlicer. I went with the Voron PIF settings and standard ABS setting from SuperSlicer (245C extruder and 90C bed). I don't think my Ender 3 reached 245C because it stopped at 235C which I think is the maximum I specified in Marlin firmware. Still these small parts just printed fine, so did not bother changing anything else. Not sure if is really needed, but will apply some loctite on metal-metal connections. The PLTight (or Vibra Tite) VC-3 supposedly is safe to use on ABS as well and can be re-adjusted a couple of times! One linear rails in the kit is marked as pre-loaded and will be used on the X-axis. Plenty of preloaded nuts with the very handy No_Drop_Nuts. And we have a frame with Kirigami bed. Next step will be the A/B Drives and Idlers.
-
Building a bed slinger this time around. Kit is in transit. I went with Frombot3D, they did me right with my 2.4R2 build so I'm going with them again. Would have like to try the LDO kit but price and availability turned me away. I guess I will see if the savings ends up being worth it or not. So far I'm printing parts. Base parts are Prusament Galaxy Black ASA, Accent parts will be FilamentOne ASA Sky Blue.
- 70 replies
-
- 2
-
-

-
- builddiary
- switchwire
- (and 2 more)
-
First week of Knocking my head of with fusion and the Try to Extrude some Item Profiles and doing Math on where to place what to make the Printer 100mm greater in all dimensions. Looking where i need to put how much To LEft Right and Up and Down. Oder List so far for Components : Frame Check , Holes to Drill ( i need to wait for the Cenvention Machines to get free :P) Electronics : Mainboard , PSu 24 Volt , Some stuff for Heatbed and Hotend , Cabel missing in PTFE Mechanic : all stuff together but the Rails got Delivered in MGN9 instead of 12 ( i can Curse like a Sailor in such Cases) , so need to wait till they are Delivered Things to do : STL in the Right Dimensions ( Front and Rear Grill left and Right , Some Holders for the Fly Mainboard and ather little tings) I will post if i got something ready with STL and Pictures
- 46 replies
-
- 3
-
-
- builddiary
- switchwire
- (and 1 more)
-
Hello all, As suggested to me in my intro thread I guess I will start this one as a place to document my Voron 2.4 build. I have had a Voxelab Aquila for the last couple years and have modded and worked that poor thing into the ground and have decided that I enjoy this hobby enough to make a big upgrade. Here is what I am planning and where I am as of today: Voron 2.4 350x350 direct drive CW2, E3D Revo all sourced parts with some smaller kits thrown in where it makes sense. I have a LDO frame kit in space grey on the way from KB-3D, along with a Tensor hardware kit. ACM deck, back and top panels coming from print solid. I ordered my 440C sus linear rails from Robotdig and Din 3 rail from Digikey. I attempted to start printing the ABS parts on my printer but its been problematic at best so I went ahead and ordered the functional parts from 3D pros Etsy shop in black and grey. I think that about covers it for now and figure this should get me started. I will update with pics after I get the first round of parts in and get started. Tim
-
Hi, as the title suggests, this is going to take a while. I don't have spare money laying around so a kit is out of the question. I'm going to source everything myself. This is actually something I like doing. So, the actual build state is as follows : I bought the extrusions (In Poland, great quality and price) and am now in the process of tapping and drilling. Not very exciting I'm afraid, although I did design and print a few very simple jigs for drilling holes. I have no experience in printing ABS, always having printed in PLA and PETG. I tried with an enclosure for my trusted Ender 3 but hated the smell and the results were below par. So I decided to take advantage of the Voron PIF program, but since this is a slow build anyways I'll wait till the Stealthburner is officially the goto toolhead. As soon as the screws arrive from Ali I'll start assembling the frame.
- 465 replies
-
- 4
-
-
-
- builddiary
- trident
- (and 1 more)
-
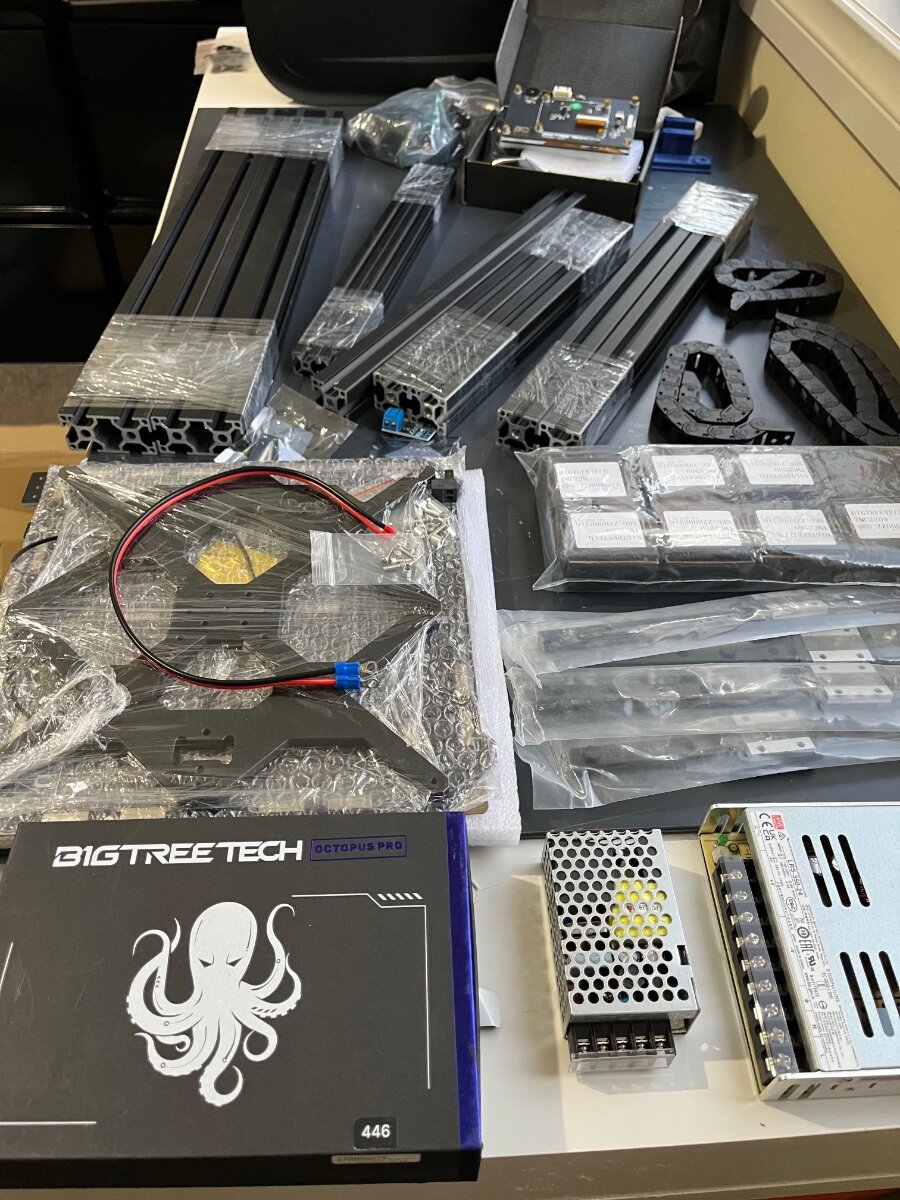
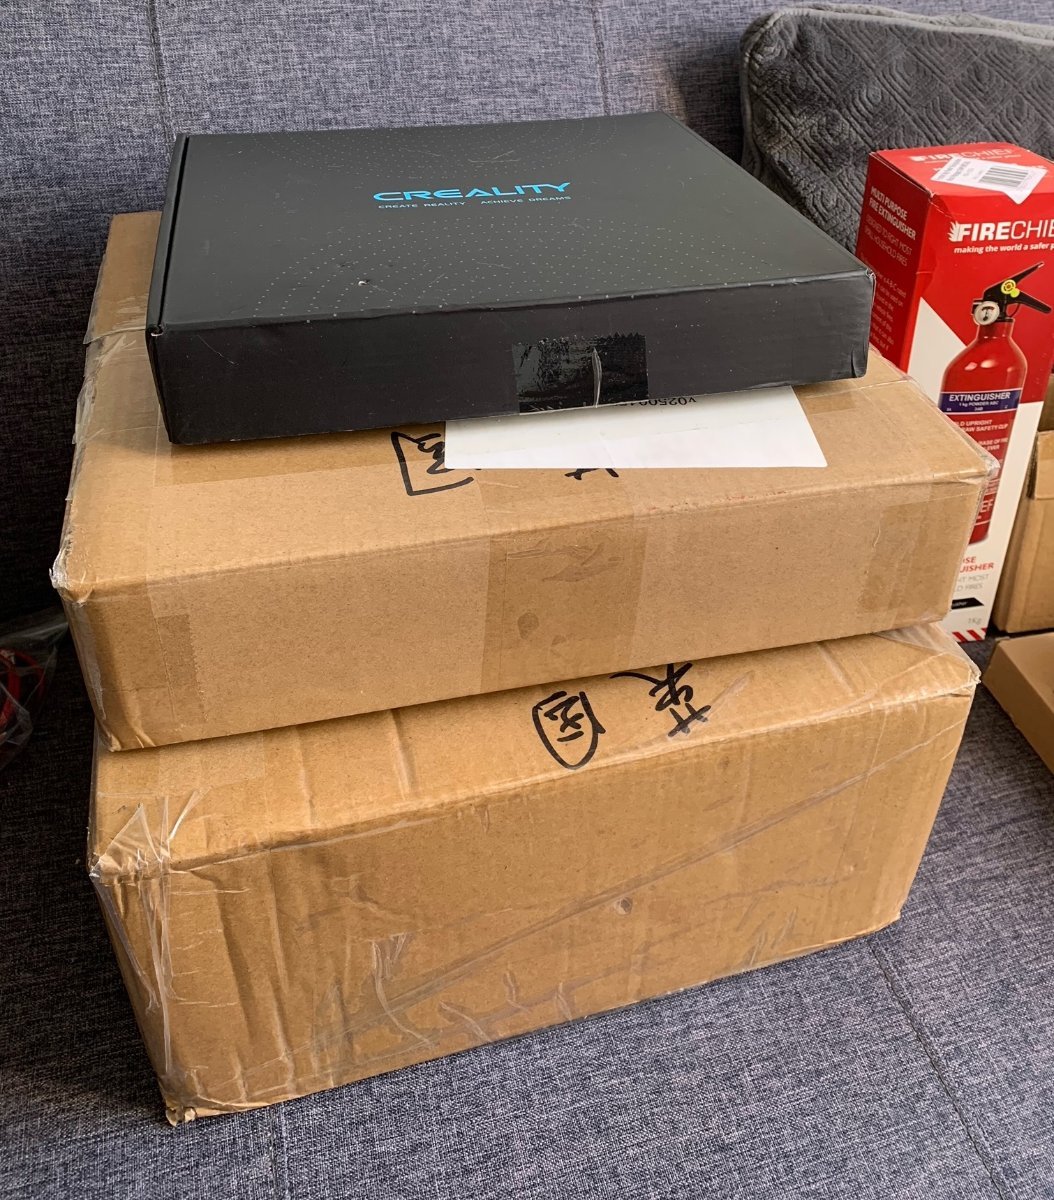
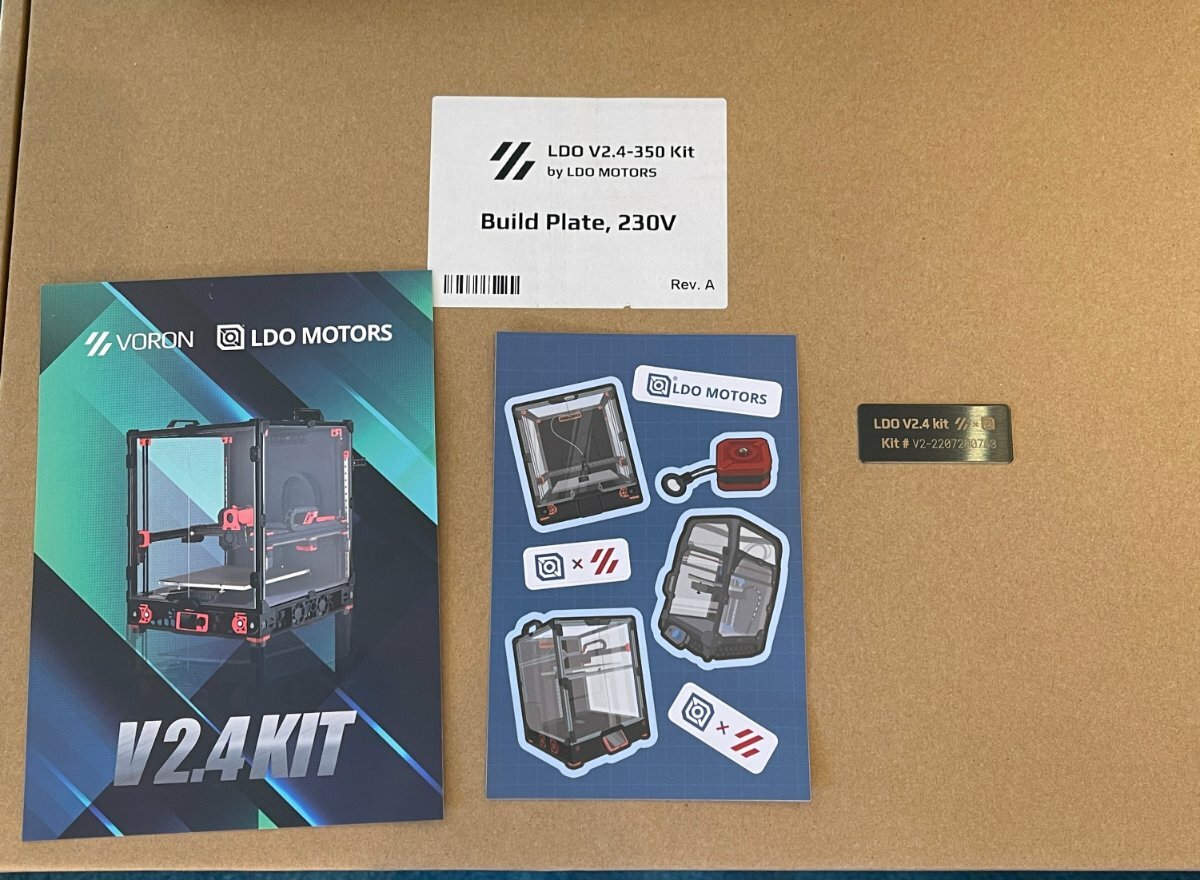
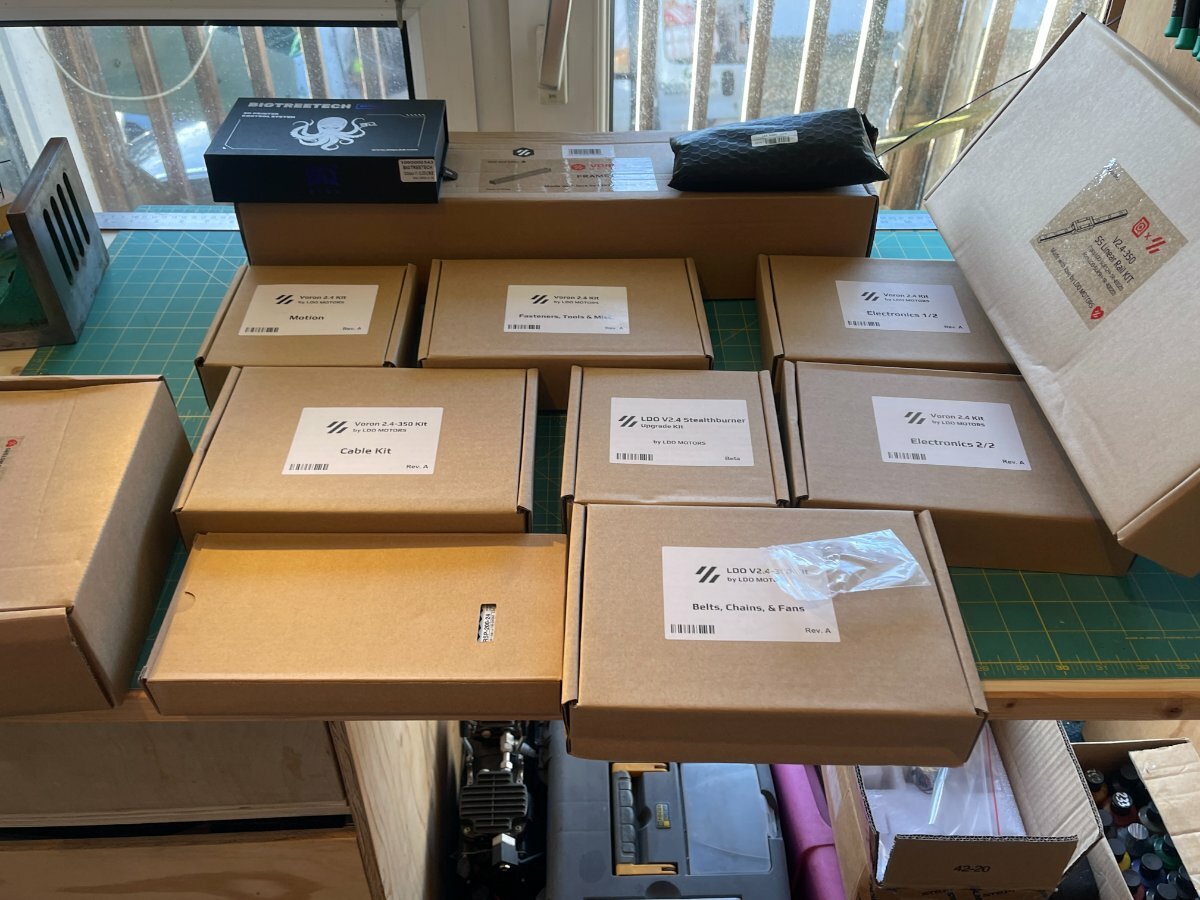
So this is not my first Voron but it is my first published diary so bear with me. My previous builds (1.5 -> 1.6 and V0) were all self sourced which gives choice but can be very long winded and time consuming, so this time after much reading around I plmped for the LDO Kit in it's full 350mm size. There was a wait while the boat slowly chugged around but here is some of what arrived: Amongst the stickers and card with URL links is an engraved metal stick on badge with what I assume is a unique serial number - neat! Everything came extremely well packed and many boxes within boxes - all clearly labelled.
-
After I have successfully completed my Voron 2.4, I would like to build another printer. I wavered VzBot and Trident. My sieger is the latter. Since my last construction diary was not really written promptly, I want to keep this step up-to-date and illustrated. I will also include my costs. Then we start the construction starting at this point with ordering the aluminum profile 20x20 Nut 6 type-i for 79Euro How to sight I have to switch to M6, but this was no problem with my 2.4.
-
After deciding to make the move a week ago, I looked around on google to find a supplier and settled on three choices: Bluerolls Store or FYSETC 1th Store on Aliexpress or formbot3d.com. All from China since I could not find anyone in the rest of the world with kits ready to roll off and marks as 'in stock' **more on that later but one of my main requirements is that the kit arrives quickly Formbot3d - https://www.formbot3d.com/ - 1120 usd with courrier lottery (DHL/TNT/FedEx/UPS) FYSETC 1th Store - pronounced "Fizetk Firth Store" ; ) - https://www.aliexpress.com/store/2498059?spm=a2g0o.detail.1000007.1.349c34b2EKkljr - 1065 usd with DHL Bluerolls Store - https://www.aliexpress.com/store/2808029?spm=a2g0o.detail.1000007.1.14763867V7eQbU - 1225 usd with DHL Because of my past experience with Aliexpress, being too often frustrating, my choice was biased towards Formbot since they are the one with a standalone website; they had the kit marked "in stock", credible reviews and no indication of problems. I ordered on Jan 9th and got the box on the 20th I'm glad to report that everything arrived as expected, in good shape and well packaged in EPP foam like you've seen for others on youtube. ********* My build is a custom size: i'm going for 350 x 350 x 730. I simply added 400mm to the z axis swapping the 400mm rails for 800mm ones. Here's the list of stuff I got for this mod: 4 main vertical extrusions, 930mm with blind corners: MISUMI Part No:HFSB5-2020-930-LCP-RCP 4 800mm linear rails from Robotdigg: part No: GS_MGN9-1H-B800 : https://www.robotdigg.com/product/1314/Black-anodized-linear-rail-7,-9,-12-and-15 10meters of GT2-9 belt and a 1meter piece of DC1015 drag chain also From robotdigg Apart from the enclosure panels, that's all you need.
- 143 replies
-
- 2
-
-
- v2.4
- 350x350x730
- (and 1 more)
-
Hi guys, here is the current status of my build, im waiting for the cable chains to proceed with the eletronic wiring. The plan is also to use a octopus v1.1 + ebb36 for the toolhead, while crimping i decided to remove most of the cables and can is the way to go. Self sourced parts, and a fermio enclosure.
-
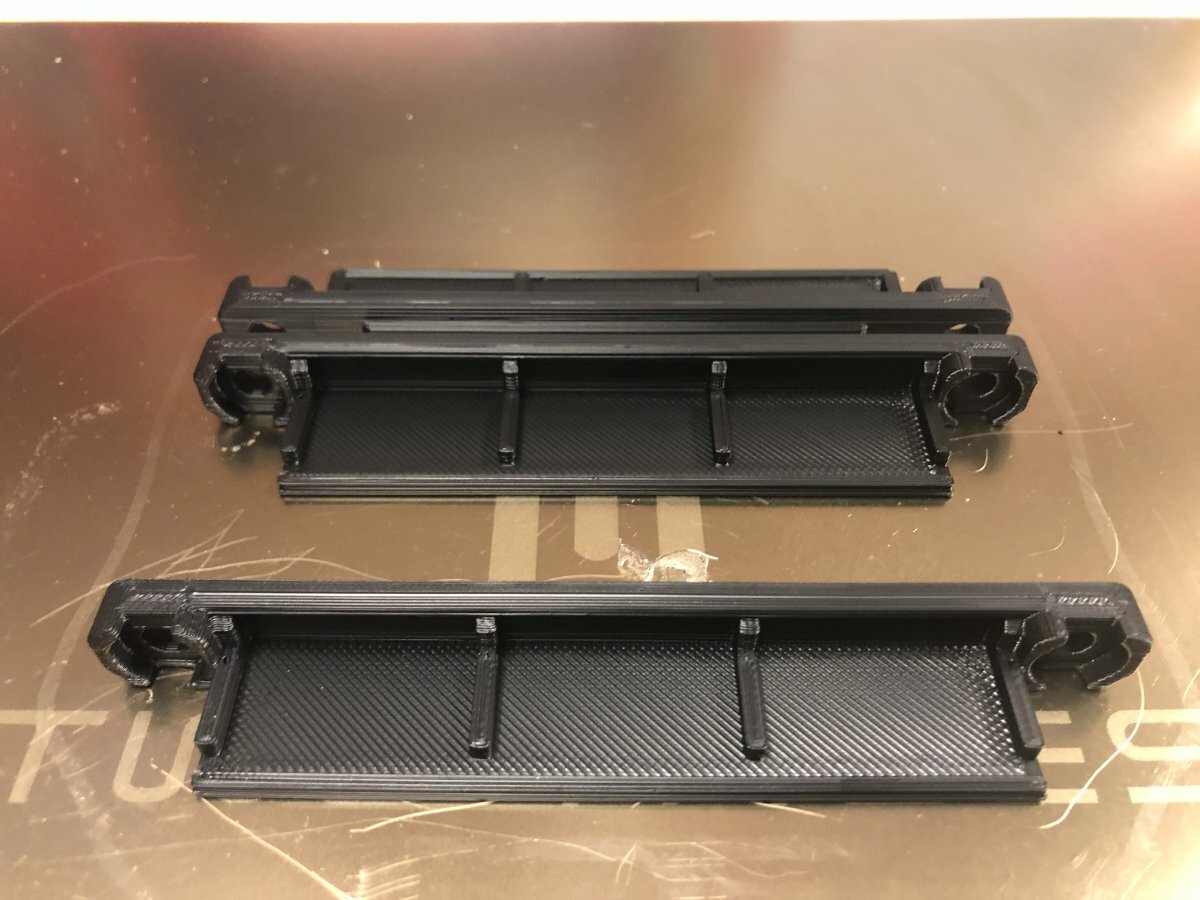
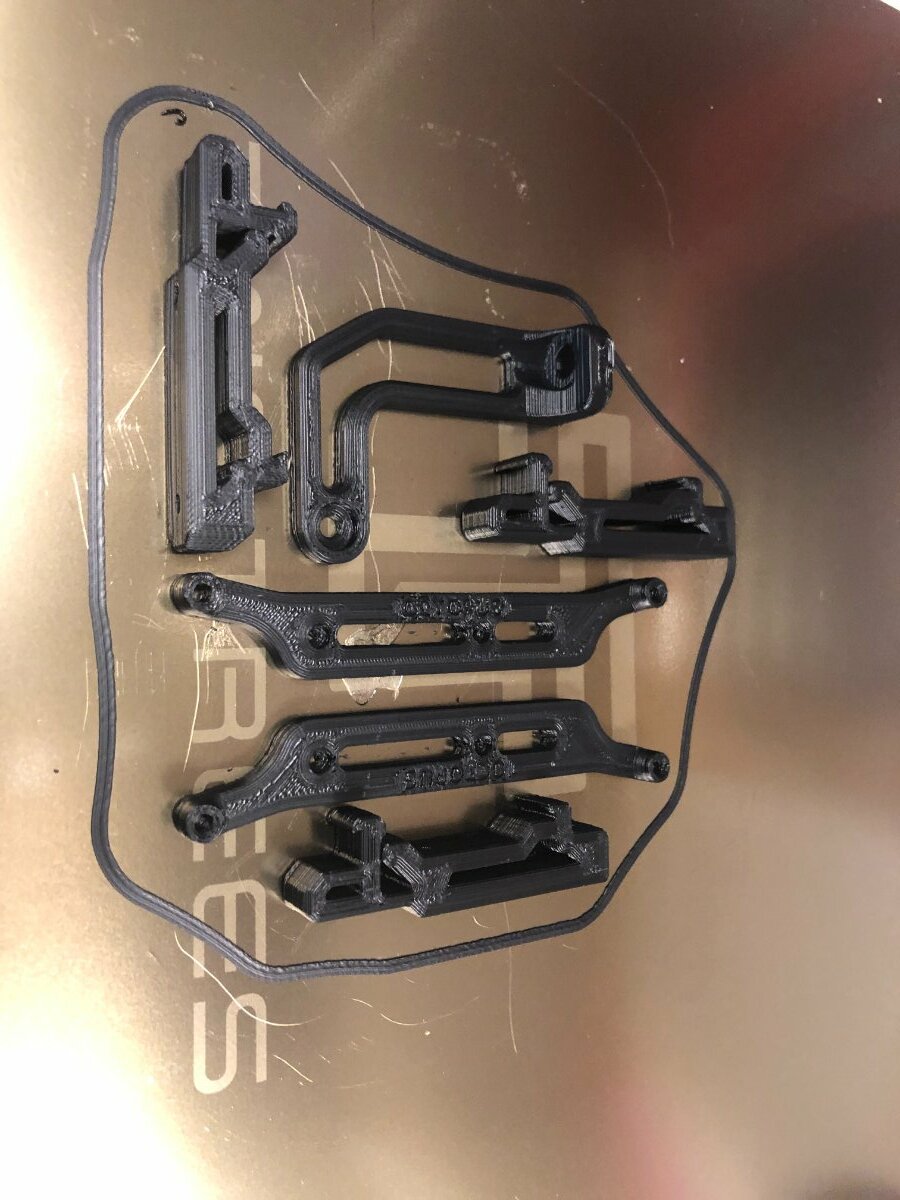
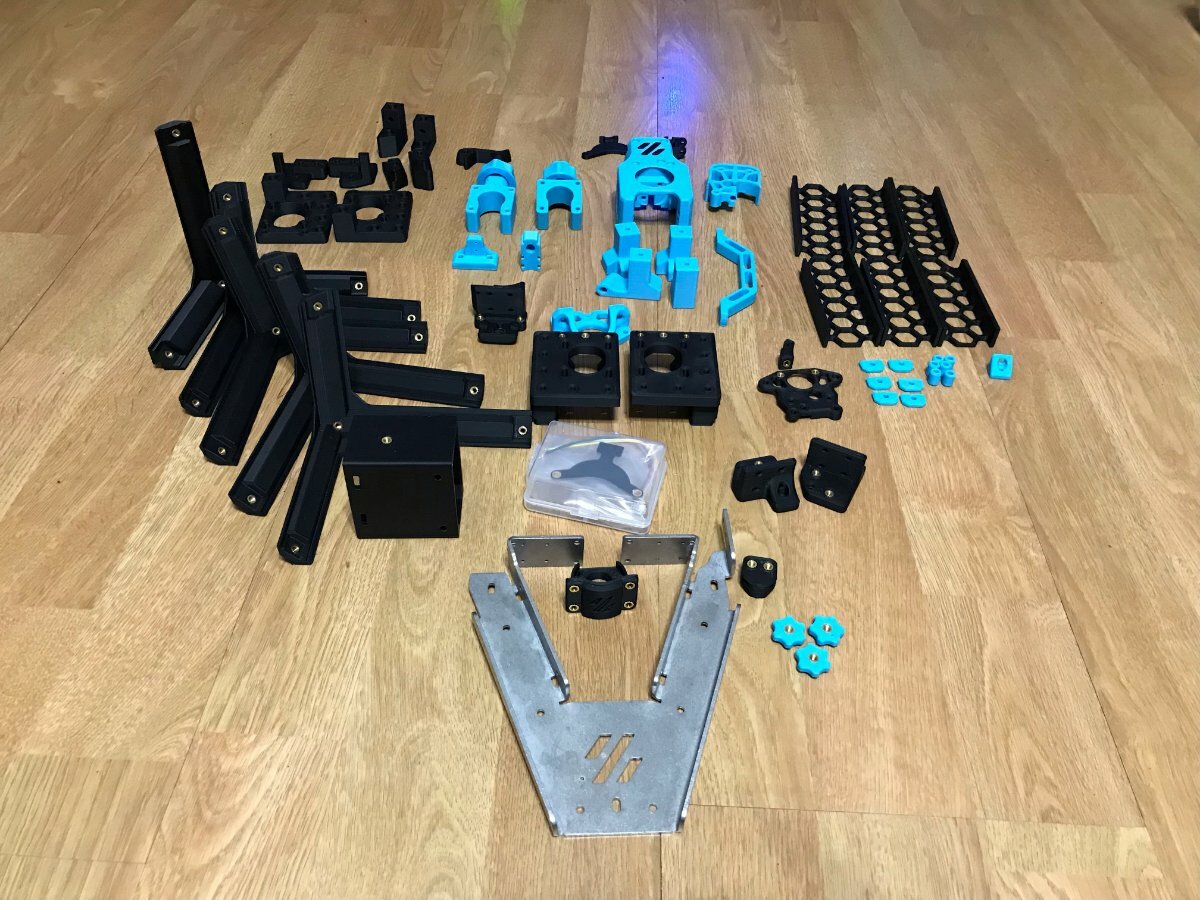
Hi All So I've been planning to build a Trident for the last year and I now have all the non-printed parts. I bought some from via BOM links or comparable sources and eventually purchased a partial Magic Phoenix kit to fill-out parts I was missing. I printed the parts in the image around 10 months ago, so some of the parts are out of date. I'm also not 100% sure about the colour. This is a ABS filament available in Australia from a company called 3dFillies. I have some Fillamentum ASA Extrafill in traffic red and black which I could use instead. Comments?
-
Well after confessing, in my intro, that amongst other sins I am lazy I have decided to pull my thumb out and get on and build my second Voron (0.1). Clearly the term "get on" is a relative one and should be viewed in context. Somewhere between the thermal heat-death of the universe and the half-life of Copernicium-235, I'll try and aim for better than Continental Drift as a good measure of progress. I spent last night inserting the heat-inserts into the necessary parts and managing to melt a couple and misalign a few others courtesy of my sausage fingers but fortunately Voron #1 came to the rescue and churned out the necessary replacement parts. For the purposes of this build, I'll be fitting the kirigami bed from the outset (much easier than a retrofit) and fitting an ADXL345 accelerometer. I have to confess that I utterly love the Resonance Compensation features of Klipper (saves printing a zillion test prints and never quite getting decently ghost free results). Clearly because I am still lazy I did not lay out all the parts for the printer
-
 Hi, I'm starting my journey in the build process. What will the purpose of this printer for start : I'm producing litophanes on 4 printers (well, 3 actully, the 4th is under modification :D) These litophanes take a hell of time to be printed (3 to 4 days for the biggest 20cm diameter ones) So I want to speed up a little bit the process without loosing quality. Second purpose, I'm also doing maps of the moon 600x450 mm. having a bigger plate will enhance quality ( less joints to fill !) MARE IRIS I baught a FYSETC kit : https://fr.aliexpress.com/item/1005004544503501.html?spm=a2g0o.order_detail.order_detail_item.4.73d67d56WGdZP9&gatewayAdapt=glo2fra Purple she will be (ship from spain, 4 days delivery to France) I jumped on this kit before knowing that FYSETC have had a ... peculiar behavior respect to the VORON project and team. sorry for that. I was looking tat LDO kit but 500€ difference is a HUGE gap (30% more whaaaaat ?!) I will use a rapido HF hotend as several people adised me, Klipper (never used it but having a VORON without klipper is like having a Ferrari without fuel no ?) I'm focusing on the preparation now : What to print, how much filament, how to organize the mess. here's how I proceeded : Download the stl on the github : https://github.com/VoronDesign/Voron-2/releases/tag/V2.4r2 There is a shit load (sorry, language...) of pieces to print right now I see that I will need 242 hours of printing and 1.8kg of ABS. I have so decided to print EVERYTHING (or change my mind) in same ABS color : Purple (https://www.amazon.fr/gp/product/B01AE9EQJ2/ref=ppx_yo_dt_b_asin_title_o02_s00?ie=UTF8&psc=1) I have created a google sheet to have more visibility : https://docs.google.com/spreadsheets/d/1wKTEwpUDCoE5RdBIAZ99yWagr5PqbSOThR42P0DKqDA/edit?usp=sharing This is 19 plates, placed in 19 plastic bags to get things easier I have 2 prusa MK3S, it will be a full week of printing. (if everything goes well my dear, if everything goes well...) I havn't started to print, I need to finish a prusa box before... (https://www.printer-box.com/fr/) I will have to clean and treat the linear rails also as per this video from Alex Kenis : I have alrerady treated linear rails for my "ender3", unmounting the carriage is NOT simple and I don't do it anymore. So here's my process: - wash linear rails + carriage with Alccol isopropyl 99% - flush the carriage with WD 40 (flush in the little hole of the carriage) - apply grease (SUPER LUBE : https://www.amazon.fr/Super-Lube-21030-Synthetic-Grease/dp/B000XBH9HI) on linear rails and in the ball way of the carriage Questions : - Right now I think it's a huge project to print, I can't stop thinking I'm printing to much pieces. Of course it's much more than the PIF programs gives you, I think maybe people prints just the necessary parts then print the rest on the Voron itself but it should be a pain to rebuild everything no ? - I'm also thinking to several stuff : I'm not an inexperienced maker, and I will go for taptaptap stuff and ADXL345. Several people told me to start basic and upgrdade AFTER. isn't it a pain to modifiy AFTER when you know you will go for a mod ? *************************************************************************** EDIT : Here's the link to my Voron printed part check list : https://docs.google.com/spreadsheets/d/1fp3H7S3F8znif39BxnOTzqTZ4fQqCVs-TIW24X1bEUU/edit#gid=0 I'm updating this version along the way. when I see pieces that are no longer in the official STl repository, I remove it.
 -
Was going to keep this one quiet, but then asking for others to do a build diary and me not - how did @smirk put it: pot; kettle;black - point taken. How did this start? Well I ordered some 300mm extrusions for the previous tri-zero build (Voron with a twist). However living where I do, postage can be an issue and I got tired of waiting for the parts to arrive, so I finished the previous build without the longer extrusions. Since then they have arrived, and having build two previous V0's, I had plenty of spare parts. And as the members of the forum has come to know, I have plenty of extra's for those "rainy days" or "just in case days" - again not hoarding, just forward planning. Also loved the way the TriZero prints - auto bed levelling, auto Z-calibration, etc. Thus - another Vo build. As you know, I cannot seem to build a stock standard Voron - thus decided to to the Box Zero, but wait there is more - the TriZero needs to be incorporated, as well as auto Z calibration, and I need the unofficial Mini-stealthburner from @atrushing but wait there is more - why only have LED's on the toolhead - modified the bed log - put an LED in there as well. And Who mounts for the bed.... Enough of my rambling - some pictures - don't have many as I was not going to do a build diary.
-
Got the last box (for now) of parts in the post earlier in the week - a PIF kit from Slidr over on Discord, and there was some time late this week to get the build started! Spent last night cleaning and greasing the linear rails & fitting them to the required extrusions & building the bed carrier. Looked over my work this evening and 3 of the 4 Y/Z rails were in the wrong side of each extrusion... Hopefully that will teach me not to work on it late in the evening! Thought I'd have a problem getting the Z rails trammed, but a glass-ceramic stovetop was flat enough to sort that out. Hopefully it'll be accurate enough, but we'll see when I get around to tuning I suppose. I'm building with a Formbot kit - and the M3 screws are unfortunately quite soft - I've partially stripped two of them already. Both on blind joints, but tapping a T8 screwdriver into the chewed up screwhead seems to have been enough to get them to loosen off. I caution people against using ball-head hex keys too much with the formbot kit, It'll lead to headaches. Aside from that, the kit parts look great. Don't have to worry about sourcing a Pi as I've an old 3B lying around from years ago that I plan to use.
-
 Starting building soon, most parts are delivered or in transport now. had some delay of Formbot city lockdown, but LDO is having massive delays also (even worse). Expecting to start building in about two weeks.... to be continued! Voron Kit: Formbot 2.4 R3 350 Vulcan SF Printed Parts: ASA Carbon Black & Neon Yellow (Neon Yellow was self sources, not a default color offered) High Quality prints from Mehmet (Turkey) on Etsy 5 star rating https://www.etsy.com/nl/shop/Yacime3D?ref=simple-shop-header-name&listing_id=1188668167 Wiring: Decided to buy an all black kit + SB kit from OneTwo3D.co.uk LCD: BTT Pi TFT50 v2.0 - BigTreeTech Electronics: Need to decide to mount things normal, or vertical, see what brings best space and cooling. Ventilation/filtering: Nevermore Duo with two Delta fans. Mostly for the hot air distribution, but filtering helps. VEFACH filter outlet MOD
 -
Have all the hardware for the build - self sourced late last year. Looking at options and the escalation in postage costs, this I feel is no longer a viable way to go. Kits in the end work out much cheaper and that is the way I will go in future. Looking at kits on Formbot's Aliexpress store, the delivery times to Australia is within 6 weeks. And the kits are approximately 500AUD cheaper than locally sourced kits from Formbot. Enough of this and on to the build. Frame done and parts printing. As @Buurman, planning a few mods with the build and even though the Switchwire is not meant to be enclosed, it will be. Will be a slow build but definitely not as drawn out, as was the 2.4r2 build. Lets start: -Individually self sourced parts Parts being printed on the newly build V2.4008. Color scheme will be Blue, White and Black. Frame assembled: (Build on a mirror) And yes, I have a Raspi Pi4 and some spare: @smirk I am not a hoarder - just plan ahead - you know for those rainy days.
- 110 replies
-
- 3
-
-
-
- builddiary
- switchwire
- (and 1 more)
-
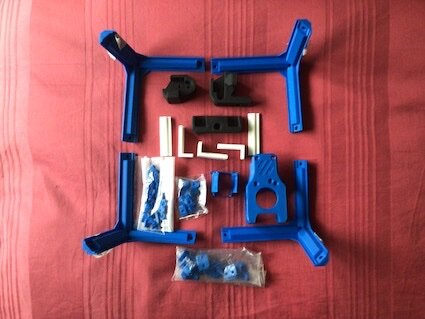
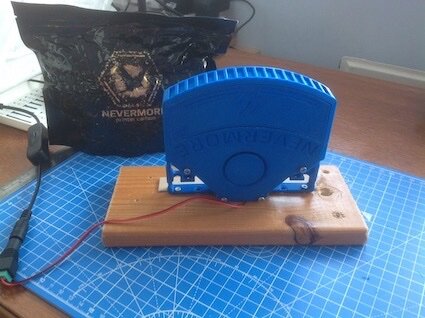
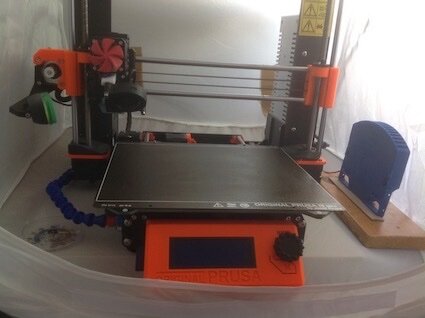
I've had a Prusa MK3 for around three years and a Prusa Mini for about two years; I was going to get a an XL but saw the light (Hallelujah) and got a an LDO Voron 0.1 kit from onetwo3d instead. It was on order for about 4 weeks and arrived two days ago. The only bit I've taken out of the kit, so far, is the heat thread inserts tool. I'm going with Sunlu blue ABS and eSun black ABS+. I've printed some stuff while I've been waiting - most of the Top Hat, all the bits for the frame and am currently printing more blue stuff. I was a bit nervous of printing ABS, but I had a light tent for the MK3S so I thought I'd give it go with that, always with the fallback of buying the printed parts. I started using a Kores glue stick on a Prusa brand textured plate, which worked ok, but difficult to get the coating even. I've now moved to a diluted (2 parts water, 1 part glue) Kores liquid PVA. A scant brush tip full will usually do all the area I need. It spreads evenly and washes off fine with hot soap water. But the ABS fumes are uncomfortable, not too smelly, but throat challenging and headachy. My playroom is an upstairs bedroom, to which I keep the door shut when printing. Nonetheless the whole upstairs gets quite a dose of the ABS fumes. So, I though I'd print the Nevermore Carbon Filter V4 and have today put that in the MK3S tent on a very posh wooden mount with a piece of cardboard under it to help it keep upright I'm using a not-so-powerful 2 pin connection fan at the moment, but after just this afternoon as a trial, it does seem better, at least the upstairs feels ok now. I've got a more powerful fan on it's way from China - I'll reprint the fan cowling for it in black I think, before it moves to Mr Voron. My Prusa took me ages to build, I took it slowly and it took about a month to complete. I did start this Voron project in a rush, but have slowed down (just a bit) now - I intend to enjoy the build. I've started a spread sheet as a build and print guide, I want to be able to start each section, Prusa style, knowing I've got all the bits that I need to complete it in front of me. I also printed a bracket for a Logitech C270 camera - I'm trying to anticipate any "extra" m3 nuts required in the frame to attach bits like a camera mount, Nevermore Fan mount, maybe handles. I'd really appreciate any suggestions I'll probably finish printing all the Blue Bits tomorrow, and then next week I'll have a go at building The Frame All suggestions and encouragement welcome. This diary building feels very therapeutic, better by far than boring the whatever's off of mates down the pub, but I'll probably do that as well
- 11 replies
-
- 3
-
-
- builddiary
- v0.1
- (and 1 more)


.jpg.26081af1442786b38c8b3d70fd8d78ac.jpg)
.jpg.395aaacea0a1a3df1252d76e75770b2b.jpg)
.jpg.52d082b6a4ed5241bb22919c0ce40181.jpg)
.jpg.78db5010090144c653a47788d307a704.jpg)
.jpg.e363cfcf7450891f07927e5beed7b472.jpg)


.jpg.741035037423d9b34d81e4ada8492246.jpg)