21 14 2 Details Changelog 0 Questions 643 Comments 3 Reviews 1 Tutorial Support Recommended Comments Prev 2 3 4 5 6 7 8 9 10 11 12 Next Page 7 of 26 Venom 1 Posted January 20, 2023 Share 8 hours ago, atrushing said: I have updated the motor_bridge and added an Umbilical_mount in the Downloads section. Awesome! Can't wait to get my extruder so I can try this out. Thanks for adding this! 1 Quote Link to comment Share on other sites More sharing options... Venom 1 Posted January 25, 2023 Share About to order the BOM... Any idea what wire gauge for the led's? Quote Link to comment Share on other sites More sharing options... atrushing 994 Posted January 25, 2023 Share 2 hours ago, Venom said: About to order the BOM... Any idea what wire gauge for the led's? I think I use 24 awg but a little thicker can't hurt. They only use about 60 mA x 3 LEDs so it is not that much current. Quote Link to comment Share on other sites More sharing options... Rixi 7 Posted February 8, 2023 (edited) Share On 12/21/2022 at 9:51 AM, atrushing said: How does this look? The offset is 31mm in X and 30mm in Y. Mini_SB_Orb2.0_Ender_6_Mount_BL_Touch.stl 178.3 kB · 7 downloads My life is to f*** busy. Or I'm too lazy. Anyways: A few weeks have passed since I printed the Mini Stealth toolhead and planned to install it my Ender 6. Last weekend I finally did it. Setting it up and doing a first minimum of calibration also took a while, but it's now printing. There is still much work to do. Re-locate the Y-endstop to not loose so much build volume. Re-Print it in ABS/ASA (the black one is still PETG since my old print head was not capable of ABS/ASA). Calibrate it better. Increase the print speed. Overall building it went quite easy and everything fits well including @atrushing's custom Ender 6 mount. Many thanks again! The only problem I noticed is the 3007 fan I have. I thought this one by GDSTIME (ordered on AliExpress) would be of decent quality, but alrady after maybe only 1-2h runtime it tends to rattle sometimes: Any suggestions for a good fan? Or is the Sleeve Bearing the problem? Thank you, Johannes Edited February 8, 2023 by Rixi 2 Quote Link to comment Share on other sites More sharing options... Buurman 891 Posted February 8, 2023 Share 10 minutes ago, Rixi said: Any suggestions for a good fan? Or is the Sleeve Bearing the problem? These should be ok for at least a while, but double bearings is better. 1 Quote Link to comment Share on other sites More sharing options... atrushing 994 Posted February 8, 2023 Share 43 minutes ago, Rixi said: A few weeks have passed since I printed the Mini Stealth toolhead and planned to install it my Ender 6. Last weekend I finally did it. Setting it up and doing a first minimum of calibration also took a while, but it's now printing. Great to hear! it looks nice in all black. 45 minutes ago, Rixi said: The only problem I noticed is the 3007 fan I have. Since you will need to re-build the toolhead after you print it in ABS/ASA, I am near to having the new version of the Mini Stealth ready to publish and it can fit a 3007 or 3010 fan. That looks like a Dragon in the pictures but if you tell me which hotend you use I can upload the proper .stl a little early. Quote Link to comment Share on other sites More sharing options... Buurman 891 Posted February 8, 2023 Share 12 minutes ago, atrushing said: Great to hear! it looks nice in all black. I must agree! I printed it grey with sprkles, cherry red with sparkles, but think I need to go black sparkles 1 Quote Link to comment Share on other sites More sharing options... Rixi 7 Posted February 8, 2023 Share Haha, black is actually not my personal favorite. But it was the only PETG I had (beside transparent). I like your colourful Mini Stealthburners more 2 hours ago, atrushing said: That looks like a Dragon in the pictures but if you tell me which hotend you use I can upload the proper .stl a little early. I have no idea how you identified the Dragon from the given pictures, but you're absolutely right. Genious you! To be precise, it's the TriangleLab Dragon which seams to have a slightly different heat-block than the Phaetus labeled Dragon. 2 hours ago, atrushing said: I am near to having the new version of the Mini Stealth ready to publish and it can fit a 3007 or 3010 fan. Sounds great And is there any specific 3010 fan that you can recommend? Talking about the cooling: Have you ever considered to design a kind of fan shroud to lead/focus the airflow through the cold-end ? Something similar like this (or at least with the same idea behind)? 1 Quote Link to comment Share on other sites More sharing options... atrushing 994 Posted February 8, 2023 Share 42 minutes ago, Rixi said: And is there any specific 3010 fan that you can recommend? I am only using whichever 3007 fan I can get on Amazon so I can't really help here.. 46 minutes ago, Rixi said: Have you ever considered to design a kind of fan shroud to lead/focus the airflow through the cold-end It would be a lot of work designing one for each different hotend and I don't know how well they would help. Radial fans are not good with pressure so the more you restrict the flow, the less efficient they get. I think it is more important to make sure the air has somewhere to exit and take the heat with it. 1 hour ago, Rixi said: I have no idea how you identified the Dragon from the given pictures, but you're absolutely right. I have spent many hours working around the 3D models of all these different hotends (I just need to find a model of the VolcoMosq...) Attached is the new Mini Stealth - Orbiter 2.0 - Dragon (minimal) plus the 3007 adapter clip. [a]_Mini_Stlb_Orbiter_2.0_Dragon_minimal_3010.stl 3007_Fan_Spacer_v1.2.stl Quote Link to comment Share on other sites More sharing options... atrushing 994 Posted February 8, 2023 Share 4 hours ago, Rixi said: The only problem I noticed is the 3007 fan I have. I thought this one by GDSTIME (ordered on AliExpress) would be of decent quality, but alrady after maybe only 1-2h runtime it tends to rattle sometimes: You don't happen to be running this 12V fan on 24V? That could lead to issues.. Quote Link to comment Share on other sites More sharing options... Rixi 7 Posted February 8, 2023 Share 1 hour ago, atrushing said: Radial fans are not good with pressure so the more you restrict the flow, the less efficient they get That's true and I'm aware of it. Narrowing the "tunnel" for the air too much wouldn't be a good idea. But for my "feeling" (which is for sure miles away from any scientific approach) the area behind the fan is quite wide and the hotend sits "somewhere" in this area. There could be much air flowing around the hotend without picking up any heat. Maybe it's not neccessary to to make an individual duct for every hotend type, but a generic one that has enough space to install any of your considered hotends (maybe excluding the Mosquito because of it's way different shape). Just my thoughts. Feel free to "use" them or not! Thanks for the updated models ! Quote Link to comment Share on other sites More sharing options... Rixi 7 Posted February 8, 2023 Share 1 hour ago, atrushing said: You don't happen to be running this 12V fan on 24V? That could lead to issues.. Thanks for reviewing/asking this, it's in deed 12V. (my printer is running on 24V, but I preaviously installed a step-down converter to 13V to be able to run a Noctua 4010 on the original printhead. Quote Link to comment Share on other sites More sharing options... atrushing 994 Posted February 8, 2023 Share 8 minutes ago, Rixi said: my printer is running on 24V, but I preaviously installed a step-down converter to 13V That makes more sense.. With the 3010 fan it is easier to find 24V options. Quote Link to comment Share on other sites More sharing options... mvdveer 2,773 Posted February 8, 2023 Share I love how this product just keeps evolving. I printed one of the first models that came out and it is working beautifully on mysecond V0. I think on behalf of the teamfdm community, I would like to give a BIG shout out to @atrushing for his great work, willingness to adapt his models to suit the need of individual users, speedy response to specific requests and his help in general in this forum. Thank you 3 Quote Link to comment Share on other sites More sharing options... atrushing 994 Posted February 8, 2023 Share 33 minutes ago, mvdveer said: I love how this product just keeps evolving. It really has come a long way from my first design.. Thanks to you GOMs for beta-testing the early design issues! 2 1 Quote Link to comment Share on other sites More sharing options... Buurman 891 Posted February 9, 2023 Share 11 hours ago, mvdveer said: I would like to give a BIG shout out to @atrushing for his great work, willingness to adapt his models to suit the need of individual users, speedy response to specific requests and his help in general in this forum I try to send him a friendly message every day But yes... I said it before, its amazing what you are doing @atrushing!!! thanks! 2 Quote Link to comment Share on other sites More sharing options... Buurman 891 Posted February 9, 2023 Share 11 hours ago, atrushing said: It really has come a long way from my first design Im glad you started thinking outside of the BOX so cool to see the square first design though! Still think you should rename it to "The Rush" like.. the rock, but then... well.. you know.. The RUSH! Quote Link to comment Share on other sites More sharing options... atrushing 994 Posted February 9, 2023 Share 41 minutes ago, Buurman said: Im glad you started thinking outside of the BOX so cool to see the square first design though! Still think you should rename it to "The Rush" like.. the rock, but then... well.. you know.. The RUSH! The first square design was just a Mini After Orbiter with a facelift. It still had the meager 3010 blowers.. Of course, one silly idea always leads to another! I like the idea of The Rush but I want to pay respect to the source design. (plus its better for the search algorithms ) Quote Link to comment Share on other sites More sharing options... Buurman 891 Posted February 9, 2023 Share 39 minutes ago, atrushing said: The first square design was just a Mini After Orbiter with a facelift. It still had the meager 3010 blowers.. Of course, one silly idea always leads to another! I like the idea of The Rush but I want to pay respect to the source design. (plus its better for the search algorithms ) I guess Mini Stealth codename "The Rush" should do for now then hahaha! 1 1 Quote Link to comment Share on other sites More sharing options... crazypenguin 3 Posted February 14, 2023 Share Wow, this mod is amazing! At the moment I'm considering a Mini Stealthburner for my Switchwire build. Mainly because my printer is in an cabinet, thus being a bit limited in headspace above. Has someone tried this before? I'm using a Orbiter 2.0 and Dragonfly BMO hotend, so this mod is a perfect fit. Is there a possibility for a BL-Touch attachment? Quote Link to comment Share on other sites More sharing options... atrushing 994 Posted February 14, 2023 Share 43 minutes ago, crazypenguin said: Has someone tried this before? I'm using a Orbiter 2.0 and Dragonfly BMO hotend, so this mod is a perfect fit. Is there a possibility for a BL-Touch attachment? It looks like this might take some work. I will start working on the x-frame pieces for the Switchwire. Adding the BL-Touch might be more challenging. I have seen a solution to fit one but it is designed for the V2.4 which looks like it has more room. I can highly recommend using the IR Probe. It is quicker, easier and more accurate than the BL-Touch. Below are the V2.4 BL-Touch, the Mini Stealth and the Switchwire x-frame pieces (in that order). 1 Quote Link to comment Share on other sites More sharing options... crazypenguin 3 Posted February 15, 2023 Share On 2/14/2023 at 7:13 PM, atrushing said: It looks like this might take some work. I will start working on the x-frame pieces for the Switchwire. Adding the BL-Touch might be more challenging. I have seen a solution to fit one but it is designed for the V2.4 which looks like it has more room. I can highly recommend using the IR Probe. It is quicker, easier and more accurate than the BL-Touch. Below are the V2.4 BL-Touch, the Mini Stealth and the Switchwire x-frame pieces (in that order). Thank you so much! I'm impressed how much size difference there is. I came up with the idea as my printer is placed in a IKEA cabinet which limits its height. From what I can tell I might take some advantage from the mini stealthburner due to height limits. Quote Link to comment Share on other sites More sharing options... atrushing 994 Posted February 16, 2023 Share On 2/14/2023 at 4:44 PM, crazypenguin said: a Mini Stealthburner for my Switchwire build. This was a little tricky and the official Switchwire x-frame pieces have some geometry around the limit switch that I don't understand. The Y and Z offsets are also different than the other Vorons. I simplified the design a little and ditched the extra x_bearing_block so the x-frame pieces mount directly to the MGN carriage. I haven't done any work on BL-Touch mounting yet. The LGX Lite and the Mini Sherpa versions should work with the standard Switchwire Z offset. (files attached) Unfortunately, with the Orbiter 1.5 and 2.0 the stepper motor sits too low and I would have to re-work these pieces and move the Z offset up at least 3mm if the range of Z-travel of the Switchwire would allow it. x_frame_Switchwire_right.stl x_frame_Switchwire_left.stl 1 Quote Link to comment Share on other sites More sharing options... crazypenguin 3 Posted February 17, 2023 Share 18 hours ago, atrushing said: This was a little tricky and the official Switchwire x-frame pieces have some geometry around the limit switch that I don't understand. The Y and Z offsets are also different than the other Vorons. I simplified the design a little and ditched the extra x_bearing_block so the x-frame pieces mount directly to the MGN carriage. I haven't done any work on BL-Touch mounting yet. The LGX Lite and the Mini Sherpa versions should work with the standard Switchwire Z offset. (files attached) Unfortunately, with the Orbiter 1.5 and 2.0 the stepper motor sits too low and I would have to re-work these pieces and move the Z offset up at least 3mm if the range of Z-travel of the Switchwire would allow it. x_frame_Switchwire_right.stl 450.47 kB · 1 download x_frame_Switchwire_left.stl 437.09 kB · 1 download Wow, I'm impressed by your work! Quote Link to comment Share on other sites More sharing options... atrushing 994 Posted February 17, 2023 Share 1 hour ago, crazypenguin said: Wow, I'm impressed by your work! Thanks, I do what I can.. I have worked up a new version that should work with either of the Mini Stealth Orbiter toolheads. They raise the nozzle by 3mm so I don't know if the Switchwire has enough negative Z travel for this to work. x_frame_Switchwire_Orbiter_right.stl x_frame_Switchwire_Orbiter_left.stl 2 1 Quote Link to comment Share on other sites More sharing options... Prev 2 3 4 5 6 7 8 9 10 11 12 Next Page 7 of 26 Join the conversation You can post now and register later. If you have an account, sign in now to post with your account. Add a comment... × Pasted as rich text. Paste as plain text instead Only 75 emoji are allowed. × Your link has been automatically embedded. Display as a link instead × Your previous content has been restored. Clear editor × You cannot paste images directly. Upload or insert images from URL. × Desktop Tablet Phone Submit Comment
Venom 1 Posted January 20, 2023 Share 8 hours ago, atrushing said: I have updated the motor_bridge and added an Umbilical_mount in the Downloads section. Awesome! Can't wait to get my extruder so I can try this out. Thanks for adding this! 1 Quote Link to comment Share on other sites More sharing options...
Venom 1 Posted January 25, 2023 Share About to order the BOM... Any idea what wire gauge for the led's? Quote Link to comment Share on other sites More sharing options...
atrushing 994 Posted January 25, 2023 Share 2 hours ago, Venom said: About to order the BOM... Any idea what wire gauge for the led's? I think I use 24 awg but a little thicker can't hurt. They only use about 60 mA x 3 LEDs so it is not that much current. Quote Link to comment Share on other sites More sharing options...
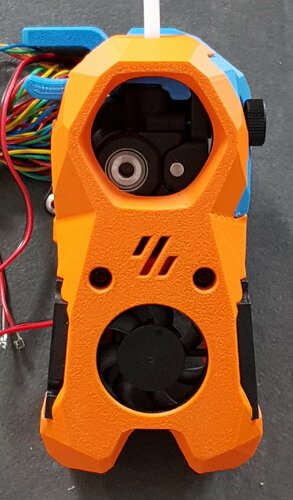
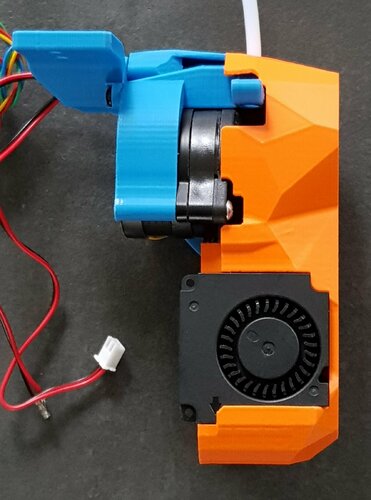
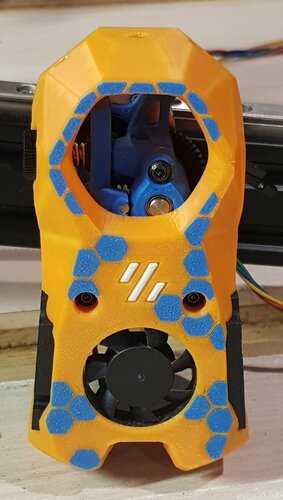
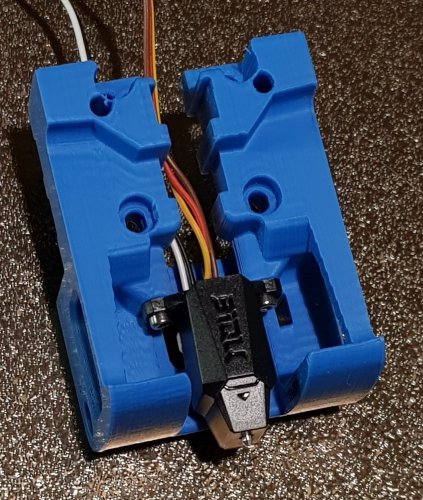
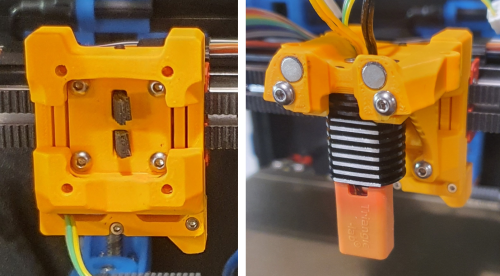
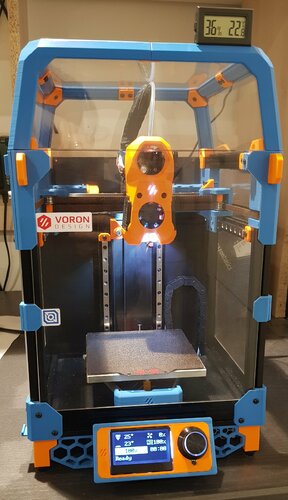
Rixi 7 Posted February 8, 2023 (edited) Share On 12/21/2022 at 9:51 AM, atrushing said: How does this look? The offset is 31mm in X and 30mm in Y. Mini_SB_Orb2.0_Ender_6_Mount_BL_Touch.stl 178.3 kB · 7 downloads My life is to f*** busy. Or I'm too lazy. Anyways: A few weeks have passed since I printed the Mini Stealth toolhead and planned to install it my Ender 6. Last weekend I finally did it. Setting it up and doing a first minimum of calibration also took a while, but it's now printing. There is still much work to do. Re-locate the Y-endstop to not loose so much build volume. Re-Print it in ABS/ASA (the black one is still PETG since my old print head was not capable of ABS/ASA). Calibrate it better. Increase the print speed. Overall building it went quite easy and everything fits well including @atrushing's custom Ender 6 mount. Many thanks again! The only problem I noticed is the 3007 fan I have. I thought this one by GDSTIME (ordered on AliExpress) would be of decent quality, but alrady after maybe only 1-2h runtime it tends to rattle sometimes: Any suggestions for a good fan? Or is the Sleeve Bearing the problem? Thank you, Johannes Edited February 8, 2023 by Rixi 2 Quote Link to comment Share on other sites More sharing options...
Buurman 891 Posted February 8, 2023 Share 10 minutes ago, Rixi said: Any suggestions for a good fan? Or is the Sleeve Bearing the problem? These should be ok for at least a while, but double bearings is better. 1 Quote Link to comment Share on other sites More sharing options...
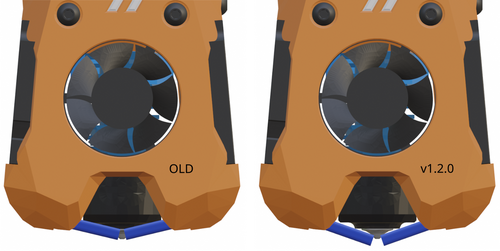
atrushing 994 Posted February 8, 2023 Share 43 minutes ago, Rixi said: A few weeks have passed since I printed the Mini Stealth toolhead and planned to install it my Ender 6. Last weekend I finally did it. Setting it up and doing a first minimum of calibration also took a while, but it's now printing. Great to hear! it looks nice in all black. 45 minutes ago, Rixi said: The only problem I noticed is the 3007 fan I have. Since you will need to re-build the toolhead after you print it in ABS/ASA, I am near to having the new version of the Mini Stealth ready to publish and it can fit a 3007 or 3010 fan. That looks like a Dragon in the pictures but if you tell me which hotend you use I can upload the proper .stl a little early. Quote Link to comment Share on other sites More sharing options...
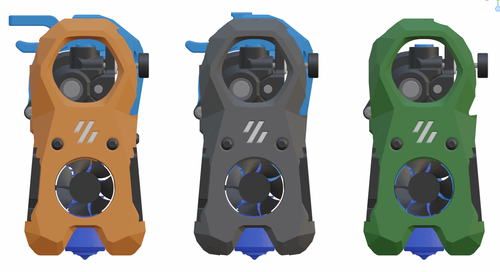
Buurman 891 Posted February 8, 2023 Share 12 minutes ago, atrushing said: Great to hear! it looks nice in all black. I must agree! I printed it grey with sprkles, cherry red with sparkles, but think I need to go black sparkles 1 Quote Link to comment Share on other sites More sharing options...
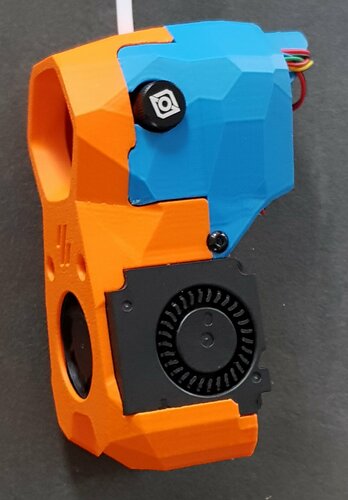
Rixi 7 Posted February 8, 2023 Share Haha, black is actually not my personal favorite. But it was the only PETG I had (beside transparent). I like your colourful Mini Stealthburners more 2 hours ago, atrushing said: That looks like a Dragon in the pictures but if you tell me which hotend you use I can upload the proper .stl a little early. I have no idea how you identified the Dragon from the given pictures, but you're absolutely right. Genious you! To be precise, it's the TriangleLab Dragon which seams to have a slightly different heat-block than the Phaetus labeled Dragon. 2 hours ago, atrushing said: I am near to having the new version of the Mini Stealth ready to publish and it can fit a 3007 or 3010 fan. Sounds great And is there any specific 3010 fan that you can recommend? Talking about the cooling: Have you ever considered to design a kind of fan shroud to lead/focus the airflow through the cold-end ? Something similar like this (or at least with the same idea behind)? 1 Quote Link to comment Share on other sites More sharing options...
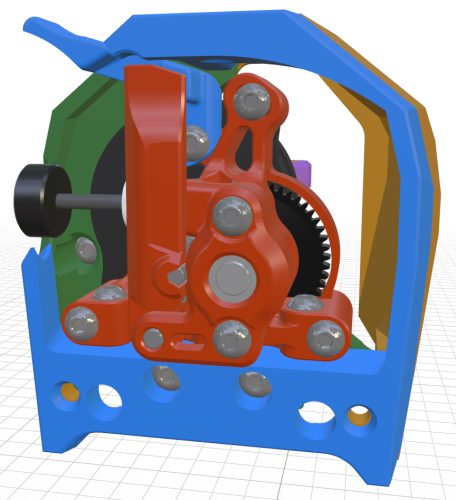
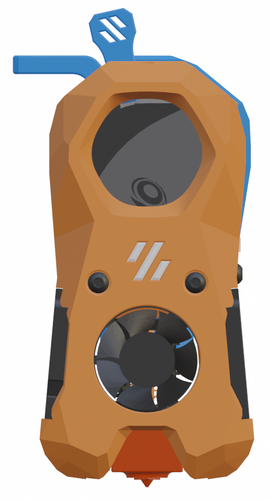
atrushing 994 Posted February 8, 2023 Share 42 minutes ago, Rixi said: And is there any specific 3010 fan that you can recommend? I am only using whichever 3007 fan I can get on Amazon so I can't really help here.. 46 minutes ago, Rixi said: Have you ever considered to design a kind of fan shroud to lead/focus the airflow through the cold-end It would be a lot of work designing one for each different hotend and I don't know how well they would help. Radial fans are not good with pressure so the more you restrict the flow, the less efficient they get. I think it is more important to make sure the air has somewhere to exit and take the heat with it. 1 hour ago, Rixi said: I have no idea how you identified the Dragon from the given pictures, but you're absolutely right. I have spent many hours working around the 3D models of all these different hotends (I just need to find a model of the VolcoMosq...) Attached is the new Mini Stealth - Orbiter 2.0 - Dragon (minimal) plus the 3007 adapter clip. [a]_Mini_Stlb_Orbiter_2.0_Dragon_minimal_3010.stl 3007_Fan_Spacer_v1.2.stl Quote Link to comment Share on other sites More sharing options...
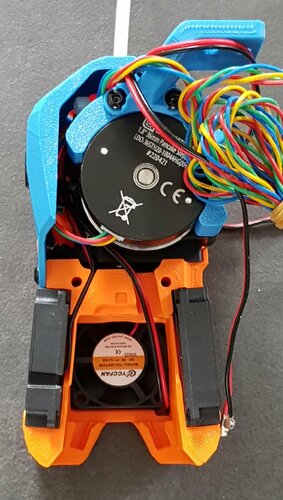
atrushing 994 Posted February 8, 2023 Share 4 hours ago, Rixi said: The only problem I noticed is the 3007 fan I have. I thought this one by GDSTIME (ordered on AliExpress) would be of decent quality, but alrady after maybe only 1-2h runtime it tends to rattle sometimes: You don't happen to be running this 12V fan on 24V? That could lead to issues.. Quote Link to comment Share on other sites More sharing options...
Rixi 7 Posted February 8, 2023 Share 1 hour ago, atrushing said: Radial fans are not good with pressure so the more you restrict the flow, the less efficient they get That's true and I'm aware of it. Narrowing the "tunnel" for the air too much wouldn't be a good idea. But for my "feeling" (which is for sure miles away from any scientific approach) the area behind the fan is quite wide and the hotend sits "somewhere" in this area. There could be much air flowing around the hotend without picking up any heat. Maybe it's not neccessary to to make an individual duct for every hotend type, but a generic one that has enough space to install any of your considered hotends (maybe excluding the Mosquito because of it's way different shape). Just my thoughts. Feel free to "use" them or not! Thanks for the updated models ! Quote Link to comment Share on other sites More sharing options...
Rixi 7 Posted February 8, 2023 Share 1 hour ago, atrushing said: You don't happen to be running this 12V fan on 24V? That could lead to issues.. Thanks for reviewing/asking this, it's in deed 12V. (my printer is running on 24V, but I preaviously installed a step-down converter to 13V to be able to run a Noctua 4010 on the original printhead. Quote Link to comment Share on other sites More sharing options...
atrushing 994 Posted February 8, 2023 Share 8 minutes ago, Rixi said: my printer is running on 24V, but I preaviously installed a step-down converter to 13V That makes more sense.. With the 3010 fan it is easier to find 24V options. Quote Link to comment Share on other sites More sharing options...
mvdveer 2,773 Posted February 8, 2023 Share I love how this product just keeps evolving. I printed one of the first models that came out and it is working beautifully on mysecond V0. I think on behalf of the teamfdm community, I would like to give a BIG shout out to @atrushing for his great work, willingness to adapt his models to suit the need of individual users, speedy response to specific requests and his help in general in this forum. Thank you 3 Quote Link to comment Share on other sites More sharing options...
atrushing 994 Posted February 8, 2023 Share 33 minutes ago, mvdveer said: I love how this product just keeps evolving. It really has come a long way from my first design.. Thanks to you GOMs for beta-testing the early design issues! 2 1 Quote Link to comment Share on other sites More sharing options...
Buurman 891 Posted February 9, 2023 Share 11 hours ago, mvdveer said: I would like to give a BIG shout out to @atrushing for his great work, willingness to adapt his models to suit the need of individual users, speedy response to specific requests and his help in general in this forum I try to send him a friendly message every day But yes... I said it before, its amazing what you are doing @atrushing!!! thanks! 2 Quote Link to comment Share on other sites More sharing options...
Buurman 891 Posted February 9, 2023 Share 11 hours ago, atrushing said: It really has come a long way from my first design Im glad you started thinking outside of the BOX so cool to see the square first design though! Still think you should rename it to "The Rush" like.. the rock, but then... well.. you know.. The RUSH! Quote Link to comment Share on other sites More sharing options...
atrushing 994 Posted February 9, 2023 Share 41 minutes ago, Buurman said: Im glad you started thinking outside of the BOX so cool to see the square first design though! Still think you should rename it to "The Rush" like.. the rock, but then... well.. you know.. The RUSH! The first square design was just a Mini After Orbiter with a facelift. It still had the meager 3010 blowers.. Of course, one silly idea always leads to another! I like the idea of The Rush but I want to pay respect to the source design. (plus its better for the search algorithms ) Quote Link to comment Share on other sites More sharing options...
Buurman 891 Posted February 9, 2023 Share 39 minutes ago, atrushing said: The first square design was just a Mini After Orbiter with a facelift. It still had the meager 3010 blowers.. Of course, one silly idea always leads to another! I like the idea of The Rush but I want to pay respect to the source design. (plus its better for the search algorithms ) I guess Mini Stealth codename "The Rush" should do for now then hahaha! 1 1 Quote Link to comment Share on other sites More sharing options...
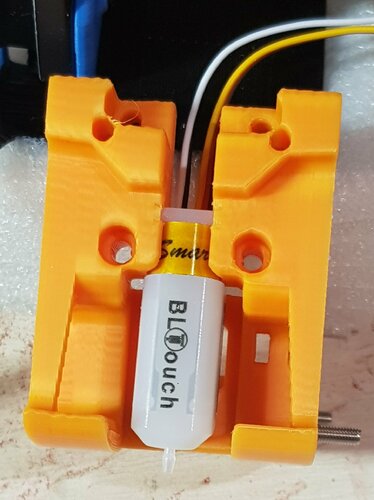
crazypenguin 3 Posted February 14, 2023 Share Wow, this mod is amazing! At the moment I'm considering a Mini Stealthburner for my Switchwire build. Mainly because my printer is in an cabinet, thus being a bit limited in headspace above. Has someone tried this before? I'm using a Orbiter 2.0 and Dragonfly BMO hotend, so this mod is a perfect fit. Is there a possibility for a BL-Touch attachment? Quote Link to comment Share on other sites More sharing options...
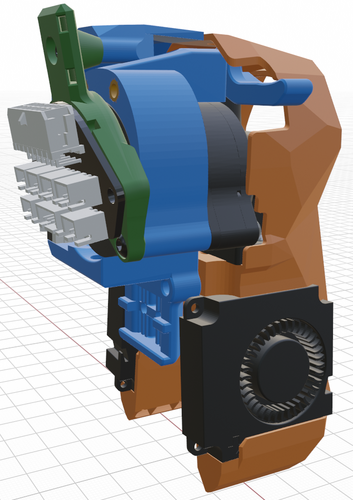
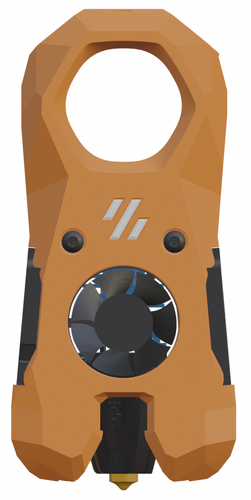
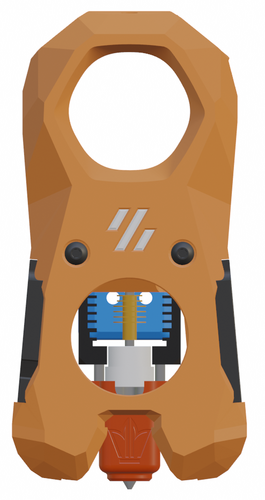
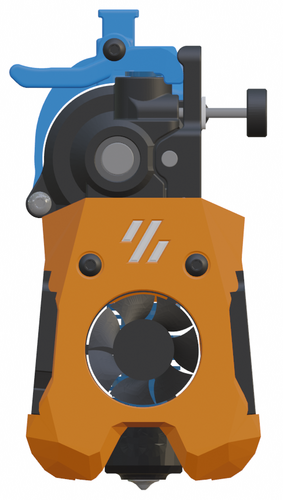
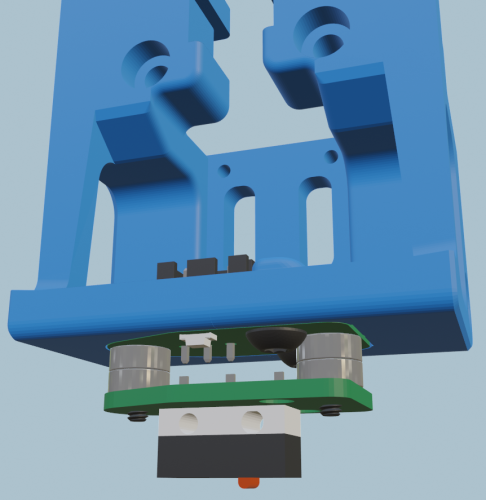
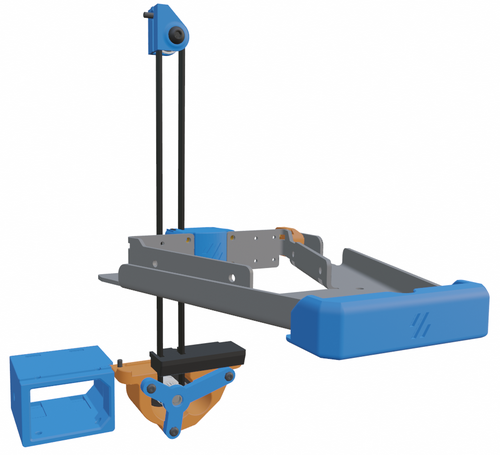
atrushing 994 Posted February 14, 2023 Share 43 minutes ago, crazypenguin said: Has someone tried this before? I'm using a Orbiter 2.0 and Dragonfly BMO hotend, so this mod is a perfect fit. Is there a possibility for a BL-Touch attachment? It looks like this might take some work. I will start working on the x-frame pieces for the Switchwire. Adding the BL-Touch might be more challenging. I have seen a solution to fit one but it is designed for the V2.4 which looks like it has more room. I can highly recommend using the IR Probe. It is quicker, easier and more accurate than the BL-Touch. Below are the V2.4 BL-Touch, the Mini Stealth and the Switchwire x-frame pieces (in that order). 1 Quote Link to comment Share on other sites More sharing options...
crazypenguin 3 Posted February 15, 2023 Share On 2/14/2023 at 7:13 PM, atrushing said: It looks like this might take some work. I will start working on the x-frame pieces for the Switchwire. Adding the BL-Touch might be more challenging. I have seen a solution to fit one but it is designed for the V2.4 which looks like it has more room. I can highly recommend using the IR Probe. It is quicker, easier and more accurate than the BL-Touch. Below are the V2.4 BL-Touch, the Mini Stealth and the Switchwire x-frame pieces (in that order). Thank you so much! I'm impressed how much size difference there is. I came up with the idea as my printer is placed in a IKEA cabinet which limits its height. From what I can tell I might take some advantage from the mini stealthburner due to height limits. Quote Link to comment Share on other sites More sharing options...
atrushing 994 Posted February 16, 2023 Share On 2/14/2023 at 4:44 PM, crazypenguin said: a Mini Stealthburner for my Switchwire build. This was a little tricky and the official Switchwire x-frame pieces have some geometry around the limit switch that I don't understand. The Y and Z offsets are also different than the other Vorons. I simplified the design a little and ditched the extra x_bearing_block so the x-frame pieces mount directly to the MGN carriage. I haven't done any work on BL-Touch mounting yet. The LGX Lite and the Mini Sherpa versions should work with the standard Switchwire Z offset. (files attached) Unfortunately, with the Orbiter 1.5 and 2.0 the stepper motor sits too low and I would have to re-work these pieces and move the Z offset up at least 3mm if the range of Z-travel of the Switchwire would allow it. x_frame_Switchwire_right.stl x_frame_Switchwire_left.stl 1 Quote Link to comment Share on other sites More sharing options...
crazypenguin 3 Posted February 17, 2023 Share 18 hours ago, atrushing said: This was a little tricky and the official Switchwire x-frame pieces have some geometry around the limit switch that I don't understand. The Y and Z offsets are also different than the other Vorons. I simplified the design a little and ditched the extra x_bearing_block so the x-frame pieces mount directly to the MGN carriage. I haven't done any work on BL-Touch mounting yet. The LGX Lite and the Mini Sherpa versions should work with the standard Switchwire Z offset. (files attached) Unfortunately, with the Orbiter 1.5 and 2.0 the stepper motor sits too low and I would have to re-work these pieces and move the Z offset up at least 3mm if the range of Z-travel of the Switchwire would allow it. x_frame_Switchwire_right.stl 450.47 kB · 1 download x_frame_Switchwire_left.stl 437.09 kB · 1 download Wow, I'm impressed by your work! Quote Link to comment Share on other sites More sharing options...
atrushing 994 Posted February 17, 2023 Share 1 hour ago, crazypenguin said: Wow, I'm impressed by your work! Thanks, I do what I can.. I have worked up a new version that should work with either of the Mini Stealth Orbiter toolheads. They raise the nozzle by 3mm so I don't know if the Switchwire has enough negative Z travel for this to work. x_frame_Switchwire_Orbiter_right.stl x_frame_Switchwire_Orbiter_left.stl 2 1 Quote Link to comment Share on other sites More sharing options...


 21
21
 14
14
 2
2


Recommended Comments
Join the conversation
You can post now and register later. If you have an account, sign in now to post with your account.