21 14 2 Details Changelog 0 Questions 651 Comments 3 Reviews 1 Tutorial Support Recommended Comments Prev 21 22 23 24 25 26 27 Next Page 26 of 27 Zhao 3 Posted March 15 (edited) Share @atrushing Thanks, will give it a go, and will keep and eye on this space as well for your new work. Edited March 15 by Zhao Quote Link to comment Share on other sites More sharing options... atrushing 1,006 Posted March 16 Share On 3/15/2025 at 7:52 AM, Zhao said: @atrushing Thanks, will give it a go, and will keep and eye on this space as well for your new work. I have pushed a new set of cores into the Sherpa Mini folder and I am working on the Prusa MK3s backplate (as well as the StealthChanger mount). It will still take some work, especially the wire routing portion because the wires need to come out from the back to clear the Prusa aluminum frame. I also need to allow the air to escape from behind the hotend to avoid heat creep.. Quote Link to comment Share on other sites More sharing options... Reef 2 Posted March 20 Share Is there a X gantry mount for the Voron 2.4 that uses the MGN9 rail? I looked through the files and only see mounts for the MGN12 in the v2.4 x gantry section. Or will the Voron 0 mgn9 x gantry mount work on the 2.4. Quote Link to comment Share on other sites More sharing options... atrushing 1,006 Posted March 20 Share 5 hours ago, Reef said: Is there a X gantry mount for the Voron 2.4 that uses the MGN9 rail? I looked through the files and only see mounts for the MGN12 in the v2.4 x gantry section. Or will the Voron 0 mgn9 x gantry mount work on the 2.4. Is it a single or double MGN9 rail? Front or top mounted? The V0 MGN9 mount is designed for the linear rail mounted on top of a 1515 aluminum extrusion so it wouldn't work without some serious modification. I have looked at a version for a single front mounted MGN9 rail and I think it could work. If you want to tell me which probe mount you need, I can try to work one up that you could test. Here you can see the difference between the MGN12 and MGN9 (in red) hole patterns. Quote Link to comment Share on other sites More sharing options... Reef 2 Posted March 20 (edited) Share 6 hours ago, atrushing said: Is it a single or double MGN9 rail? Front or top mounted? The V0 MGN9 mount is designed for the linear rail mounted on top of a 1515 aluminum extrusion so it wouldn't work without some serious modification. I have looked at a version for a single front mounted MGN9 rail and I think it could work. If you want to tell me which probe mount you need, I can try to work one up that you could test. Here you can see the difference between the MGN12 and MGN9 (in red) hole patterns. Much appreciated. It is a single front mount MGN9. I will be using the BTT Eddy coil. Dragon HF with mini Sherpa mount printed. I did print the shroud that has the Eddy mount on the left as well. Center mounting the probe is ideal but whatever is easier. And the x endstop on mount as well if possible (I seen all of your models have the option just thought i would ask). Edited March 20 by Reef Quote Link to comment Share on other sites More sharing options... atrushing 1,006 Posted March 20 Share 2 hours ago, Reef said: Much appreciated. It is a single front mount MGN9. I will be using the BTT Eddy coil. Dragon HF with mini Sherpa mount printed. I did print the shroud that has the Eddy mount on the left as well. Center mounting the probe is ideal but whatever is easier. And the x endstop on mount as well if possible (I seen all of your models have the option just thought i would ask). I might have missed something.. When I looked into the MGN9 linear carriage before, it was for the Switchwire x-carriage which runs the belts under the 2020 extrusion. The V2.4 gantry runs the belts directly behind the x-carriage and this creates an interference with the smaller hole spacing of the MGN9 carriage. With the new rigid core piece that I am working on (a few posts above), I might be able to make a new x-carriage for the Trident/V2.4 with belt mounting on the sides like the Voron TAP setup. It might take me a little while to get this finished though. Quote Link to comment Share on other sites More sharing options... Reef 2 Posted March 22 (edited) Share On 3/20/2025 at 11:52 AM, atrushing said: I might have missed something.. When I looked into the MGN9 linear carriage before, it was for the Switchwire x-carriage which runs the belts under the 2020 extrusion. The V2.4 gantry runs the belts directly behind the x-carriage and this creates an interference with the smaller hole spacing of the MGN9 carriage. With the new rigid core piece that I am working on (a few posts above), I might be able to make a new x-carriage for the Trident/V2.4 with belt mounting on the sides like the Voron TAP setup. It might take me a little while to get this finished though. What do the other hot ends like dragon burner or xol. I will do some digging but i am not the best when it comes to modelling. I was using the Boop with the previous version of the mini Stealth burner and will probably re install the boop but use the Eddy with the side mount for now. or Would it be possible to use the DAb with a rigged block instead of the limit switch? is the DAB for the MGN12? it only states it can be use on a Trident or 2.4. Edited March 22 by Reef Quote Link to comment Share on other sites More sharing options... atrushing 1,006 Posted March 22 (edited) Share 1 hour ago, Reef said: What do the other hot ends like dragon burner or xol. I will do some digging but i am not the best when it comes to modelling. I was using the Boop with the previous version of the mini Stealth burner and will probably re install the boop but use the Eddy with the side mount for now. or Would it be possible to use the DAb with a rigged block instead of the limit switch? is the DAB for the MGN12? it only states it can be use on a Trident or 2.4. You are right! The Boop uses a side belt loop/clamp system similar to TAP. The PrintersForAnts folks also have the standard rigid Micron mount and I have two versions that I modified for the Mini Stealth. They could work for your V2.4 build but they fit an MGN9C rail and not the MGN9H rail. Since you are mounting the Eddy to the shroud you should be able to use the standard one. The DAB is designed for an MGN12 linear rail. When I re-work the V2.4/Trident x-carriages I plan to start with the flat printed style of the DAB but I think that the side belt loop/clamp setup would probably be better/easier for both the MGN9 and MGN12 rail setups. The hard part will be fitting all of the different probe options. I am working on a Prusa MK3s mount and then one for the StealthChanger. Once those are done I will work on the new Trident/V2.4 x-carriages. Edited March 22 by atrushing Quote Link to comment Share on other sites More sharing options... Zhao 3 Posted March 22 (edited) Share On 3/16/2025 at 8:39 PM, atrushing said: I have pushed a new set of cores into the Sherpa Mini folder and I am working on the Prusa MK3s backplate (as well as the StealthChanger mount). It will still take some work, especially the wire routing portion because the wires need to come out from the back to clear the Prusa aluminum frame. I also need to allow the air to escape from behind the hotend to avoid heat creep.. I've printed the new cores today, will test it out Edit - Could you provide me with the coordinate of the four holes on the back of the new core please? I tried converting it to a part in FreeCAD but I can't seem to get good coordinates of the holes as the mesh cannot be easily simplified by the program. Edited March 23 by Zhao 1 Quote Link to comment Share on other sites More sharing options... atrushing 1,006 Posted March 26 Share On 3/23/2025 at 12:40 AM, Zhao said: I've printed the new cores today, will test it out Edit - Could you provide me with the coordinate of the four holes on the back of the new core please? I tried converting it to a part in FreeCAD but I can't seem to get good coordinates of the holes as the mesh cannot be easily simplified by the program. The top holes accept 25-26mm hole center spacing and the bottom holes are 25mm apart and 30mm below. I have just pushed new Prusa x-carriages to GitHub. I will be making new core pieces for the other extruders soon. Quote Link to comment Share on other sites More sharing options... Zhao 3 Posted March 29 Share That's great, thanks. I printed this out but found that the heatset inserts don't match what I have are a bit too small. I've downloaded Blender to try and sort this out - is it correct to use edit mode -> edge select -> hold down ctrl to pick shortest path around the circle -> press s -> press shift+z to lock z -> type in the ratio (I used 0.9)? Is there a way to change the diameter specifically rather than as a ratio? Thanks 1 Quote Link to comment Share on other sites More sharing options... atrushing 1,006 Posted March 29 Share 37 minutes ago, Zhao said: That's great, thanks. I printed this out but found that the heatset inserts don't match what I have are a bit too small. I've downloaded Blender to try and sort this out - is it correct to use edit mode -> edge select -> hold down ctrl to pick shortest path around the circle -> press s -> press shift+z to lock z -> type in the ratio (I used 0.9)? Is there a way to change the diameter specifically rather than as a ratio? Thanks Yeah, the Ruthex and CNC Kitchen inserts are smaller than the Voron standard inserts. That is the right direction to take in Blender. Unfortunately there is no simple way to specify an actual dimension. I will select the feature that I want to modify and temporarily copy it on an orthogonal axis to visually determine what size it currently is (I make all of the heat-set recesses 4.7mm in diameter). Ruthex suggests a 4.0mm hole for their inserts. So you would divide 4.0 by 4.7 to find an accurate ratio which calculates to 0.851. Printed holes usually end up undersized so your 0.9 ratio should be fine. I use Alt+click to select edge loops, or your Ctrl+click method, but I prefer to work in vertex mode (pro tip: 1, 2 and 3 quickly changes between vertex, edge and face select modes). With only those vertices selected you go to Mesh > Snap > Cursor to Selected. Then you need to change your Transform Pivot Point to 3D Cursor (in this situation, Bounding Box would work as well). Then you can select all of the vertices/faces that need to be scaled and use the Shift+Z option. In my working file I do not triangulate the faces so I am able to use Alt+click in face select mode to quickly select the whole ring of faces. If you select everything, then under the delete menu you can select Limited Dissolve with a Max Angle of 0.1 to make the mesh easier to work with but not loose any geometry. When you export the .stl, Blender will triangulate all of the faces again. 1 Quote Link to comment Share on other sites More sharing options... atrushing 1,006 Posted April 13 Share On 3/20/2025 at 2:26 PM, Reef said: Much appreciated. It is a single front mount MGN9. I will be using the BTT Eddy coil. Dragon HF with mini Sherpa mount printed. I did print the shroud that has the Eddy mount on the left as well. Center mounting the probe is ideal but whatever is easier. And the x endstop on mount as well if possible (I seen all of your models have the option just thought i would ask). I have worked up a design to fit an MGN9H linear carriage modified from the Boop backplate. This design fits my new rigid core pieces. The X-endstop mount needs to be a separate piece and is secured with a pair of M2x10 self-tapping screws. The BTT Eddy is too tall to fit under the linear carriage so you will need to use the side mount shroud. I am still working on an MGN12 version of this style x-carriage and then I need to adapt these versions to different probe options. For now, I will just upload the MGN9H no-probe version here. MGN9_Rigid_x-carriage_No_Probe.stl MGN9_Rigid_x-carriage_X_Endstop_Bracket.stl [a]_belt_clamp_x2.stl Quote Link to comment Share on other sites More sharing options... Reef 2 Posted April 25 Share I am just now seeing this, much appreciated. going to print now and i will let you know how it works 1 Quote Link to comment Share on other sites More sharing options... Reef 2 Posted May 1 Share On 4/13/2025 at 4:24 PM, atrushing said: I have worked up a design to fit an MGN9H linear carriage modified from the Boop backplate. This design fits my new rigid core pieces. The X-endstop mount needs to be a separate piece and is secured with a pair of M2x10 self-tapping screws. The BTT Eddy is too tall to fit under the linear carriage so you will need to use the side mount shroud. I am still working on an MGN12 version of this style x-carriage and then I need to adapt these versions to different probe options. For now, I will just upload the MGN9H no-probe version here. MGN9_Rigid_x-carriage_No_Probe.stl 380.06 kB · 2 downloads MGN9_Rigid_x-carriage_X_Endstop_Bracket.stl 76.84 kB · 2 downloads [a]_belt_clamp_x2.stl 104.87 kB · 2 downloads There is a clearance issue with the fans and the mount. The fans protrude from the front cover not allowing it to seat against the magnets. Not sure if you have other projects on your plate, I may tray either a spacer or attempt altering the file to be thicker 4.5mm on the top and down the canter Quote Link to comment Share on other sites More sharing options... atrushing 1,006 Posted May 1 Share 3 hours ago, Reef said: There is a clearance issue with the fans and the mount. The fans protrude from the front cover not allowing it to seat against the magnets. Not sure if you have other projects on your plate, I may tray either a spacer or attempt altering the file to be thicker 4.5mm on the top and down the canter Sorry, I should have linked the new rigid core pieces. I developed them before I came back to the MGN9 parts. The new core pieces are 6mm deeper than the standard cores so they allow the Mini Stealth to sit flat against any x-carriage. They are also very rigid and help my updated DAB operate much more reliably. I am almost done making a full set of MGN9H x-carriages for the new core pieces and I plan on making new x-carriages for MGN9C, MGN12H and MGN12C linear rails. Quote Link to comment Share on other sites More sharing options... Reef 2 Posted May 2 Share 19 hours ago, atrushing said: Sorry, I should have linked the new rigid core pieces. I developed them before I came back to the MGN9 parts. The new core pieces are 6mm deeper than the standard cores so they allow the Mini Stealth to sit flat against any x-carriage. They are also very rigid and help my updated DAB operate much more reliably. I am almost done making a full set of MGN9H x-carriages for the new core pieces and I plan on making new x-carriages for MGN9C, MGN12H and MGN12C linear rails. thank you. will the MGN9h carriages be in the common parts Voron 2.4 folder when complete? Quote Link to comment Share on other sites More sharing options... atrushing 1,006 Posted May 2 Share 2 hours ago, Reef said: thank you. will the MGN9h carriages be in the common parts Voron 2.4 folder when complete? Yes, I will have four new folders, each with its own readme for the rigid x-carriages. They should be able to fit other printers with front mounted linear rails as well such as the Micron or my Vorpal when I get around to finishing the assembly manual.. Quote Link to comment Share on other sites More sharing options... Anacardium 2 Posted May 28 Share Hi! Just built my first Mini Stealth with Orbiter 2 für my V0.2. Prints very well! Would like to replace the SB on my V2.4, too. But couldn´t find a version with a Clicky probe which I´m currently using on the SB. Am I wrong or is this probe not supported? Quote Link to comment Share on other sites More sharing options... atrushing 1,006 Posted May 28 Share 8 minutes ago, Anacardium said: Would like to replace the SB on my V2.4, too. But couldn´t find a version with a Clicky probe which I´m currently using on the SB. My understanding is that Klicky is the same size as an Omron probe so it should fit into the Omron x-carriage. 1 Quote Link to comment Share on other sites More sharing options... claudermilk 1,878 Posted May 29 Share Clicky is designed as a drop-in replacement for the Omron probe. If the Omron fits, Clicky should fit. 2 Quote Link to comment Share on other sites More sharing options... Anacardium 2 Posted May 29 Share Thanks @claudermilk, when @atrushingmentioned that it should fit, I remembered that my Voron V2 kit originally came with an Omron probe and I later replaced it with the Clicky. Parts already printed.... going for it for my V2.4 2 Quote Link to comment Share on other sites More sharing options... Zhao 3 Posted June 6 Share @atrushingHi, wondered if you have come across this before: https://github.com/zruncho3d/poke?tab=readme-ov-file Quote Link to comment Share on other sites More sharing options... atrushing 1,006 Posted June 7 Share 8 hours ago, Zhao said: @atrushingHi, wondered if you have come across this before: https://github.com/zruncho3d/poke?tab=readme-ov-file I saw this after I developed my DAB flexure probing x-carriage. I can't imagine any way of incorporating the Poke into the Mini Stealth. Their core is too wide to fit in the shroud and its print orientation is different than my core. Their flexures are printed as bridges from the bottom up while my core is printed from the back to the front. Also, the Dragon hotend seems to be the only one that is supported. My DAB is separate from the toolhead so it can support any of 23 hotends. Quote Link to comment Share on other sites More sharing options... Zhao 3 Posted June 7 (edited) Share Morning. Oh, I guess the mini stealthburner toolhead is different from the mini stealth orbiter? Also, which type of micro switch is used with the DAB please - and what does DAB stand for? Edited June 7 by Zhao Quote Link to comment Share on other sites More sharing options... Prev 21 22 23 24 25 26 27 Next Page 26 of 27 Join the conversation You can post now and register later. If you have an account, sign in now to post with your account. Add a comment... × Pasted as rich text. Paste as plain text instead Only 75 emoji are allowed. × Your link has been automatically embedded. Display as a link instead × Your previous content has been restored. Clear editor × You cannot paste images directly. Upload or insert images from URL. × Desktop Tablet Phone Submit Comment
Zhao 3 Posted March 15 (edited) Share @atrushing Thanks, will give it a go, and will keep and eye on this space as well for your new work. Edited March 15 by Zhao Quote Link to comment Share on other sites More sharing options...
atrushing 1,006 Posted March 16 Share On 3/15/2025 at 7:52 AM, Zhao said: @atrushing Thanks, will give it a go, and will keep and eye on this space as well for your new work. I have pushed a new set of cores into the Sherpa Mini folder and I am working on the Prusa MK3s backplate (as well as the StealthChanger mount). It will still take some work, especially the wire routing portion because the wires need to come out from the back to clear the Prusa aluminum frame. I also need to allow the air to escape from behind the hotend to avoid heat creep.. Quote Link to comment Share on other sites More sharing options...
Reef 2 Posted March 20 Share Is there a X gantry mount for the Voron 2.4 that uses the MGN9 rail? I looked through the files and only see mounts for the MGN12 in the v2.4 x gantry section. Or will the Voron 0 mgn9 x gantry mount work on the 2.4. Quote Link to comment Share on other sites More sharing options...
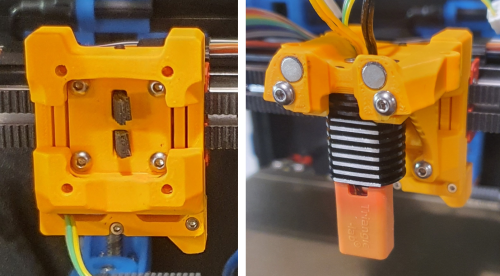
atrushing 1,006 Posted March 20 Share 5 hours ago, Reef said: Is there a X gantry mount for the Voron 2.4 that uses the MGN9 rail? I looked through the files and only see mounts for the MGN12 in the v2.4 x gantry section. Or will the Voron 0 mgn9 x gantry mount work on the 2.4. Is it a single or double MGN9 rail? Front or top mounted? The V0 MGN9 mount is designed for the linear rail mounted on top of a 1515 aluminum extrusion so it wouldn't work without some serious modification. I have looked at a version for a single front mounted MGN9 rail and I think it could work. If you want to tell me which probe mount you need, I can try to work one up that you could test. Here you can see the difference between the MGN12 and MGN9 (in red) hole patterns. Quote Link to comment Share on other sites More sharing options...
Reef 2 Posted March 20 (edited) Share 6 hours ago, atrushing said: Is it a single or double MGN9 rail? Front or top mounted? The V0 MGN9 mount is designed for the linear rail mounted on top of a 1515 aluminum extrusion so it wouldn't work without some serious modification. I have looked at a version for a single front mounted MGN9 rail and I think it could work. If you want to tell me which probe mount you need, I can try to work one up that you could test. Here you can see the difference between the MGN12 and MGN9 (in red) hole patterns. Much appreciated. It is a single front mount MGN9. I will be using the BTT Eddy coil. Dragon HF with mini Sherpa mount printed. I did print the shroud that has the Eddy mount on the left as well. Center mounting the probe is ideal but whatever is easier. And the x endstop on mount as well if possible (I seen all of your models have the option just thought i would ask). Edited March 20 by Reef Quote Link to comment Share on other sites More sharing options...
atrushing 1,006 Posted March 20 Share 2 hours ago, Reef said: Much appreciated. It is a single front mount MGN9. I will be using the BTT Eddy coil. Dragon HF with mini Sherpa mount printed. I did print the shroud that has the Eddy mount on the left as well. Center mounting the probe is ideal but whatever is easier. And the x endstop on mount as well if possible (I seen all of your models have the option just thought i would ask). I might have missed something.. When I looked into the MGN9 linear carriage before, it was for the Switchwire x-carriage which runs the belts under the 2020 extrusion. The V2.4 gantry runs the belts directly behind the x-carriage and this creates an interference with the smaller hole spacing of the MGN9 carriage. With the new rigid core piece that I am working on (a few posts above), I might be able to make a new x-carriage for the Trident/V2.4 with belt mounting on the sides like the Voron TAP setup. It might take me a little while to get this finished though. Quote Link to comment Share on other sites More sharing options...
Reef 2 Posted March 22 (edited) Share On 3/20/2025 at 11:52 AM, atrushing said: I might have missed something.. When I looked into the MGN9 linear carriage before, it was for the Switchwire x-carriage which runs the belts under the 2020 extrusion. The V2.4 gantry runs the belts directly behind the x-carriage and this creates an interference with the smaller hole spacing of the MGN9 carriage. With the new rigid core piece that I am working on (a few posts above), I might be able to make a new x-carriage for the Trident/V2.4 with belt mounting on the sides like the Voron TAP setup. It might take me a little while to get this finished though. What do the other hot ends like dragon burner or xol. I will do some digging but i am not the best when it comes to modelling. I was using the Boop with the previous version of the mini Stealth burner and will probably re install the boop but use the Eddy with the side mount for now. or Would it be possible to use the DAb with a rigged block instead of the limit switch? is the DAB for the MGN12? it only states it can be use on a Trident or 2.4. Edited March 22 by Reef Quote Link to comment Share on other sites More sharing options...
atrushing 1,006 Posted March 22 (edited) Share 1 hour ago, Reef said: What do the other hot ends like dragon burner or xol. I will do some digging but i am not the best when it comes to modelling. I was using the Boop with the previous version of the mini Stealth burner and will probably re install the boop but use the Eddy with the side mount for now. or Would it be possible to use the DAb with a rigged block instead of the limit switch? is the DAB for the MGN12? it only states it can be use on a Trident or 2.4. You are right! The Boop uses a side belt loop/clamp system similar to TAP. The PrintersForAnts folks also have the standard rigid Micron mount and I have two versions that I modified for the Mini Stealth. They could work for your V2.4 build but they fit an MGN9C rail and not the MGN9H rail. Since you are mounting the Eddy to the shroud you should be able to use the standard one. The DAB is designed for an MGN12 linear rail. When I re-work the V2.4/Trident x-carriages I plan to start with the flat printed style of the DAB but I think that the side belt loop/clamp setup would probably be better/easier for both the MGN9 and MGN12 rail setups. The hard part will be fitting all of the different probe options. I am working on a Prusa MK3s mount and then one for the StealthChanger. Once those are done I will work on the new Trident/V2.4 x-carriages. Edited March 22 by atrushing Quote Link to comment Share on other sites More sharing options...
Zhao 3 Posted March 22 (edited) Share On 3/16/2025 at 8:39 PM, atrushing said: I have pushed a new set of cores into the Sherpa Mini folder and I am working on the Prusa MK3s backplate (as well as the StealthChanger mount). It will still take some work, especially the wire routing portion because the wires need to come out from the back to clear the Prusa aluminum frame. I also need to allow the air to escape from behind the hotend to avoid heat creep.. I've printed the new cores today, will test it out Edit - Could you provide me with the coordinate of the four holes on the back of the new core please? I tried converting it to a part in FreeCAD but I can't seem to get good coordinates of the holes as the mesh cannot be easily simplified by the program. Edited March 23 by Zhao 1 Quote Link to comment Share on other sites More sharing options...
atrushing 1,006 Posted March 26 Share On 3/23/2025 at 12:40 AM, Zhao said: I've printed the new cores today, will test it out Edit - Could you provide me with the coordinate of the four holes on the back of the new core please? I tried converting it to a part in FreeCAD but I can't seem to get good coordinates of the holes as the mesh cannot be easily simplified by the program. The top holes accept 25-26mm hole center spacing and the bottom holes are 25mm apart and 30mm below. I have just pushed new Prusa x-carriages to GitHub. I will be making new core pieces for the other extruders soon. Quote Link to comment Share on other sites More sharing options...
Zhao 3 Posted March 29 Share That's great, thanks. I printed this out but found that the heatset inserts don't match what I have are a bit too small. I've downloaded Blender to try and sort this out - is it correct to use edit mode -> edge select -> hold down ctrl to pick shortest path around the circle -> press s -> press shift+z to lock z -> type in the ratio (I used 0.9)? Is there a way to change the diameter specifically rather than as a ratio? Thanks 1 Quote Link to comment Share on other sites More sharing options...
atrushing 1,006 Posted March 29 Share 37 minutes ago, Zhao said: That's great, thanks. I printed this out but found that the heatset inserts don't match what I have are a bit too small. I've downloaded Blender to try and sort this out - is it correct to use edit mode -> edge select -> hold down ctrl to pick shortest path around the circle -> press s -> press shift+z to lock z -> type in the ratio (I used 0.9)? Is there a way to change the diameter specifically rather than as a ratio? Thanks Yeah, the Ruthex and CNC Kitchen inserts are smaller than the Voron standard inserts. That is the right direction to take in Blender. Unfortunately there is no simple way to specify an actual dimension. I will select the feature that I want to modify and temporarily copy it on an orthogonal axis to visually determine what size it currently is (I make all of the heat-set recesses 4.7mm in diameter). Ruthex suggests a 4.0mm hole for their inserts. So you would divide 4.0 by 4.7 to find an accurate ratio which calculates to 0.851. Printed holes usually end up undersized so your 0.9 ratio should be fine. I use Alt+click to select edge loops, or your Ctrl+click method, but I prefer to work in vertex mode (pro tip: 1, 2 and 3 quickly changes between vertex, edge and face select modes). With only those vertices selected you go to Mesh > Snap > Cursor to Selected. Then you need to change your Transform Pivot Point to 3D Cursor (in this situation, Bounding Box would work as well). Then you can select all of the vertices/faces that need to be scaled and use the Shift+Z option. In my working file I do not triangulate the faces so I am able to use Alt+click in face select mode to quickly select the whole ring of faces. If you select everything, then under the delete menu you can select Limited Dissolve with a Max Angle of 0.1 to make the mesh easier to work with but not loose any geometry. When you export the .stl, Blender will triangulate all of the faces again. 1 Quote Link to comment Share on other sites More sharing options...
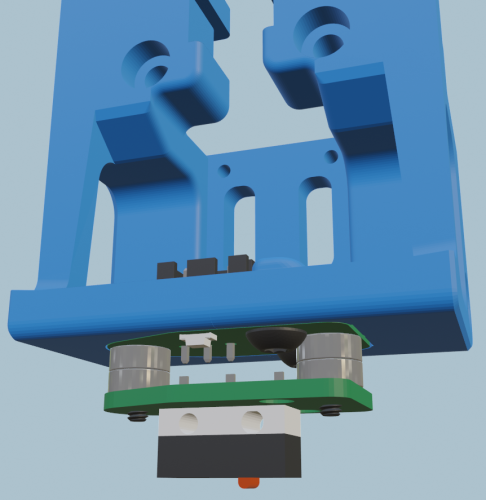
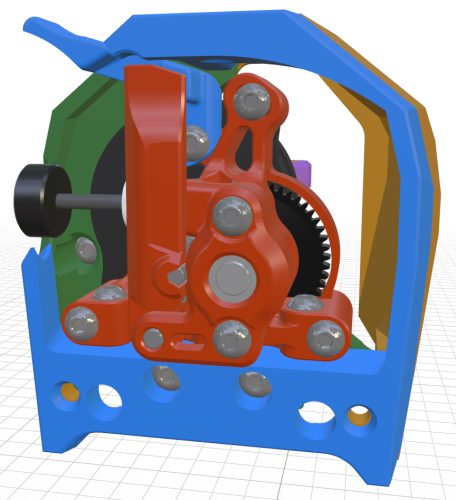
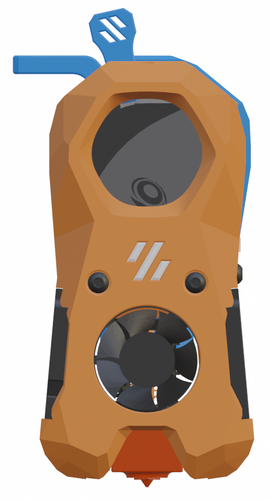
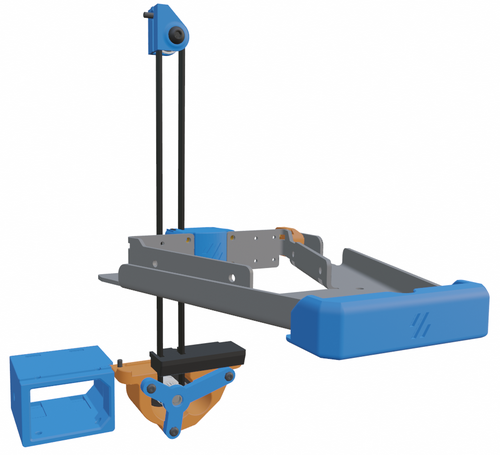
atrushing 1,006 Posted April 13 Share On 3/20/2025 at 2:26 PM, Reef said: Much appreciated. It is a single front mount MGN9. I will be using the BTT Eddy coil. Dragon HF with mini Sherpa mount printed. I did print the shroud that has the Eddy mount on the left as well. Center mounting the probe is ideal but whatever is easier. And the x endstop on mount as well if possible (I seen all of your models have the option just thought i would ask). I have worked up a design to fit an MGN9H linear carriage modified from the Boop backplate. This design fits my new rigid core pieces. The X-endstop mount needs to be a separate piece and is secured with a pair of M2x10 self-tapping screws. The BTT Eddy is too tall to fit under the linear carriage so you will need to use the side mount shroud. I am still working on an MGN12 version of this style x-carriage and then I need to adapt these versions to different probe options. For now, I will just upload the MGN9H no-probe version here. MGN9_Rigid_x-carriage_No_Probe.stl MGN9_Rigid_x-carriage_X_Endstop_Bracket.stl [a]_belt_clamp_x2.stl Quote Link to comment Share on other sites More sharing options...
Reef 2 Posted April 25 Share I am just now seeing this, much appreciated. going to print now and i will let you know how it works 1 Quote Link to comment Share on other sites More sharing options...
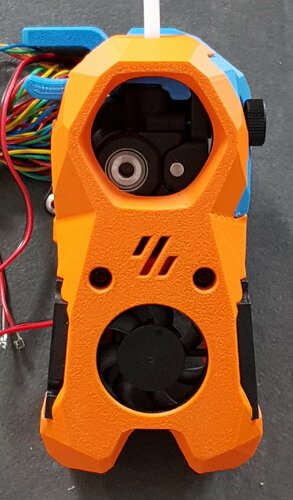
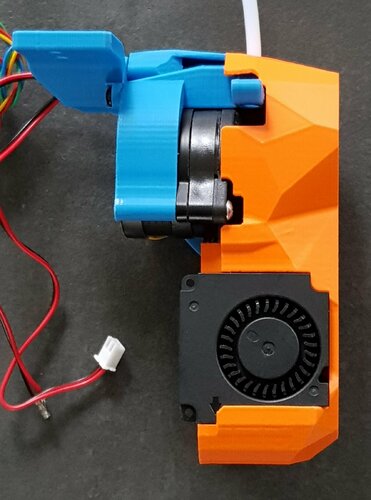
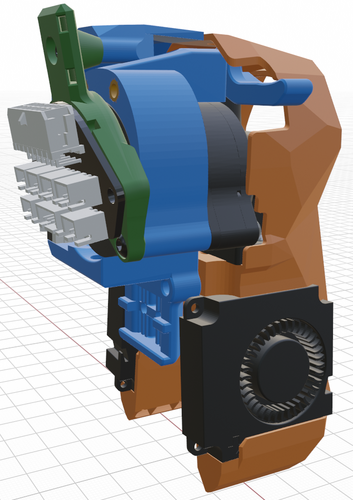
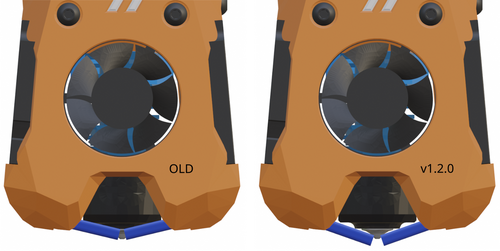
Reef 2 Posted May 1 Share On 4/13/2025 at 4:24 PM, atrushing said: I have worked up a design to fit an MGN9H linear carriage modified from the Boop backplate. This design fits my new rigid core pieces. The X-endstop mount needs to be a separate piece and is secured with a pair of M2x10 self-tapping screws. The BTT Eddy is too tall to fit under the linear carriage so you will need to use the side mount shroud. I am still working on an MGN12 version of this style x-carriage and then I need to adapt these versions to different probe options. For now, I will just upload the MGN9H no-probe version here. MGN9_Rigid_x-carriage_No_Probe.stl 380.06 kB · 2 downloads MGN9_Rigid_x-carriage_X_Endstop_Bracket.stl 76.84 kB · 2 downloads [a]_belt_clamp_x2.stl 104.87 kB · 2 downloads There is a clearance issue with the fans and the mount. The fans protrude from the front cover not allowing it to seat against the magnets. Not sure if you have other projects on your plate, I may tray either a spacer or attempt altering the file to be thicker 4.5mm on the top and down the canter Quote Link to comment Share on other sites More sharing options...
atrushing 1,006 Posted May 1 Share 3 hours ago, Reef said: There is a clearance issue with the fans and the mount. The fans protrude from the front cover not allowing it to seat against the magnets. Not sure if you have other projects on your plate, I may tray either a spacer or attempt altering the file to be thicker 4.5mm on the top and down the canter Sorry, I should have linked the new rigid core pieces. I developed them before I came back to the MGN9 parts. The new core pieces are 6mm deeper than the standard cores so they allow the Mini Stealth to sit flat against any x-carriage. They are also very rigid and help my updated DAB operate much more reliably. I am almost done making a full set of MGN9H x-carriages for the new core pieces and I plan on making new x-carriages for MGN9C, MGN12H and MGN12C linear rails. Quote Link to comment Share on other sites More sharing options...
Reef 2 Posted May 2 Share 19 hours ago, atrushing said: Sorry, I should have linked the new rigid core pieces. I developed them before I came back to the MGN9 parts. The new core pieces are 6mm deeper than the standard cores so they allow the Mini Stealth to sit flat against any x-carriage. They are also very rigid and help my updated DAB operate much more reliably. I am almost done making a full set of MGN9H x-carriages for the new core pieces and I plan on making new x-carriages for MGN9C, MGN12H and MGN12C linear rails. thank you. will the MGN9h carriages be in the common parts Voron 2.4 folder when complete? Quote Link to comment Share on other sites More sharing options...
atrushing 1,006 Posted May 2 Share 2 hours ago, Reef said: thank you. will the MGN9h carriages be in the common parts Voron 2.4 folder when complete? Yes, I will have four new folders, each with its own readme for the rigid x-carriages. They should be able to fit other printers with front mounted linear rails as well such as the Micron or my Vorpal when I get around to finishing the assembly manual.. Quote Link to comment Share on other sites More sharing options...
Anacardium 2 Posted May 28 Share Hi! Just built my first Mini Stealth with Orbiter 2 für my V0.2. Prints very well! Would like to replace the SB on my V2.4, too. But couldn´t find a version with a Clicky probe which I´m currently using on the SB. Am I wrong or is this probe not supported? Quote Link to comment Share on other sites More sharing options...
atrushing 1,006 Posted May 28 Share 8 minutes ago, Anacardium said: Would like to replace the SB on my V2.4, too. But couldn´t find a version with a Clicky probe which I´m currently using on the SB. My understanding is that Klicky is the same size as an Omron probe so it should fit into the Omron x-carriage. 1 Quote Link to comment Share on other sites More sharing options...
claudermilk 1,878 Posted May 29 Share Clicky is designed as a drop-in replacement for the Omron probe. If the Omron fits, Clicky should fit. 2 Quote Link to comment Share on other sites More sharing options...
Anacardium 2 Posted May 29 Share Thanks @claudermilk, when @atrushingmentioned that it should fit, I remembered that my Voron V2 kit originally came with an Omron probe and I later replaced it with the Clicky. Parts already printed.... going for it for my V2.4 2 Quote Link to comment Share on other sites More sharing options...
Zhao 3 Posted June 6 Share @atrushingHi, wondered if you have come across this before: https://github.com/zruncho3d/poke?tab=readme-ov-file Quote Link to comment Share on other sites More sharing options...
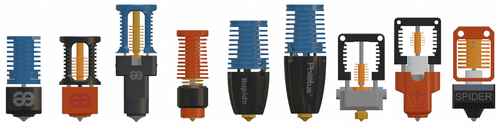
atrushing 1,006 Posted June 7 Share 8 hours ago, Zhao said: @atrushingHi, wondered if you have come across this before: https://github.com/zruncho3d/poke?tab=readme-ov-file I saw this after I developed my DAB flexure probing x-carriage. I can't imagine any way of incorporating the Poke into the Mini Stealth. Their core is too wide to fit in the shroud and its print orientation is different than my core. Their flexures are printed as bridges from the bottom up while my core is printed from the back to the front. Also, the Dragon hotend seems to be the only one that is supported. My DAB is separate from the toolhead so it can support any of 23 hotends. Quote Link to comment Share on other sites More sharing options...
Zhao 3 Posted June 7 (edited) Share Morning. Oh, I guess the mini stealthburner toolhead is different from the mini stealth orbiter? Also, which type of micro switch is used with the DAB please - and what does DAB stand for? Edited June 7 by Zhao Quote Link to comment Share on other sites More sharing options...


 21
21
 14
14
 2
2


Recommended Comments
Join the conversation
You can post now and register later. If you have an account, sign in now to post with your account.