15 6 2 Details Changelog 0 Questions 72 Comments 1 Review 1 Tutorial Support Recommended Comments Prev 1 2 3 Next Page 1 of 3 mo_themage 0 Posted March 14, 2023 (edited) Share printing now to replace v2.4 SB. hopefully this cools better than 5015 SB Edited March 14, 2023 by mo_themage Quote Link to comment Share on other sites More sharing options... atrushing 994 Posted March 14, 2023 Share 1 hour ago, mo_themage said: printing now to replace v2.4 SB. hopefully this cools better than 5015 SB Sounds like fun! By the specs, the 5015 provides 4.8 CFM and each 4010 provides 3.62 CFM. That makes for a 50% increase in airflow at 7.24 CFM. Just a warning, @Buurman found it difficult routing the wires behind the Mini Stealth Mini Sherpa in his V2.4 due to the bulk of connectors. I tend to run the wires all the way to the electronics bay and he is moving to a CANbus solution. 1 Quote Link to comment Share on other sites More sharing options... eel8068 1 Posted March 20, 2023 Share I really love this mod but I recently switched to using a Euclid probe and it sucks that I can't use it with this tool head. Big ask but is there any chance of getting a carriage version that is compatible with the Euclid? Quote Link to comment Share on other sites More sharing options... atrushing 994 Posted March 20, 2023 Share 4 hours ago, eel8068 said: I really love this mod but I recently switched to using a Euclid probe and it sucks that I can't use it with this tool head. Big ask but is there any chance of getting a carriage version that is compatible with the Euclid? I will check into this. It looks like the SB X-carriage Euclid probe mod would be a good place to start. 1 Quote Link to comment Share on other sites More sharing options... atrushing 994 Posted March 21, 2023 Share On 3/20/2023 at 7:17 AM, eel8068 said: is there any chance of getting a carriage version that is compatible with the Euclid? I worked this up using geometry from the Euclid GitHub page. It should work with the M2.5 self-tapping screws from the kit. x_frame_Mini_Stealth_Euclid_left.stl x_frame_Mini_Stealth_Euclid_right.stl 5 Quote Link to comment Share on other sites More sharing options... mvdveer 2,773 Posted March 21, 2023 Share Thanks for all the work you are doing on behalf of the members. It is really appreciated by all. 1 Quote Link to comment Share on other sites More sharing options... eel8068 1 Posted March 21, 2023 Share 7 hours ago, atrushing said: I worked this up using geometry from the Euclid GitHub page. It should work with the M2.5 self-tapping screws from the kit. x_frame_Mini_Stealth_Euclid_left.stl 347.05 kB · 1 download x_frame_Mini_Stealth_Euclid_right.stl 424.89 kB · 1 download Oh man, you are amazing haha. I didn't expect such a fast response. Gonna go print it out and see how it fits together 1 Quote Link to comment Share on other sites More sharing options... mo_themage 0 Posted March 22, 2023 Share hey! just wanted to give a quick update. the upgrade went super good, only bad thing i see is I keep having to re-tight the 2x m3x50 every once in a while, they get lose and the head wiggles around Quote Link to comment Share on other sites More sharing options... atrushing 994 Posted March 22, 2023 Share 3 hours ago, mo_themage said: only bad thing i see is I keep having to re-tight the 2x m3x50 every once in a while, they get lose and the head wiggles around I had a similar issue with my very first install of this. It turned out that I had used smaller (Ruthex) heat-set inserts and they weren't biting into the x-carriage well enough. I am also wondering if the brass inserts have inherently lower friction against the stainless screws and with temperature changes and differential expansion they might start to creep loose. I'm sure a dab of thread locker would do wonders. Using black coated screws might be a helpful as well. Quote Link to comment Share on other sites More sharing options... PrintLab 2 Posted March 28, 2023 Share This is fantastic. I've printed a few in a few different colors, and recently started dressing one up with its furniture. Those 4010 blowers fit like a dream! Outstanding work. I'm currently drafting up an X-mount for a front-facing MGN12 with horizontally-oriented 6mm 2GT (Ender 3 style). I'll post it up if it works out 2 Quote Link to comment Share on other sites More sharing options... Leafy 0 Posted March 31, 2023 Share Is there a BOM of the purchased parts for this? I don't want to buy the wrong LEDs. Quote Link to comment Share on other sites More sharing options... atrushing 994 Posted March 31, 2023 Share 46 minutes ago, Leafy said: Is there a BOM of the purchased parts for this? I don't want to buy the wrong LEDs. This uses the same RGBW LED modules that the original Stealthburner uses but the wire length is shorter. I just bought a large pack from Amazon. The rest of the components are all rather standard fare and the screw sizes and quantities depend a bit on which configuration is being installed in which printer.. Quote Link to comment Share on other sites More sharing options... Leafy 0 Posted March 31, 2023 Share SK6812 RGBNW LED from that link is exactly what I needed. Quote Link to comment Share on other sites More sharing options... BayCoder1 0 Posted April 12, 2023 Share On 3/28/2023 at 5:17 PM, PrintLab said: This is fantastic. I've printed a few in a few different colors, and recently started dressing one up with its furniture. Those 4010 blowers fit like a dream! Outstanding work. I'm currently drafting up an X-mount for a front-facing MGN12 with horizontally-oriented 6mm 2GT (Ender 3 style). I'll post it up if it works out Have any luck? Currently working on fixing up my ender 3 and would love to fit this extruder to it. Thanks in advance!! Quote Link to comment Share on other sites More sharing options... malulam 4 Posted May 25, 2023 Share Hey @atrushing, thank you for that awesome work you are doing! I printed all the parts and build the Mini Stealth to replace my Mini Stealthburner on my Voron 0.2. Today I testfitted it and I was wondering if I could use this with sensorless homing. On the Mini Stealthburner the x-carriage hits the xy-carriages before the toolhead hits anything. I mounted the Mini Stealth to my X-Carriage and saw that the toolhead hits the XY-Joint lower part. Is it save to use this with sensorless homing without breaking the Mini Stealth or should I - at least for the X-Axis - switch to Endstop switches? Another thing I found a bit unclear was how to print the LED Carrier. I printed them from clear ABS now. Hope that works. Thank you! Quote Link to comment Share on other sites More sharing options... atrushing 994 Posted May 25, 2023 Share 36 minutes ago, malulam said: Hey @atrushing, thank you for that awesome work you are doing! I printed all the parts and build the Mini Stealth to replace my Mini Stealthburner on my Voron 0.2. Today I testfitted it and I was wondering if I could use this with sensorless homing. On the Mini Stealthburner the x-carriage hits the xy-carriages before the toolhead hits anything. I mounted the Mini Stealth to my X-Carriage and saw that the toolhead hits the XY-Joint lower part. Is it save to use this with sensorless homing without breaking the Mini Stealth or should I - at least for the X-Axis - switch to Endstop switches? Another thing I found a bit unclear was how to print the LED Carrier. I printed them from clear ABS now. Hope that works. Thank you! Glad you like it! Unless you are using extreme homing speeds I don't think there would be a problem with the bottom of the cooling fan bumping into the x-carriage but it would flex and make your X homing less accurate. Another option that should work would be to use a longer screw at the base of the cable door with some washers or a simple printed spacer to gain 4-7mm as needed and bump the x-carriage at a more solid part of the toolhead. Using a flat head screw could make sense here too. I print the diffuser and LED carrier in white ABS but I know that others use clear to allow more light through. I guess PETG could work there too as it isn't under any stresses and is far enough away from the hotend. Sensorless_homing_spacer.stl 2 Quote Link to comment Share on other sites More sharing options... malulam 4 Posted May 25, 2023 Share Thank you for the fast reply! I will try your suggestion with the screw and the spacer Quote Link to comment Share on other sites More sharing options... bthubs 4 Posted August 2, 2023 Share Hello again atrushing! Per my request that I posted in your other designs, would you be so kind as to design a version for this extruder compatible with knomi + dragon UHF + boop? Also for you to be aware, Annex did release a new version of the sherpa around a week ago, which looks to be dimensionally similar to the prior rev, though I'm no expert. Thanks again for your time! Quote Link to comment Share on other sites More sharing options... atrushing 994 Posted August 3, 2023 Share 11 hours ago, bthubs said: Hello again atrushing! Per my request that I posted in your other designs, would you be so kind as to design a version for this extruder compatible with knomi + dragon UHF + boop? Also for you to be aware, Annex did release a new version of the sherpa around a week ago, which looks to be dimensionally similar to the prior rev, though I'm no expert. Thanks again for your time! The latest version of the Sherpa is mostly changed for the new RIDGA gears and doesn't change the mounting at all.. Quote Link to comment Share on other sites More sharing options... atrushing 994 Posted August 8, 2023 Share On 8/2/2023 at 11:33 PM, bthubs said: Hello again atrushing! Per my request that I posted in your other designs, would you be so kind as to design a version for this extruder compatible with knomi + dragon UHF + boop? Also for you to be aware, Annex did release a new version of the sherpa around a week ago, which looks to be dimensionally similar to the prior rev, though I'm no expert. Thanks again for your time! Here is a Mini Sherpa + Dragon/Rapido UHF + Knomi shroud. The Boop beta 4 remix I made before should fit the Mini Sherpa without any problems. [a]_Mini_Stealth_Mini_Stealth_Dragon-Rapido_UHF_Knomi.stl Quote Link to comment Share on other sites More sharing options... bthubs 4 Posted September 1, 2023 Share Hello again! Any chance you've designed an ebb36/umbilical mount for this mod? 1 Quote Link to comment Share on other sites More sharing options... atrushing 994 Posted September 3, 2023 Share On 9/1/2023 at 8:10 PM, bthubs said: Hello again! Any chance you've designed an ebb36/umbilical mount for this mod? I'm pretty sure the standard Umbilical_Mount_Mini_Sherpa should work fine with Boop. It is a little tricky to fit the cable door over it. I've attached it here so you don't need to dig through the whole list above.. Umbilical_Mount-Mini_Sherpa.stl 1 Quote Link to comment Share on other sites More sharing options... Lusanagi 4 Posted September 20, 2023 (edited) Share Edit: Sorry, didn't even see the complete assembly before typing and didn't realize this mod fits directly into the MGN12H with the switchwire @atrushing there is one question that came up while dry assembling and looking at the actual drawings: I tried fitting the original switchwire xz belt clips, but they are a tad bit bigger (the original stealthburner has a 19mm space for the clips, while mini stealth has a 17.5 space. Should I just file/cut the side, are they missing. or maybe the face in the carriage needs to be shifted in? Edited September 21, 2023 by Lusanagi Quote Link to comment Share on other sites More sharing options... atrushing 994 Posted September 22, 2023 Share On 9/20/2023 at 9:55 AM, Lusanagi said: there is one question that came up while dry assembling and looking at the actual drawings: I tried fitting the original switchwire xz belt clips, but they are a tad bit bigger (the original stealthburner has a 19mm space for the clips, while mini stealth has a 17.5 space. Should I just file/cut the side, are they missing. or maybe the face in the carriage needs to be shifted in? Yeah, those belt clips are pretty chonky.. I used MakerBeam XL T-slot nuts that I had from my V0.1 build. Looking at your screenshot I guess I could open the x-frames up a little for the printed pieces but I found them very awkward to work with when you are trying to fit those two pieces and the four belt ends in to the tight opening. On 9/20/2023 at 9:55 AM, Lusanagi said: Edit: Sorry, didn't even see the complete assembly before typing and didn't realize this mod fits directly into the MGN12H with the switchwire No worries. Nice to see that you can work with Blender! If you change to the "Material Preview" mode then all of the parts will be in color and I find it easier to visualize the finished product. 1 Quote Link to comment Share on other sites More sharing options... Reef 2 Posted November 14, 2023 Share Just downloaded the files and plan to get printing today. As I am doing a bunch of upgrades to my v2 does anyone know if this will work with the voron tap? I'm guessing not as I don't see anything in the files or mention on it but figured I would ask before purchasing one Quote Link to comment Share on other sites More sharing options... Prev 1 2 3 Next Page 1 of 3 Join the conversation You can post now and register later. If you have an account, sign in now to post with your account. Add a comment... × Pasted as rich text. Paste as plain text instead Only 75 emoji are allowed. × Your link has been automatically embedded. Display as a link instead × Your previous content has been restored. Clear editor × You cannot paste images directly. Upload or insert images from URL. × Desktop Tablet Phone Submit Comment
mo_themage 0 Posted March 14, 2023 (edited) Share printing now to replace v2.4 SB. hopefully this cools better than 5015 SB Edited March 14, 2023 by mo_themage Quote Link to comment Share on other sites More sharing options...
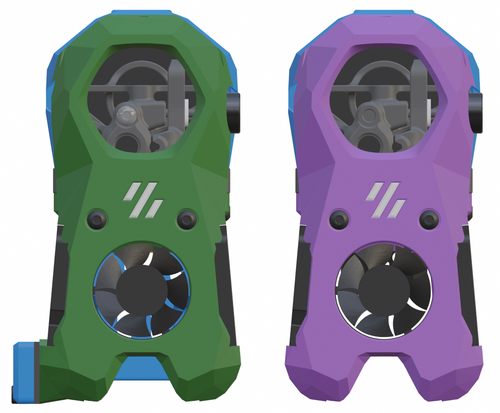
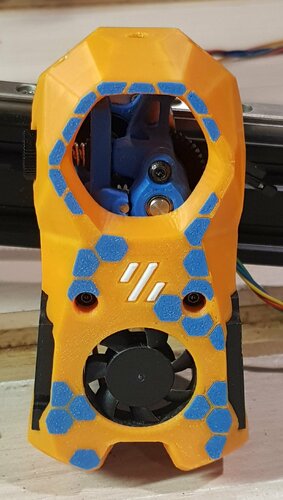
atrushing 994 Posted March 14, 2023 Share 1 hour ago, mo_themage said: printing now to replace v2.4 SB. hopefully this cools better than 5015 SB Sounds like fun! By the specs, the 5015 provides 4.8 CFM and each 4010 provides 3.62 CFM. That makes for a 50% increase in airflow at 7.24 CFM. Just a warning, @Buurman found it difficult routing the wires behind the Mini Stealth Mini Sherpa in his V2.4 due to the bulk of connectors. I tend to run the wires all the way to the electronics bay and he is moving to a CANbus solution. 1 Quote Link to comment Share on other sites More sharing options...
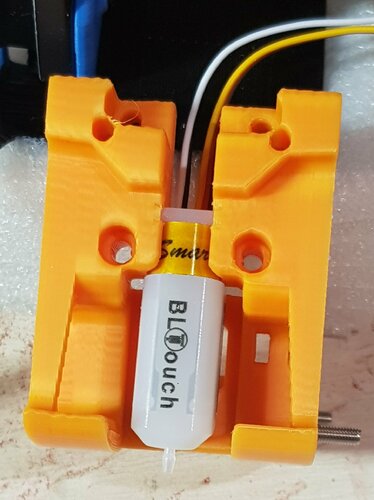
eel8068 1 Posted March 20, 2023 Share I really love this mod but I recently switched to using a Euclid probe and it sucks that I can't use it with this tool head. Big ask but is there any chance of getting a carriage version that is compatible with the Euclid? Quote Link to comment Share on other sites More sharing options...
atrushing 994 Posted March 20, 2023 Share 4 hours ago, eel8068 said: I really love this mod but I recently switched to using a Euclid probe and it sucks that I can't use it with this tool head. Big ask but is there any chance of getting a carriage version that is compatible with the Euclid? I will check into this. It looks like the SB X-carriage Euclid probe mod would be a good place to start. 1 Quote Link to comment Share on other sites More sharing options...
atrushing 994 Posted March 21, 2023 Share On 3/20/2023 at 7:17 AM, eel8068 said: is there any chance of getting a carriage version that is compatible with the Euclid? I worked this up using geometry from the Euclid GitHub page. It should work with the M2.5 self-tapping screws from the kit. x_frame_Mini_Stealth_Euclid_left.stl x_frame_Mini_Stealth_Euclid_right.stl 5 Quote Link to comment Share on other sites More sharing options...
mvdveer 2,773 Posted March 21, 2023 Share Thanks for all the work you are doing on behalf of the members. It is really appreciated by all. 1 Quote Link to comment Share on other sites More sharing options...
eel8068 1 Posted March 21, 2023 Share 7 hours ago, atrushing said: I worked this up using geometry from the Euclid GitHub page. It should work with the M2.5 self-tapping screws from the kit. x_frame_Mini_Stealth_Euclid_left.stl 347.05 kB · 1 download x_frame_Mini_Stealth_Euclid_right.stl 424.89 kB · 1 download Oh man, you are amazing haha. I didn't expect such a fast response. Gonna go print it out and see how it fits together 1 Quote Link to comment Share on other sites More sharing options...
mo_themage 0 Posted March 22, 2023 Share hey! just wanted to give a quick update. the upgrade went super good, only bad thing i see is I keep having to re-tight the 2x m3x50 every once in a while, they get lose and the head wiggles around Quote Link to comment Share on other sites More sharing options...
atrushing 994 Posted March 22, 2023 Share 3 hours ago, mo_themage said: only bad thing i see is I keep having to re-tight the 2x m3x50 every once in a while, they get lose and the head wiggles around I had a similar issue with my very first install of this. It turned out that I had used smaller (Ruthex) heat-set inserts and they weren't biting into the x-carriage well enough. I am also wondering if the brass inserts have inherently lower friction against the stainless screws and with temperature changes and differential expansion they might start to creep loose. I'm sure a dab of thread locker would do wonders. Using black coated screws might be a helpful as well. Quote Link to comment Share on other sites More sharing options...
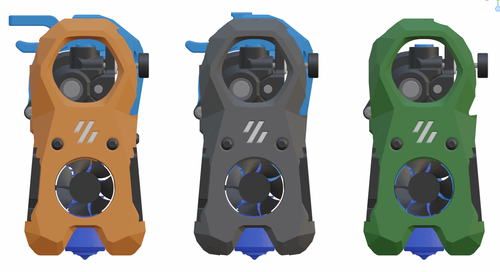
PrintLab 2 Posted March 28, 2023 Share This is fantastic. I've printed a few in a few different colors, and recently started dressing one up with its furniture. Those 4010 blowers fit like a dream! Outstanding work. I'm currently drafting up an X-mount for a front-facing MGN12 with horizontally-oriented 6mm 2GT (Ender 3 style). I'll post it up if it works out 2 Quote Link to comment Share on other sites More sharing options...
Leafy 0 Posted March 31, 2023 Share Is there a BOM of the purchased parts for this? I don't want to buy the wrong LEDs. Quote Link to comment Share on other sites More sharing options...
atrushing 994 Posted March 31, 2023 Share 46 minutes ago, Leafy said: Is there a BOM of the purchased parts for this? I don't want to buy the wrong LEDs. This uses the same RGBW LED modules that the original Stealthburner uses but the wire length is shorter. I just bought a large pack from Amazon. The rest of the components are all rather standard fare and the screw sizes and quantities depend a bit on which configuration is being installed in which printer.. Quote Link to comment Share on other sites More sharing options...
Leafy 0 Posted March 31, 2023 Share SK6812 RGBNW LED from that link is exactly what I needed. Quote Link to comment Share on other sites More sharing options...
BayCoder1 0 Posted April 12, 2023 Share On 3/28/2023 at 5:17 PM, PrintLab said: This is fantastic. I've printed a few in a few different colors, and recently started dressing one up with its furniture. Those 4010 blowers fit like a dream! Outstanding work. I'm currently drafting up an X-mount for a front-facing MGN12 with horizontally-oriented 6mm 2GT (Ender 3 style). I'll post it up if it works out Have any luck? Currently working on fixing up my ender 3 and would love to fit this extruder to it. Thanks in advance!! Quote Link to comment Share on other sites More sharing options...
malulam 4 Posted May 25, 2023 Share Hey @atrushing, thank you for that awesome work you are doing! I printed all the parts and build the Mini Stealth to replace my Mini Stealthburner on my Voron 0.2. Today I testfitted it and I was wondering if I could use this with sensorless homing. On the Mini Stealthburner the x-carriage hits the xy-carriages before the toolhead hits anything. I mounted the Mini Stealth to my X-Carriage and saw that the toolhead hits the XY-Joint lower part. Is it save to use this with sensorless homing without breaking the Mini Stealth or should I - at least for the X-Axis - switch to Endstop switches? Another thing I found a bit unclear was how to print the LED Carrier. I printed them from clear ABS now. Hope that works. Thank you! Quote Link to comment Share on other sites More sharing options...
atrushing 994 Posted May 25, 2023 Share 36 minutes ago, malulam said: Hey @atrushing, thank you for that awesome work you are doing! I printed all the parts and build the Mini Stealth to replace my Mini Stealthburner on my Voron 0.2. Today I testfitted it and I was wondering if I could use this with sensorless homing. On the Mini Stealthburner the x-carriage hits the xy-carriages before the toolhead hits anything. I mounted the Mini Stealth to my X-Carriage and saw that the toolhead hits the XY-Joint lower part. Is it save to use this with sensorless homing without breaking the Mini Stealth or should I - at least for the X-Axis - switch to Endstop switches? Another thing I found a bit unclear was how to print the LED Carrier. I printed them from clear ABS now. Hope that works. Thank you! Glad you like it! Unless you are using extreme homing speeds I don't think there would be a problem with the bottom of the cooling fan bumping into the x-carriage but it would flex and make your X homing less accurate. Another option that should work would be to use a longer screw at the base of the cable door with some washers or a simple printed spacer to gain 4-7mm as needed and bump the x-carriage at a more solid part of the toolhead. Using a flat head screw could make sense here too. I print the diffuser and LED carrier in white ABS but I know that others use clear to allow more light through. I guess PETG could work there too as it isn't under any stresses and is far enough away from the hotend. Sensorless_homing_spacer.stl 2 Quote Link to comment Share on other sites More sharing options...
malulam 4 Posted May 25, 2023 Share Thank you for the fast reply! I will try your suggestion with the screw and the spacer Quote Link to comment Share on other sites More sharing options...
bthubs 4 Posted August 2, 2023 Share Hello again atrushing! Per my request that I posted in your other designs, would you be so kind as to design a version for this extruder compatible with knomi + dragon UHF + boop? Also for you to be aware, Annex did release a new version of the sherpa around a week ago, which looks to be dimensionally similar to the prior rev, though I'm no expert. Thanks again for your time! Quote Link to comment Share on other sites More sharing options...
atrushing 994 Posted August 3, 2023 Share 11 hours ago, bthubs said: Hello again atrushing! Per my request that I posted in your other designs, would you be so kind as to design a version for this extruder compatible with knomi + dragon UHF + boop? Also for you to be aware, Annex did release a new version of the sherpa around a week ago, which looks to be dimensionally similar to the prior rev, though I'm no expert. Thanks again for your time! The latest version of the Sherpa is mostly changed for the new RIDGA gears and doesn't change the mounting at all.. Quote Link to comment Share on other sites More sharing options...
atrushing 994 Posted August 8, 2023 Share On 8/2/2023 at 11:33 PM, bthubs said: Hello again atrushing! Per my request that I posted in your other designs, would you be so kind as to design a version for this extruder compatible with knomi + dragon UHF + boop? Also for you to be aware, Annex did release a new version of the sherpa around a week ago, which looks to be dimensionally similar to the prior rev, though I'm no expert. Thanks again for your time! Here is a Mini Sherpa + Dragon/Rapido UHF + Knomi shroud. The Boop beta 4 remix I made before should fit the Mini Sherpa without any problems. [a]_Mini_Stealth_Mini_Stealth_Dragon-Rapido_UHF_Knomi.stl Quote Link to comment Share on other sites More sharing options...
bthubs 4 Posted September 1, 2023 Share Hello again! Any chance you've designed an ebb36/umbilical mount for this mod? 1 Quote Link to comment Share on other sites More sharing options...
atrushing 994 Posted September 3, 2023 Share On 9/1/2023 at 8:10 PM, bthubs said: Hello again! Any chance you've designed an ebb36/umbilical mount for this mod? I'm pretty sure the standard Umbilical_Mount_Mini_Sherpa should work fine with Boop. It is a little tricky to fit the cable door over it. I've attached it here so you don't need to dig through the whole list above.. Umbilical_Mount-Mini_Sherpa.stl 1 Quote Link to comment Share on other sites More sharing options...
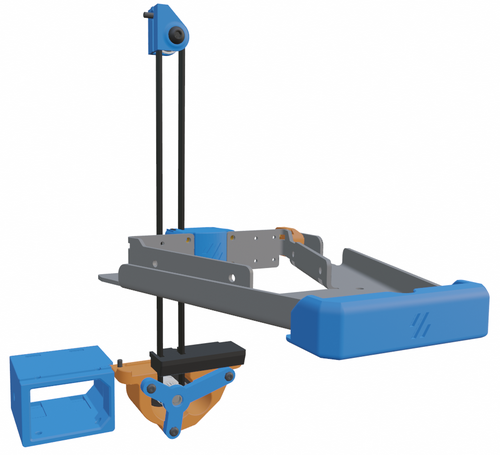
Lusanagi 4 Posted September 20, 2023 (edited) Share Edit: Sorry, didn't even see the complete assembly before typing and didn't realize this mod fits directly into the MGN12H with the switchwire @atrushing there is one question that came up while dry assembling and looking at the actual drawings: I tried fitting the original switchwire xz belt clips, but they are a tad bit bigger (the original stealthburner has a 19mm space for the clips, while mini stealth has a 17.5 space. Should I just file/cut the side, are they missing. or maybe the face in the carriage needs to be shifted in? Edited September 21, 2023 by Lusanagi Quote Link to comment Share on other sites More sharing options...
atrushing 994 Posted September 22, 2023 Share On 9/20/2023 at 9:55 AM, Lusanagi said: there is one question that came up while dry assembling and looking at the actual drawings: I tried fitting the original switchwire xz belt clips, but they are a tad bit bigger (the original stealthburner has a 19mm space for the clips, while mini stealth has a 17.5 space. Should I just file/cut the side, are they missing. or maybe the face in the carriage needs to be shifted in? Yeah, those belt clips are pretty chonky.. I used MakerBeam XL T-slot nuts that I had from my V0.1 build. Looking at your screenshot I guess I could open the x-frames up a little for the printed pieces but I found them very awkward to work with when you are trying to fit those two pieces and the four belt ends in to the tight opening. On 9/20/2023 at 9:55 AM, Lusanagi said: Edit: Sorry, didn't even see the complete assembly before typing and didn't realize this mod fits directly into the MGN12H with the switchwire No worries. Nice to see that you can work with Blender! If you change to the "Material Preview" mode then all of the parts will be in color and I find it easier to visualize the finished product. 1 Quote Link to comment Share on other sites More sharing options...
Reef 2 Posted November 14, 2023 Share Just downloaded the files and plan to get printing today. As I am doing a bunch of upgrades to my v2 does anyone know if this will work with the voron tap? I'm guessing not as I don't see anything in the files or mention on it but figured I would ask before purchasing one Quote Link to comment Share on other sites More sharing options...


 15
15
 6
6
 2
2

Recommended Comments
Join the conversation
You can post now and register later. If you have an account, sign in now to post with your account.