Search the Community
Showing results for tags 'sherpa'.
Found 1 result
-

Version 1.1.0
570 downloads
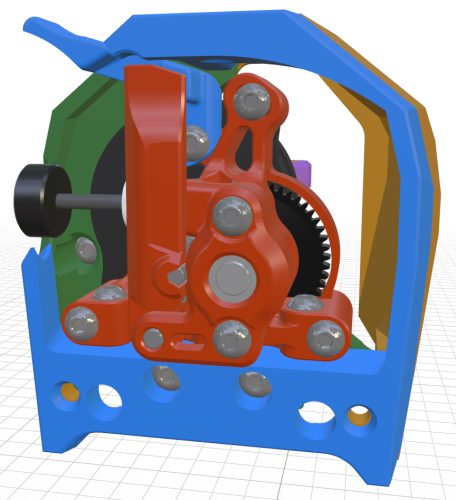
This remix of the Sherpa Micro extruder uses the RIDGA gears from a Vz Hextrudort. Other than using 'twirl' gears, they are also 5mm shorter than the standard Bondtech gears which solves the collision that a stock Sherpa has with the 5015 blower in a Stealthburner. I mirrored the extruder about the Y axis to put the tensioning screw on the left side and added a filament release lever since the idler_arm is not accessible when installed in a Steathburner. This requires a modified idler_arm for ridgidity. I have also added a shield over the 50t gear to protect the toolhead wiring. This design fits the official Stealthburner_main_body as well as the official cable_door. The cable chain mounts were adjusted to clear the stepper motor but otherwise remain stock. Below is a list of the hardware that differs from a standard Stealthburner CW2 install. 1 - Mellow CNC Vz HextrudORT drive gears Set 7 2 - M3x25 screws below extruder (from the front) 1 - M2x10 self tapping screw at the top (from behind) 2 - M3x12 screws to secure extruder 1 - M3x10 screw to attach filament release lever The Sherpa Micro Vz RIDGA will need some basic components from a BMG Dual Drive kit. 2 - MR85 bearings 1 - Thumbscrew with tensioning spring and washer 2 - 3mm steel pins for idler_arm pivot and idler gear The included .blend file shows the complete CW2 assembly with hardware. You can select any part and press [H] to hide it. Pressing [Alt] + [H] shows everything again. Pressing [F2] while a part is selected brings up the Rename dialog so you can see the name of each component i.e. "M3x25_BHCS". I have included .stl files for building a standard Sherpa Micro, with standard BMG gears, but adding the filament_release_lever. The files added here are mirrored to put the tension screw on the left but can each be mirrored back in the slicer to match the official orientation. Below is a list of the parts required: 1 - Sherpa_Micro_VzRIDGA_Back_v1.1.stl 1 - Sherpa_Micro_Core_mirrored.stl (official geometry mirrored) 1 - Sherpa_Micro_VzRIDGA_Front.stl (official geometry mirrored) 1 - Sherpa_Micro_Idler_Arm_FR-Lever_mirrored.stl 1 - Sherpa_Micro_VzRIDGA_Filament_Release_Lever.stl The extruder parts are licensed under the Annex Engineering License and the Clockwork 2 parts are licensed under the GPL v3 License.- 3 comments
-
- 3
-

-

-
- stealthburner
- clockwork2
- (and 1 more)