
-
 5
5
-
 1
1
What's New in Version 1.0.0 See changelog
Released
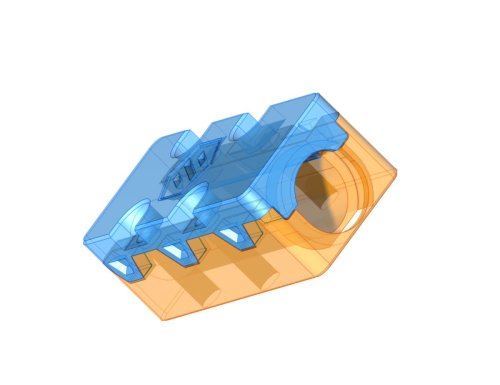
This is a remix of Hartk1213's Voron2.4 GE5C Z Joint.
https://github.com/VoronDesign/VoronUsers/tree/master/printer_mods/hartk1213/Voron2.4_GE5C
Update 5/27/2023: Thanks to the comments and concerns regarding this from reddit, especially the strength of the split joint, I redesigned this so it should be stronger (certainly feels stronger). To strengthen the split part, I moved the split up towards the top (instead of along the center of the bearing. I suggest using some superglue and it should be very strong (I had to cut the bearing out of one).
There are two versions provided:
- The basic version has no locking tabs and can be assembled using glue. This version is named “Voron_GE5C Z joint_REMIX-4H.stl”.
- The other version is designed with locking clips (this is the version I used). It is named “Voron_GE5C Z joint_REMIX-4H-CLIPS.stl”, and is also designed to be glued. I feel this version will be a bit stronger, since it has a mechanical connection as well. The clip version will need a bit of persuasion to snap together (I just gave it a good couple of hits on the desktop, but closing it in a vice may also work). If you don't have luck snapping it together, try the basic version.
BOM (for each z-joint)
- (1) M5x25mm BHCS (though other lengths will work with different spacers)
- (4) M3x16 SHCS to mount the joint to the Z-carriages
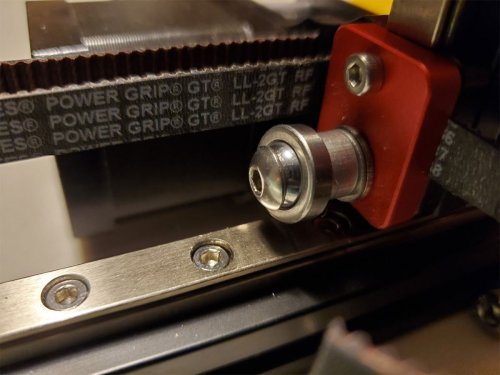
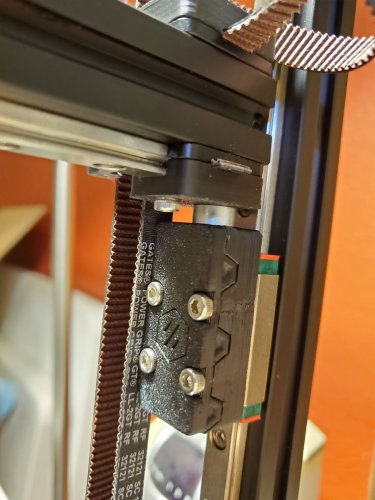
- (1) GE5C bearing (see note below about the cheap ones)
- (2-3) M5 1mm spacers (or washers if they are similar in size)
- Optionally you can use some M5 aluminum spacers instead of the washers, and different length M5 screws.
In the parts pictured, I used M5x25mm screws, and some M5x8x5mm spacers (though I plan to swap them for M5x8x3mm spacers). Note that the number of spacers and length of screws will depend on the stack height of your lower belt clips + the thickness of the AB joints and the tensioners. So YMMV, and I recommend measuring your parts before deciding on a proper length of M5 screw, and how many spacers or washers will work in your particular application.
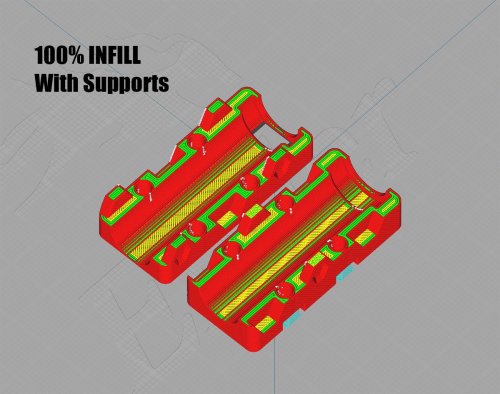
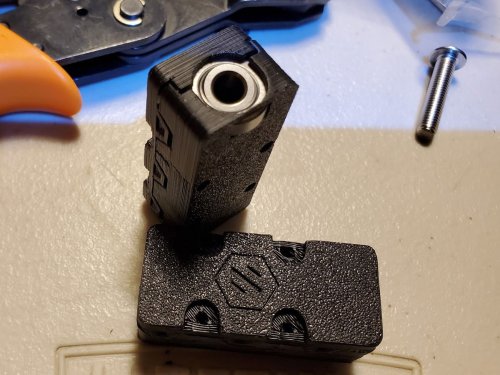
I recommend printing these in ABS with 100% infill and supports touching the build plate. You may be able to get away with no supports if you have your settings tuned and your printer can print bridges without issues. Additionally, (in Cura) I used Slicing Tolerance “Exclusive” and set the Wall Ordering to “Outside to Inside", which helps to produce parts which are closer to the designed size. It is a good idea to run a flow calibration and horizontal expansion calibration prior to printing these, which will also help if you find the parts do not fit the bearing well. The parts should be oriented as shown. After printing, poke out the single layer of bridge material in the mounting holes to clear them for the M3 screws.
The parts are not oriented for printing.
As pictured, I am using M5x25 BHCS, as well as a 5mm M5 spacer (which I plan to swap for a 3mm M5 spacer). I also ordered some IGUS GE5C bearings since I found that more than half the bearings in the pack of no-spec GE5C bearings I got from Ali, have very noticeable play. I found 4 that were OK enough to install, but they will be replaced with the IGUS bearings at some point. You can also find ABEC-7 rated GE5C bearings a bit cheaper on West3d.com (but for the price difference I'd just get the IGUS bearings). I'm still in the process of building my Voron 2.4 R2, which is slow going since I keep finding things to make or remix for it (that is not a complaint :D). So I have not fully tested this, but I did re-align the gantry after installing these and found no issues with interference.
The STEP file is included for easy remixing.
You can see what other projects I have going on by checking out my blog here. I'm also documenting my Voron 2.4 R2 build here (but it's been a slow going process).