Search the Community
Showing results for tags 'chri.kai.in'.
Found 3 results
-

Version 2021.12.07
732 downloads
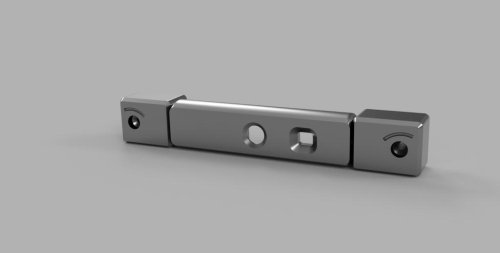
Angry CAM USB Please find my USB Camera Mod based on Waveshare OV5648 5MP USB Camera Module (A), which allows mounting to rear gantry or other position on a frame profile. Printing Printing succesful with standard VORON settings. Distance between mounts and camera housing set to 0.3 mm in *.stl file, which allows printing of mounts and housing in one print. Use the following two *.stl files for realization in one print: Camera_Housing Mounts.stl Rear_Cover.stl Additional Material Bill of Material: 1x Waveshare OV5648 5 MP Camera Module (A), incl. USB-A to JST SH PCB connector cable 2x M3x16 SHCS screws 2x M3 T-Nut for 2020 frame profile 1x Camera Housing Mounts and Rear Cover from the printing source of your trust. Optional/Required for frame sizes -
Version 2022.05.23
1,019 downloads
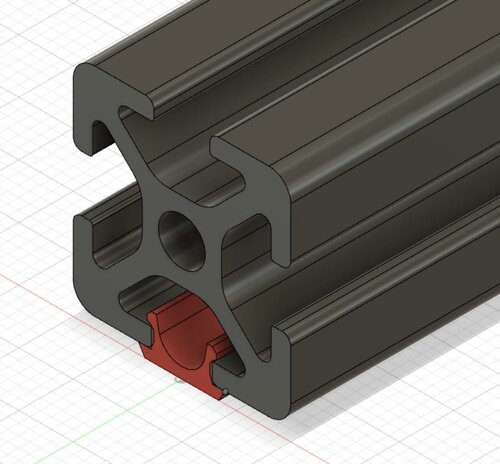
20x20mm, slot 6 Profile Covers Please find here my mod for variable profile covers for 20x20 construction profiles with 6mm slot. Printing Printing successful with standard VORON settings. For adjusting the length of the profiles you can scale the *.stl file in your slicer in y-direction after import and before positioning (rotating/placement) on your print bed. Please find the following example on how to do so for SuperSlicer: Sequence: Deactivate linked scaling with click on lock symbol, Lock symbol status (-
- 15
-

-

-
- chri.kai.in
- v1.8
- (and 3 more)
-
Version 2022.01.24
49 downloads
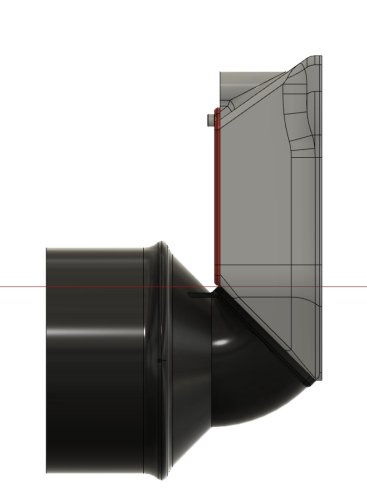
Exhaust Adapter to 100mm ventilation system Please find attached my exhaust adapter to a 100 mm ventilation system. The adapter replaces the original 60mm fan on the exhaust housing of Voron 2.4 and comparable 3d printers. Printing Printing succesful with standard VORON settings. Support should not be required, as dedicated structure has been added for increased rigidity and to avoid necessary support structures. Use the following *.stl file for realization in one print: VORON2_v2.4_Exhaust_Adapter_100mm_RC3.stl Additional Material Bill of Material: 4x M3x8 SHCS bolts 2x 90-110mm hose clamps (e.g. local hardware store) Optional: 1x 100mm Ø flexible ventilation hose (e.g. local hardware store) 4x M3x10 BHCS bolts for reverse mounting 4x M3 hex nut 4x M3 washer Mounting Replacing the original 60mm fan Losen the screws of your original 60mm fan and detach the fan from the exhaust housing. Pre-load the mounting holes in the exhaust adapter with M3x8 SHCS bolts and align and fix the adapter to your exhaust housing with the 100mm opening facing away from your printer. Screwing the bolts at the upper side of the adapter requires a hex key with ball ends. Alternatively you can screw M3x10 bolts inverse from the inner side of the exhaust housing and mount the adapter with M3 washers and hex nuts. The exisiting 24V supply for exhaust fan can be used with an external SSR for the control of an AC ventilation system or as input for any ventilation valve system in central exhaust system set ups. (Mind electrical isolation between printer and exhaust system !) Slide a 100mm Ø flexible ventilation hose over the 100mm opening and fix it with one or both of the hose clamps. Alternatively rigid 100 mm PVC ventilation pipes can be directly slided over the adapter and sealed with remains of 3mm sealing tape from your enclosure panels. FAQ No Questions and Answers yet. Question ? Answer.-
- 3
-
-
- chri.kai.in
- v1.8
- (and 2 more)