Jump to content

An Idea for a chamber heater v. 0.2

   (0 reviews)

3 Screenshots

  • Like 4

Recommended Comments

I'm keen to give this a go. Already have all of the bits so it should be easy enough. I really like the compact size. Interested in how well it will work.

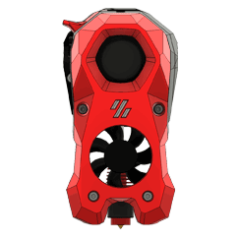
Unless I'm missing something it doesn't look like there's an intake opening for the fan. I'll see about adding one and testing it out.

Link to comment
Share on other sites

I found out that in my model a lot of features and corrections ware deactivated... but now it should be printable and should work 🙂

  • Voron FTW! 2
Link to comment
Share on other sites

Is 40w or so going to heat the chamber enough? I think it will certainly help.

On a Voron 0 the heated bed alone dumps 60w of heat into the chamber during warmup in addition to the heat from the hotend.  Of course both the bed and hotend have their power reduced when they attain the target temperature while this heater could be controlled separately..

I see one potential weakness in the design:   Hotends are designed specifically to prevent heat from the heater block from migrating to the heatsink, while here you would want to maximize this effect.  Perhaps a solid brass or copper bolt could replace the heatbreak? As the V6 has an uncommon 7mm thread in the heatsink, perhaps an older V5 type heatsink with the 6mm thread (same as the heater block) could be used with a brass 6mm bolt.

The next question would be if the heatsink could dissipate 40w of heat without melting the housing... it was only meant to dissipate the heat that creeps past the heatbreak. Perhaps a smaller heater element should be used. 

And finally, to regulate this could be tricky. You ultimately want to regulate the chamber temperature but running this heater without some kind of sensor on the heater could be disastrous if the fan were to fail. Perhaps a thermal fuse could be attached?


Good luck!

  • Like 3
Link to comment
Share on other sites
1 hour ago, ChicagoKeri said:

Is 40w or so going to heat the chamber enough? I think it will certainly help.

On a Voron 0 the heated bed alone dumps 60w of heat into the chamber during warmup in addition to the heat from the hotend.  Of course both the bed and hotend have their power reduced when they attain the target temperature while this heater could be controlled separately..

I see one potential weakness in the design:   Hotends are designed specifically to prevent heat from the heater block from migrating to the heatsink, while here you would want to maximize this effect.  Perhaps a solid brass or copper bolt could replace the heatbreak? As the V6 has an uncommon 7mm thread in the heatsink, perhaps an older V5 type heatsink with the 6mm thread (same as the heater block) could be used with a brass 6mm bolt.

The next question would be if the heatsink could dissipate 40w of heat without melting the housing... it was only meant to dissipate the heat that creeps past the heatbreak. Perhaps a smaller heater element should be used. 

And finally, to regulate this could be tricky. You ultimately want to regulate the chamber temperature but running this heater without some kind of sensor on the heater could be disastrous if the fan were to fail. Perhaps a thermal fuse could be attached?


Good luck!

I have a few of the same thoughts. It should definitely help but I'm not expecting miracles from adding an extra 40 watts but I'm really interested to see how much of a difference you can get in a small form factor. I picked up a V5 heatsink and am planning on using a normal m6 steel bolt until I can get my hands on a brass one. Should be good to compare the difference. My idea for keeping the housing from melting is to just keep the heater around the 70-80c range. Good idea on the thermal fuse. I'll pick up some ~100C ones to test.

Link to comment
Share on other sites

to eliminate the heat brake just adjust the hole (bigger countersunk) to srew the bolt deeper. In the luxus variant use thermal paste between the parts. I managed it with no problems 

20220811_234533.jpg

Edited by Bluewar
  • Like 1
Link to comment
Share on other sites

I like this idea, might be a bit weak for a chamber heater but it looks perfect for making a DIY filament dryer. I'll try to use it in a small box with a 20W heater set to 50-60 degrees. Also just thought that this would be perfect if combined with a nevermore style desiccant cartridge.

Link to comment
Share on other sites
On 8/29/2022 at 4:16 PM, ilkali said:

I like this idea, might be a bit weak for a chamber heater but it looks perfect for making a DIY filament dryer. I'll try to use it in a small box with a 20W heater set to 50-60 degrees. Also just thought that this would be perfect if combined with a nevermore style desiccant cartridge.

or something like this? see attached file.....   this is my (not ready) : HEPA_ Active Carbon_Chamber Heater_ Stealth_ Air modifier

1.pngimage.png.9232bd93f8d784bd9e76813670624eca.png

Fanny_Pack_heater.7z

Edited by Bluewar
  • Like 1
  • Voron FTW! 1
Link to comment
Share on other sites
On 9/5/2022 at 9:52 PM, HACKandThRash said:

I’m about to start beta testing this in a 350 2.4 I’ll let you know how it works for me.


Hey, how did this end up going?

Link to comment
Share on other sites

So I’ve been testing this for almost a week and my chamber temps are around 40-43c compared to the 28-30c without it I think it is doing alright for being such a little guy had a time setting the config because I’m not really that great with the coding but I’m running the heater block at 120 not sure if I could raise that temperature safely or not. 


######################
### Chamber Heater ###
######################

[heater_generic chamber_heater]
heater_pin: PA2
sensor_type: Generic 3950
sensor_pin: PF4
control: watermark
max_power: 0.7
min_temp: 0
max_temp: 270

[verify_heater chamber_heater]
max_error: 900
check_gain_time:900
hysteresis: 5
heating_gain: 2

##########################
### Chamber Heater Fan ###
##########################

[heater_fan chamber_heater_fan]
pin: PD13
max_power: 1.0
heater: chamber_heater
heater_temp: 50.0

#############################
### Enclosure Temperature ###
#############################

[thermistor chamber_thermistor]
temperature1: 25
resistance1: 10000
beta: 3950

[temperature_sensor enclosure_temp]
sensor_type: Generic 3950
sensor_pin: PF6
min_temp: 0
max_temp: 80


  • Like 2
Link to comment
Share on other sites

Nice! Did not expect such a difference. It was actually a good idea. Hehe. Thanks for sharing! How big is your printer? 

Edited by Bluewar
Link to comment
Share on other sites

Wouldn't it work better if one would get rid of the heating block and heatbreak? Then just put the heater directly into the heatsink (where the heatbreak was screwed before).

Link to comment
Share on other sites
8 minutes ago, Szafran said:

Wouldn't it work better if one would get rid of the heating block and heatbreak? Then just put the heater directly into the heatsink (where the heatbreak was screwed before).

You would still need a place to put the thermistor. You could drill a hole in the fins to fit it into but I would think it would read low because of the air blowing on it. I believe that someone on a discord I'm in set it up with the heater directly in the heatsink and put a bead thermistor in the groove mount end. I don't think he's reported back yet though.

Link to comment
Share on other sites
10 hours ago, Szafran said:

Wouldn't it work better if one would get rid of the heating block and heatbreak? Then just put the heater directly into the heatsink (where the heatbreak was screwed before).

There should be no heatbreak. The aluminium body need to touch the copper body directly. Using thermopaste is recommended because after many cycles you can get ab air gap that insulates.

Link to comment
Share on other sites

Nice idea. Thanks for sharing. Obviously needs to be tested with caution. I found it's a good idea to do a PID calibration for the chamber heater hotend. I also needed to add a fan speed setting to the fan config to drop it down slightly - was making it hard for the hotend to get to temperate. Seems to be working, but not sure what are the temperature limits once the heatsink is up to temperature yet. Will keep testing.

By the way, there is a heatset insert hole (fan mount) missing in your model. Also, there's an extra internal heatset hole opposite a blank wall - not sure why that's there. Lastly, what was your mounting plan please? Heatset inserts externally, but what are these clamping to?

Edited by axg20202
Link to comment
Share on other sites
15 hours ago, axg20202 said:

Nice idea. Thanks for sharing. Obviously needs to be tested with caution. I found it's a good idea to do a PID calibration for the chamber heater hotend. I also needed to add a fan speed setting to the fan config to drop it down slightly - was making it hard for the hotend to get to temperate. Seems to be working, but not sure what are the temperature limits once the heatsink is up to temperature yet. Will keep testing.

By the way, there is a heatset insert hole (fan mount) missing in your model. Also, there's an extra internal heatset hole opposite a blank wall - not sure why that's there. Lastly, what was your mounting plan please? Heatset inserts externally, but what are these clamping to?

Thanks for your work and comments.  To be honest I did not found a solution for mounting. If you have an idea I could model it with cad...I am super fast in modeling

Link to comment
Share on other sites

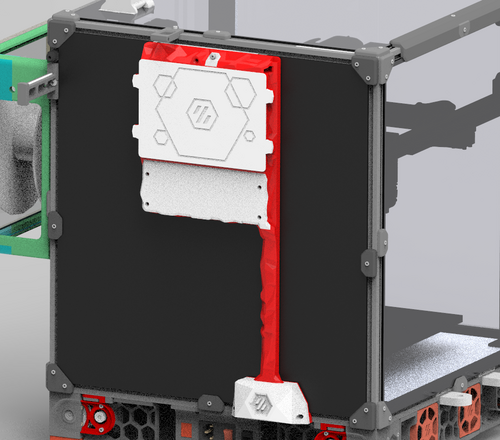
Probably just needs a 20mm wide stem with a single M5 hole at the top and two m3 recessed holes for cap screws that line up with your model. Like this....to mount it in the rear corner pushing air upwards.

Side 2020 mount.stl

Edited by axg20202
Link to comment
Share on other sites

Join the conversation

You can post now and register later. If you have an account, sign in now to post with your account.

Guest
Add a comment...

×   Pasted as rich text.   Paste as plain text instead

  Only 75 emoji are allowed.

×   Your link has been automatically embedded.   Display as a link instead

×   Your previous content has been restored.   Clear editor

×   You cannot paste images directly. Upload or insert images from URL.


Bluewar's Other Downloads


User Feedback

×
×
  • Create New...