Search the Community
Showing results for tags 'tophat'.
Found 2 results
-

Version 1.0.1
701 downloads
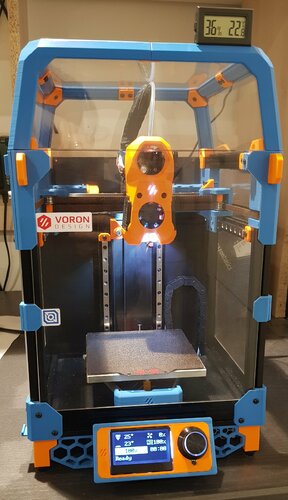
This mod started out as a remix of the TophatHingeV0.1 mod by Demosth. To gain extra space for the extruder, bowden tube and cables I modified the four upper corner A/B Frame/Idler pieces. This raises the upper 1515 alu-profile pieces by 20mm so installing the standard tophat (or a hinged tophat) is functionally the same as with a stock V0.1. The most notable visual difference from a stock V0.1 is the extra space above the gantry. I made up the extra height by adding 20mm tall strips of 3mm thick plexiglass at the bottom of the front and side panels. This mod would be easy to stretch and gain 10 or 20mm more if needed. I 'borrowed' the extra plexiglass from my back panel pieces. In the LDO kit, they ship two separate pieces of dark glass for the back panel. The smaller one is meant to close off the print chamber and the larger one is meant to cover the lower electronics bay. With this mod the smaller piece is no longer large enough so it is necessary to use the larger one at the top. I have included .stl files to install this with the stock tophat, as well as modified .stl files from Demosth's mod. For the hinged version of this mod, I have also included my latching solution for the front of the tophat. The left and right Tophat_Front_Clips allow one to slide a thumb screw in to secure the top in place. The tophat_nut_catch just provides somewhere to stow the thumbscrew when the top is open (as shown in the pictures). I used the no-drop nut mod to make the square nut easier to manage. NOTE: The original A/B Drive_Frame_Upper files that I uploaded had the back heat set insert hole in the wrong location. I have uploaded the correct version of these .slt files. (21 OCT 2022) -
Version 2021.01.21
243 downloads
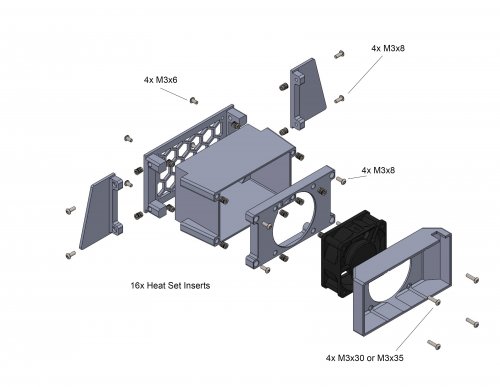
After growing tired of my room smelling of ABS, I decided to create an exhaust and filter system that could be printed entirely on a v0. This mod utilizes 5 layers of 10mm thick activated charcoal sheets, a 60mm x 25mm fan and an optional Roomba HEPA filter. I have tested it throughly and my design almost entirely eliminates the ABS smell during and after printing. The entire assembly (With the HEPA filter attachment) sticks out about 110 mm past the rear of the printer. BOM 4x M3x6 screws 8x M3x6 or M3x10 screws 4x M3x30 or M3x35 screws 16x Heat set inserts 10mm Activated Charcoal sheets Link 24v 60mm x 25mm fan Link OPTIONAL Roomba HEPA filter Link Assembly Before printing the Fan_Cover make sure to check where the wires from your fan exit the housing and select the corresponding stl. The fan wires snake through the assembly and exit through one of the holes in the grill. You will also need to cut 5 55mm x 90mm sheets of activated charcoal to fit into the chamber Wiring and Klipper If you're using an SKR mini v1.2 then you must move the hotend fan from pin FAN0 to FAN1. This allows the exhaust fan to be controlled via PWM instead of the hotend fan since the 1.2 board only has 1 controllable fan port. If you're using the v2 then you don't have to worry about that step because both fan ports are controllable. Add this to your config assuming the exhaust fan is plugged into FAN0 (PA8) [fan_generic exhaust_fan] # Exhaust Fan pin: PA8 max_power: 1.0 shutdown_speed: 0 kick_start_time: 0.5 You can then control the fan speed with SET_FAN_SPEED fan=exhaust_fan SPEED="number between 0 and 1" For example, to put the fan speed at 30% use, SET_FAN_SPEED fan=exhaust_fan SPEED=0.3 Running the fan at 30% speed during a print has lead to a dramatic decrease in ABS fumes and pretty much made them unnoticeable. I also run the fan at 100% speed at the end of a print to fully exhaust the print chamber. Adding foam tape to seal up any gaps between panels and the top-hat will also greatly increase the reduction of fumes.