Search the Community
Showing results for tags 'BladeScraper-Designs'.
Found 3 results
-

Version 2022.01.21
34 downloads
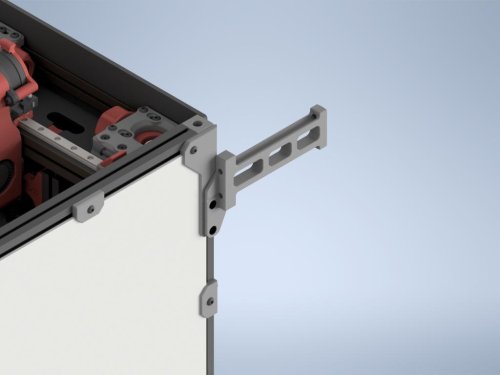
Purpose I originally came up with this mod in order to accommodate my custom hinged rear panel. The stock spoolholder gets in the way of the hinging panel and won't allow it to open without removing the spool holder. This mod moves the spoolholder to the top rear corner panel clip, allowing for easier access to the rear panel as well as providing a more secure mount. It requires minimal hardware and is very easy to install. Required Hardware 1 x M3 Nut (Square, Hex, or NoDropNut, any will work) 2 x M3x10 BHCS Print Settings 4 Walls, 5 Top/Bottom, 40% Infill Standard Voron structural part settings. You do want this to be relatively strong. Install Instructions Remove stock spool holder. You can reuse the PTFE lengths. Remove left side panel. Remove top rear corner panel clip from the acrylic panel. Hopefully you used VHB instead of glue :) Install the modified CornerPanel onto the side panel. Remove rear left foot and install one extra M3 dropnut (or use NoDropNuts Mod) onto the left side of the rear left extrusion. Reinstall side panel. Install the spool holder using the M3x10 BHCS. One of them will replace the original M3x8 in the old panel clip. Notes There are four different CornerPanel files. Each one is sized to different panel thicknesses, like the originals. Pick one that matches your panel thicknesses. There is an additional 3.25mm size just because a lot of 3mm panels tend to be actually 3.15-3.25mm in my experience. If you find that your spoolholder is slightly skewed to one side or the other, the CAD files are supplied so you can extrude them slightly thicker or thinner to get the spoolholder to stick out perfectly straight. If this part is too thick for your panels, the spoolholder will be skewed slightly to the left (when viewed from the back of the printer). If it's too thin for your panels, it'll be skewed to the right. When properly sized, the spoolholder will be perfectly straight out the back, and there's little to no chance for the edge of the spool to rub on your back panel. -
Version 2021.06.02
234 downloads
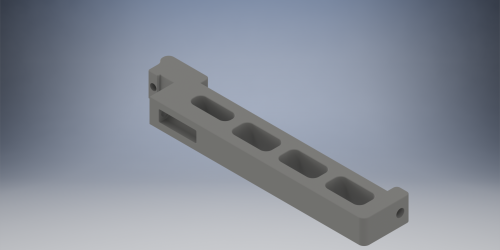
Based on the stock spool holder, this mod allows you to mount the spool holder to the horizontal top extrusions, rather than the vertical ones, to allow you to choose between more than just the front or back of the printer. It's sized to fit a KVP 5lb spool or similar, with a 100mm wide area for the spool to sit in. Just like the stock holder, it uses 4mm PTFE tubing to give the spool a nice smooth surface to ride on. BOM: 2 x M3 T-Nuts 1 x M3x12 SHCS 1 x M3x8 SHCS 1 x Length of PTFE Tubing (Approx 110mm) To install, first put two M3 T-Nuts into the horizontal extrusion, one on the top and one on the side. Then, put the M3x12 SHCS through the top hole of the holder, and screw it down loosely into the T-Nut. Then, after making sure the side hole is aligned, screw the M3x8 SHCS into the other T-Nut. This screw is technically not required, but does improve strength, as well as keep the holder pointed straight out. Without this screw, the holder will tilt up slightly without the weight of a spool. Far from a deal breaker, but I would generally suggest using both screws. This part prints without supports and only takes around an hour or less to print with moderate print speeds. Infill isn't critical but I would use at least 3 perimeters and 5 top/bottom layers.- 1 comment
-
- 6
-

-
- v2.4
- bladescraper-designs
- (and 1 more)
-
Version 2021.03.07
29 downloads
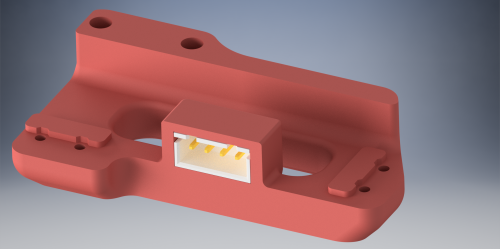
This is a simple modification to the microswitch pod to allow the installation of a JST-XH 4-pin connector. JST-XH 4-pin connector part number B4B-XH-A(LF)(SN) slides into the hole and there's a small lip to keep it sliding all the way thru. Depending on your tolerances it may be tight enough as is, or you may have to use a bit of CA glue. You may need to clean up the inside of the slot a bit using a utility knife to get the JST in, as it does involve bridging. I also slightly increased the size of the screw holes from 1.5mm to 1.7mm as I was having a hard time getting mine screwed down.-
- 1
-
-
- bladescraper-designs
- jst
- (and 1 more)