35 4 3 Details Changelog 0 Questions 93 Comments 2 Reviews 0 Tutorials Support Recommended Comments Prev 1 2 3 4 Next Page 1 of 4 rpg 2 Posted March 23, 2022 Share Quote First I drilled a 1/8" hole next to the center ground pin, rivetted the fuse to the heater's core, and applied thermal grease between the fuse body and the heater core. I then moved the ground wire to run from the fuse rather than the tab. Once I wired this up, I ran the temperatures up past the fuse limits to verify things fail safely as expected. Thanks for this design! Just checking; the cut-off fuses are single-use, so after doing the over-temperature test, I assume you had to remove the now-tripped fuse, and install a new one? 1 Quote Link to comment Share on other sites More sharing options... ahough 146 Posted March 23, 2022 Share 24 minutes ago, rpg said: Thanks for this design! Just checking; the cut-off fuses are single-use, so after doing the over-temperature test, I assume you had to remove the now-tripped fuse, and install a new one? That's correct, the fuse will need to be replaced after running that test. I wanted to make sure everything was wired up correctly and actually failed as expected when the fuse blew. 1 Quote Link to comment Share on other sites More sharing options... rpg 2 Posted March 25, 2022 (edited) Share Sorry, another question... it sounds like your thermistor is actually inserted into one of the folds of the fins in the heater, and then you filled any gaps in that fin-fold with thermal grease. Is that a grease that "sets", to hold the thermistor in place? What kind of grease did you use? Edited March 25, 2022 by rpg 1 Quote Link to comment Share on other sites More sharing options... ahough 146 Posted March 29, 2022 (edited) Share On 3/25/2022 at 12:25 AM, rpg said: Is that a grease that "sets", to hold the thermistor in place? What kind of grease did you use? It does set and helps hold it in, but it is also slightly clamped between the heater core's housing and the fan when they screw together. I'm not sure the grease alone would hold it in that well. I'm using Boron Nitride Thermal Paste by Slice Engineering on my thermistor. Edited March 29, 2022 by ahough 1 Quote Link to comment Share on other sites More sharing options... bgulari 3 Posted March 29, 2022 Share I am getting a Heater not supported error when trying to use the heater do you have any ideas? I am at a loss I cant seem to add any generic heaters. Quote Link to comment Share on other sites More sharing options... ahough 146 Posted March 29, 2022 Share 7 minutes ago, bgulari said: I am getting a Heater not supported error when trying to use the heater do you have any ideas? I am at a loss I cant seem to add any generic heaters. I'm imagining something isn't right with your heater's config. Make sure you have all of your pins set correctly, and double check your configs match the Klipper documentation (you may need to update your Klipper firmware). If you aren't using a direct copy and paste of the config in the description and have the same hardware as me, I probably won't know your setup enough to be able to troubleshoot your config. Quote Link to comment Share on other sites More sharing options... bgulari 3 Posted March 29, 2022 Share ##################################################################### # Heated Chamber ##################################################################### [heater_generic heater_chamber] gcode_id: C1 heater_pin: PB11 max_power: 1 sensor_type: NTC 100K MGB18-104F39050L32 sensor_pin: PF6 #smooth_time: control: pid pid_Kp: 54.027 pid_Ki: 0.770 pid_Kd: 948.182 #pwm_cycle_time: min_temp: 0 max_temp: 60 [verify_heater heater_chamber] max_error: 900 check_gain_time: 900 hysteresis: 5 heating_gain: 1 Here is the macro gcode_macro M141] gcode: ;take the paramater S of M141 and store it as CHAMBER_TEMP. If S is not provided, set as 21c. {% set CHAMBER_TEMP = params.S|default(21)|float %} ;set heater my_chamber_heater equal to M141 S parameter by setting equal to CHAMBER_TEMP. SET_HEATER_TEMPERATURE HEATER=CHAMBER_HEATER [TARGET={CHAMBER_TEMP}] Do you see anything wrong here? Quote Link to comment Share on other sites More sharing options... ahough 146 Posted March 29, 2022 Share 12 minutes ago, bgulari said: Do you see anything wrong here? It looks like your macro is setup to turn on a heater called "CHAMBER_HEATER". Your config shows a heater named "heater_chamber". Maybe that's causing the error you mentioned. Outside of that, I never setup PID control for my heater. I went with watermark instead. Quote Link to comment Share on other sites More sharing options... bgulari 3 Posted March 29, 2022 Share Thanks for checking that unfortunately no success. Are you using mainsail? 1 Quote Link to comment Share on other sites More sharing options... ahough 146 Posted March 29, 2022 Share 1 hour ago, bgulari said: Thanks for checking that unfortunately no success. Are you using mainsail? Yep Quote Link to comment Share on other sites More sharing options... Simon2.4 345 Posted March 29, 2022 Share Here's my config as a reference. My 'verify_heater' values are extreme because of my big glass enclosure. ##################################################################### # Chamber heater ##################################################################### [heater_generic CHAMBER_HEATER] gcode_id: C # The id to use when reporting the temperature in the M105 command. # This parameter must be provided. heater_pin: PB10 max_power: 0.750 sensor_type: Generic 3950 sensor_pin: PF7 smooth_time:1.0 control: pid # Control algorithm either pid or watermark (bangbang) #pid_Kp: 25 #pid_Ki: 1 #pid_Kd: 900 pid_Kp=35 pid_Ki=1 pid_Kd=350 #max_delta: 0.25 # On 'watermark' controlled heaters this is the number of degrees in # Celsius above the target temperature before disabling the heater # as well as the number of degrees below the target before # re-enabling the heater. pwm_cycle_time: 0.016666 min_temp: 0 max_temp: 110 [verify_heater CHAMBER_HEATER] max_error: 20000 # every second, if temp is beyond hysterisis below, the counter will add the error untill the 'max_error' is reached check_gain_time: 600 hysteresis: 5 heating_gain: 1 [idle_timeout] #gcode: ## A list of G-Code commands to execute on an idle timeout. default is to run "TURN_OFF_HEATERS" and "M84". timeout: 10800 ## Idle time (in seconds) to wait before running the above G-Code default is 600 seconds [gcode_macro M141] ##Chamber Heater ON -- gcode: SET_HEATER_TEMPERATURE HEATER=CHAMBER_HEATER TARGET={ params.S } ***NOTICE the gcode_macro M141 part --> this is because Klipper has no native support for M141 (set chamber temp) command !! custom Start G-code from my SuperSlicer: M141 S[chamber_temperature] M140 S[first_layer_bed_temperature] M104 S[first_layer_temperature] ; M109 S0 ; uncomment to remove set&wait temp gcode added automatically after this start gcode print_start EXTRUDER={first_layer_temperature[initial_extruder] + extruder_temperature_offset[initial_extruder]} BED=[first_layer_bed_temperature] CHAMBER=[chamber_temperature] g0 x170 y170 z25 f8000 Typical header of my G-code files: M141 S35 M140 S55 M104 S190 print_start EXTRUDER=190 BED=55 CHAMBER=35 g0 x170 y170 z25 f8000 M107 G21 ; set units to millimeters G90 ; use absolute coordinates M83 ; use relative distances for extrusion 2 1 Quote Link to comment Share on other sites More sharing options... bgulari 3 Posted March 30, 2022 Share Thank you so much. It ended up being a problem with my bedfans cfg file. 2 Quote Link to comment Share on other sites More sharing options... Kilo520 3 Posted August 3, 2022 Share On 3/30/2022 at 3:55 AM, bgulari said: Thank you so much. It ended up being a problem with my bedfans cfg file. What was it in bedfans.cfg that was causing heater not supported error? I am getting the same thing. I guess I don't really need bedfans when I have chamber heater, though. Quote Link to comment Share on other sites More sharing options... Poisson 164 Posted December 11, 2022 (edited) Share For anyone wondering how to get this working when you already have the Ellis bedfans.cfg: In the bedfans.cfg change the [gcode_macro SET_HEATER_TEMPERATURE] as such: [gcode_macro SET_HEATER_TEMPERATURE] rename_existing: _SET_HEATER_TEMPERATURE gcode: # Parameters {% set HEATER = params.HEATER|default("None") %} {% set TARGET = params.TARGET|default(0)|int %} # Vars {% set THRESHOLD = printer["gcode_macro _BEDFANVARS"].threshold|int %} {% if HEATER|lower == "extruder" %} M104 S{TARGET} {% elif HEATER|lower == "heater_bed" %} M99140 S{TARGET} {% elif HEATER|lower == "chamber_heater" %} _SET_HEATER_TEMPERATURE HEATER=chamber_heater TARGET={TARGET} {% else %} {action_respond_info("Heater %s not supported" % HEATER)} {% endif %} # Set fans to low if heater_bed temp is requested above threshold temp, and kick off monitoring loop. {% if HEATER|lower == "heater_bed" %} {% if TARGET >= THRESHOLD %} BEDFANSSLOW UPDATE_DELAYED_GCODE ID=bedfanloop DURATION=1 {% else %} BEDFANSOFF UPDATE_DELAYED_GCODE ID=bedfanloop DURATION=0 # Cancel bed fan loop if it's running {% endif %} {% endif %} Basically you have define your new heater. You set the temperature in that definition with _SET_HEATER_TEMPERATURE HEATER because that is what the original macro is renamed to. I will admit it took me far too long to figure out how to make this work. Edited December 11, 2022 by Poisson 2 Quote Link to comment Share on other sites More sharing options... Poisson 164 Posted December 11, 2022 (edited) Share I'm going to have to do further testing, but so far I am not seeing that big of a temp increase over the Nevermore and 2 bed fans. 5C maybe? have a 2.4r2 350 build. Any tricks here? Edited December 11, 2022 by Poisson 1 Quote Link to comment Share on other sites More sharing options... ahough 146 Posted December 11, 2022 Share 14 hours ago, Poisson said: I'm going to have to do further testing, but so far I am not seeing that big of a temp increase over the Nevermore and 2 bed fans. 5C maybe? have a 2.4r2 350 build. Any tricks here? I haven't messed with the nevermore / 2 bed fan setup, but the way I have my heater configured is for super safe operation within my house. When I'm controlling my venting system, I'm getting chamber temps between 55-65C. I prefer not to exceed 65C. The heater itself is rated for higher temps and could be capped out with a higher rated thermal fuse and higher temp settings. Just be careful if you do this, and make sure your printer is setup in a place that you wouldn't care if it caught fire. Another consideration is the temperatures your printer components can handle. Make sure you don't end up overheating motors, acrylic panels, or other parts. 1 Quote Link to comment Share on other sites More sharing options... Simon2.4 345 Posted December 11, 2022 Share 15 hours ago, Poisson said: I'm going to have to do further testing, but so far I am not seeing that big of a temp increase over the Nevermore and 2 bed fans. 5C maybe? have a 2.4r2 350 build. Any tricks here? exhaust off, sealed panels, tight door joints. 1 Quote Link to comment Share on other sites More sharing options... Poisson 164 Posted December 11, 2022 Share 5 minutes ago, Simon2.4 said: exhaust off, sealed panels, tight door joints. Exhaust have to be off to reach those high temps? I ran out of pwm fan headers and tied exhaust to the electronics chamber fans so it's on most of the time now. Quote Link to comment Share on other sites More sharing options... ahough 146 Posted December 11, 2022 Share I always have my exhaust on because of the fumes, but to get higher temps I do turn down the fan speed. I have a small gap on my front panels when the doors are closed to help the exhaust flow, but everything else has a pretty good seal. 1 Quote Link to comment Share on other sites More sharing options... Poisson 164 Posted December 11, 2022 Share I'll run some tests with 0 exhaust fan and light exhaust fan. I just moved the exhaust fan (a 24V fan) to be tied into the bed fans (12V fans) and they never get above 60% max. That exhaust is pushing a whole lot less air now. Quote Link to comment Share on other sites More sharing options... Poisson 164 Posted December 11, 2022 (edited) Share Even with no exhaust fan running, the bed at 110, the chamber heater at 100, and nevermore running, I'm still topping out a little under 45c in the chamber. This is only a couple degrees higher than I was getting with the nevermore / bed fans / no exhaust fan. My chamber thermistor is in my z chain guide on my rear gantry. Is this just life with a 350mm build? I was really hoping to get up closer to 60, to help print some PC+CF. Edited December 11, 2022 by Poisson Quote Link to comment Share on other sites More sharing options... Simon2.4 345 Posted December 12, 2022 Share Can you describe the details of your setup: 1 link the components used 2 your cfg file setup 3 How is it connected to your controller Did you measure the heater's current draw, did you measure it's fin temperature, does it have an integrated thermostat or self resetting thermal fuse Quote Link to comment Share on other sites More sharing options... Poisson 164 Posted December 12, 2022 (edited) Share 1 hour ago, Simon2.4 said: Can you describe the details of your setup: 1 link the components used 2 your cfg file setup 3 How is it connected to your controller Did you measure the heater's current draw, did you measure it's fin temperature, does it have an integrated thermostat or self resetting thermal fuse Heater (24V): https://www.amazon.com/dp/B07NY18B6Z/ref=twister_B07NXZGY84?_encoding=UTF8&psc=1 Thermistor: https://www.amazon.com/gp/product/B0714MR5BC/ref=ppx_yo_dt_b_search_asin_title?ie=UTF8&psc=1 120C Thermal fuse: https://www.amazon.com/gp/product/B0719DHV9P?ie=UTF8&psc=1&linkCode=ll1&tag=teamfdm-20&linkId=b6bf0c5da8977db5eb5377ec7ad615f6&language=en_US&ref_=as_li_ss_tl Relay: https://www.digikey.com/en/products/detail/omron-automation-and-safety/G3NA-210B-UTU-DC5-24/634443 Here are the parts I added to printer Printer.cfg. I can post the whole cfg if needed. ###################### ### Chamber Heater ### ###################### [heater_generic chamber_heater] heater_pin: PB10 sensor_type: Generic 3950 #sensor_type: EPCOS 100K B57560G104F sensor_pin: PF6 control: pid pid_Kp=35 pid_Ki=1 pid_Kd=350 max_power: .75 min_temp: 0 max_temp: 110 [verify_heater chamber_heater] max_error: 120 check_gain_time: 120 hysteresis: 5 heating_gain: 2 ########################## ### Chamber Heater Fan ### ########################## [heater_fan chamber_heater_fan] pin: PD14 max_power: 1.0 heater: chamber_heater heater_temp: 40.0 # fan will turn off below this level ############################# ### Enclosure Temperature ### ############################# [temperature_sensor enclosure_temp] sensor_type: ATC Semitec 104NT-4-R025H42G sensor_pin: PF5 min_temp: 0 max_temp: 80 It is connected to my controller (Octopus 1.1 board) on the HE2 heater. -Did you measure the heater's current draw, did you measure it's fin temperature, does it have an integrated thermostat or self resetting thermal fuse I have not measured it's current draw. I have not measured the fin temperature (when hot) but I do have an IR thermometer so I will take readings as temperature rises and compare to what the thermistor embedded in the fins is reading. It does not have an integrated thermostat or self resetting thermal fuse - only the inline fuse recommended in the build guide. Edited December 12, 2022 by Poisson 1 Quote Link to comment Share on other sites More sharing options... Poisson 164 Posted December 12, 2022 Share I may have found the problem, it looks like only one of the heater cores in this heater is heating up. It's getting a bit late for work night though and I'm going to have diagnose it tomorrow. Quote Link to comment Share on other sites More sharing options... Poisson 164 Posted December 12, 2022 (edited) Share 10 minutes ago, Simon2.4 said: I think I spotted the issue: the SSR you hose is for AC, You could just replace the heater module with an AC one. I ended up using a 500w Amazon heater with a very similar SSR to what you have: https://www.teamfdm.com/forums/topic/188-simon24s-voron-saga/page/5/ This is the heater and SSR combination that ahough lists in the bom for this...do they not work together? Edited December 12, 2022 by Poisson Quote Link to comment Share on other sites More sharing options... Prev 1 2 3 4 Next Page 1 of 4 Join the conversation You can post now and register later. If you have an account, sign in now to post with your account. Add a comment... × Pasted as rich text. Paste as plain text instead Only 75 emoji are allowed. × Your link has been automatically embedded. Display as a link instead × Your previous content has been restored. Clear editor × You cannot paste images directly. Upload or insert images from URL. × Desktop Tablet Phone Submit Comment
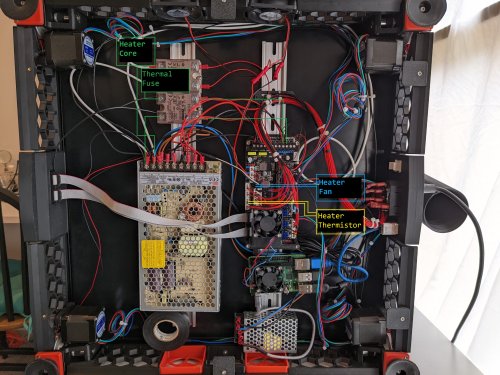
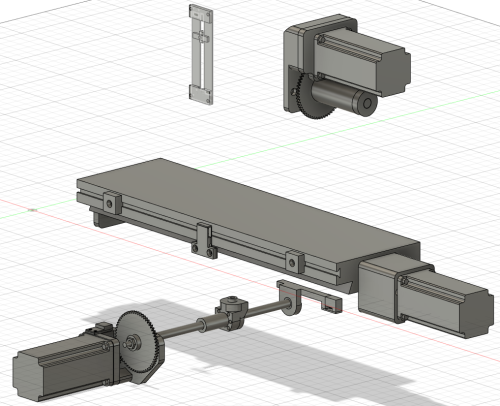
rpg 2 Posted March 23, 2022 Share Quote First I drilled a 1/8" hole next to the center ground pin, rivetted the fuse to the heater's core, and applied thermal grease between the fuse body and the heater core. I then moved the ground wire to run from the fuse rather than the tab. Once I wired this up, I ran the temperatures up past the fuse limits to verify things fail safely as expected. Thanks for this design! Just checking; the cut-off fuses are single-use, so after doing the over-temperature test, I assume you had to remove the now-tripped fuse, and install a new one? 1 Quote Link to comment Share on other sites More sharing options...
ahough 146 Posted March 23, 2022 Share 24 minutes ago, rpg said: Thanks for this design! Just checking; the cut-off fuses are single-use, so after doing the over-temperature test, I assume you had to remove the now-tripped fuse, and install a new one? That's correct, the fuse will need to be replaced after running that test. I wanted to make sure everything was wired up correctly and actually failed as expected when the fuse blew. 1 Quote Link to comment Share on other sites More sharing options...
rpg 2 Posted March 25, 2022 (edited) Share Sorry, another question... it sounds like your thermistor is actually inserted into one of the folds of the fins in the heater, and then you filled any gaps in that fin-fold with thermal grease. Is that a grease that "sets", to hold the thermistor in place? What kind of grease did you use? Edited March 25, 2022 by rpg 1 Quote Link to comment Share on other sites More sharing options...
ahough 146 Posted March 29, 2022 (edited) Share On 3/25/2022 at 12:25 AM, rpg said: Is that a grease that "sets", to hold the thermistor in place? What kind of grease did you use? It does set and helps hold it in, but it is also slightly clamped between the heater core's housing and the fan when they screw together. I'm not sure the grease alone would hold it in that well. I'm using Boron Nitride Thermal Paste by Slice Engineering on my thermistor. Edited March 29, 2022 by ahough 1 Quote Link to comment Share on other sites More sharing options...
bgulari 3 Posted March 29, 2022 Share I am getting a Heater not supported error when trying to use the heater do you have any ideas? I am at a loss I cant seem to add any generic heaters. Quote Link to comment Share on other sites More sharing options...
ahough 146 Posted March 29, 2022 Share 7 minutes ago, bgulari said: I am getting a Heater not supported error when trying to use the heater do you have any ideas? I am at a loss I cant seem to add any generic heaters. I'm imagining something isn't right with your heater's config. Make sure you have all of your pins set correctly, and double check your configs match the Klipper documentation (you may need to update your Klipper firmware). If you aren't using a direct copy and paste of the config in the description and have the same hardware as me, I probably won't know your setup enough to be able to troubleshoot your config. Quote Link to comment Share on other sites More sharing options...
bgulari 3 Posted March 29, 2022 Share ##################################################################### # Heated Chamber ##################################################################### [heater_generic heater_chamber] gcode_id: C1 heater_pin: PB11 max_power: 1 sensor_type: NTC 100K MGB18-104F39050L32 sensor_pin: PF6 #smooth_time: control: pid pid_Kp: 54.027 pid_Ki: 0.770 pid_Kd: 948.182 #pwm_cycle_time: min_temp: 0 max_temp: 60 [verify_heater heater_chamber] max_error: 900 check_gain_time: 900 hysteresis: 5 heating_gain: 1 Here is the macro gcode_macro M141] gcode: ;take the paramater S of M141 and store it as CHAMBER_TEMP. If S is not provided, set as 21c. {% set CHAMBER_TEMP = params.S|default(21)|float %} ;set heater my_chamber_heater equal to M141 S parameter by setting equal to CHAMBER_TEMP. SET_HEATER_TEMPERATURE HEATER=CHAMBER_HEATER [TARGET={CHAMBER_TEMP}] Do you see anything wrong here? Quote Link to comment Share on other sites More sharing options...
ahough 146 Posted March 29, 2022 Share 12 minutes ago, bgulari said: Do you see anything wrong here? It looks like your macro is setup to turn on a heater called "CHAMBER_HEATER". Your config shows a heater named "heater_chamber". Maybe that's causing the error you mentioned. Outside of that, I never setup PID control for my heater. I went with watermark instead. Quote Link to comment Share on other sites More sharing options...
bgulari 3 Posted March 29, 2022 Share Thanks for checking that unfortunately no success. Are you using mainsail? 1 Quote Link to comment Share on other sites More sharing options...
ahough 146 Posted March 29, 2022 Share 1 hour ago, bgulari said: Thanks for checking that unfortunately no success. Are you using mainsail? Yep Quote Link to comment Share on other sites More sharing options...
Simon2.4 345 Posted March 29, 2022 Share Here's my config as a reference. My 'verify_heater' values are extreme because of my big glass enclosure. ##################################################################### # Chamber heater ##################################################################### [heater_generic CHAMBER_HEATER] gcode_id: C # The id to use when reporting the temperature in the M105 command. # This parameter must be provided. heater_pin: PB10 max_power: 0.750 sensor_type: Generic 3950 sensor_pin: PF7 smooth_time:1.0 control: pid # Control algorithm either pid or watermark (bangbang) #pid_Kp: 25 #pid_Ki: 1 #pid_Kd: 900 pid_Kp=35 pid_Ki=1 pid_Kd=350 #max_delta: 0.25 # On 'watermark' controlled heaters this is the number of degrees in # Celsius above the target temperature before disabling the heater # as well as the number of degrees below the target before # re-enabling the heater. pwm_cycle_time: 0.016666 min_temp: 0 max_temp: 110 [verify_heater CHAMBER_HEATER] max_error: 20000 # every second, if temp is beyond hysterisis below, the counter will add the error untill the 'max_error' is reached check_gain_time: 600 hysteresis: 5 heating_gain: 1 [idle_timeout] #gcode: ## A list of G-Code commands to execute on an idle timeout. default is to run "TURN_OFF_HEATERS" and "M84". timeout: 10800 ## Idle time (in seconds) to wait before running the above G-Code default is 600 seconds [gcode_macro M141] ##Chamber Heater ON -- gcode: SET_HEATER_TEMPERATURE HEATER=CHAMBER_HEATER TARGET={ params.S } ***NOTICE the gcode_macro M141 part --> this is because Klipper has no native support for M141 (set chamber temp) command !! custom Start G-code from my SuperSlicer: M141 S[chamber_temperature] M140 S[first_layer_bed_temperature] M104 S[first_layer_temperature] ; M109 S0 ; uncomment to remove set&wait temp gcode added automatically after this start gcode print_start EXTRUDER={first_layer_temperature[initial_extruder] + extruder_temperature_offset[initial_extruder]} BED=[first_layer_bed_temperature] CHAMBER=[chamber_temperature] g0 x170 y170 z25 f8000 Typical header of my G-code files: M141 S35 M140 S55 M104 S190 print_start EXTRUDER=190 BED=55 CHAMBER=35 g0 x170 y170 z25 f8000 M107 G21 ; set units to millimeters G90 ; use absolute coordinates M83 ; use relative distances for extrusion 2 1 Quote Link to comment Share on other sites More sharing options...
bgulari 3 Posted March 30, 2022 Share Thank you so much. It ended up being a problem with my bedfans cfg file. 2 Quote Link to comment Share on other sites More sharing options...
Kilo520 3 Posted August 3, 2022 Share On 3/30/2022 at 3:55 AM, bgulari said: Thank you so much. It ended up being a problem with my bedfans cfg file. What was it in bedfans.cfg that was causing heater not supported error? I am getting the same thing. I guess I don't really need bedfans when I have chamber heater, though. Quote Link to comment Share on other sites More sharing options...
Poisson 164 Posted December 11, 2022 (edited) Share For anyone wondering how to get this working when you already have the Ellis bedfans.cfg: In the bedfans.cfg change the [gcode_macro SET_HEATER_TEMPERATURE] as such: [gcode_macro SET_HEATER_TEMPERATURE] rename_existing: _SET_HEATER_TEMPERATURE gcode: # Parameters {% set HEATER = params.HEATER|default("None") %} {% set TARGET = params.TARGET|default(0)|int %} # Vars {% set THRESHOLD = printer["gcode_macro _BEDFANVARS"].threshold|int %} {% if HEATER|lower == "extruder" %} M104 S{TARGET} {% elif HEATER|lower == "heater_bed" %} M99140 S{TARGET} {% elif HEATER|lower == "chamber_heater" %} _SET_HEATER_TEMPERATURE HEATER=chamber_heater TARGET={TARGET} {% else %} {action_respond_info("Heater %s not supported" % HEATER)} {% endif %} # Set fans to low if heater_bed temp is requested above threshold temp, and kick off monitoring loop. {% if HEATER|lower == "heater_bed" %} {% if TARGET >= THRESHOLD %} BEDFANSSLOW UPDATE_DELAYED_GCODE ID=bedfanloop DURATION=1 {% else %} BEDFANSOFF UPDATE_DELAYED_GCODE ID=bedfanloop DURATION=0 # Cancel bed fan loop if it's running {% endif %} {% endif %} Basically you have define your new heater. You set the temperature in that definition with _SET_HEATER_TEMPERATURE HEATER because that is what the original macro is renamed to. I will admit it took me far too long to figure out how to make this work. Edited December 11, 2022 by Poisson 2 Quote Link to comment Share on other sites More sharing options...
Poisson 164 Posted December 11, 2022 (edited) Share I'm going to have to do further testing, but so far I am not seeing that big of a temp increase over the Nevermore and 2 bed fans. 5C maybe? have a 2.4r2 350 build. Any tricks here? Edited December 11, 2022 by Poisson 1 Quote Link to comment Share on other sites More sharing options...
ahough 146 Posted December 11, 2022 Share 14 hours ago, Poisson said: I'm going to have to do further testing, but so far I am not seeing that big of a temp increase over the Nevermore and 2 bed fans. 5C maybe? have a 2.4r2 350 build. Any tricks here? I haven't messed with the nevermore / 2 bed fan setup, but the way I have my heater configured is for super safe operation within my house. When I'm controlling my venting system, I'm getting chamber temps between 55-65C. I prefer not to exceed 65C. The heater itself is rated for higher temps and could be capped out with a higher rated thermal fuse and higher temp settings. Just be careful if you do this, and make sure your printer is setup in a place that you wouldn't care if it caught fire. Another consideration is the temperatures your printer components can handle. Make sure you don't end up overheating motors, acrylic panels, or other parts. 1 Quote Link to comment Share on other sites More sharing options...
Simon2.4 345 Posted December 11, 2022 Share 15 hours ago, Poisson said: I'm going to have to do further testing, but so far I am not seeing that big of a temp increase over the Nevermore and 2 bed fans. 5C maybe? have a 2.4r2 350 build. Any tricks here? exhaust off, sealed panels, tight door joints. 1 Quote Link to comment Share on other sites More sharing options...
Poisson 164 Posted December 11, 2022 Share 5 minutes ago, Simon2.4 said: exhaust off, sealed panels, tight door joints. Exhaust have to be off to reach those high temps? I ran out of pwm fan headers and tied exhaust to the electronics chamber fans so it's on most of the time now. Quote Link to comment Share on other sites More sharing options...
ahough 146 Posted December 11, 2022 Share I always have my exhaust on because of the fumes, but to get higher temps I do turn down the fan speed. I have a small gap on my front panels when the doors are closed to help the exhaust flow, but everything else has a pretty good seal. 1 Quote Link to comment Share on other sites More sharing options...
Poisson 164 Posted December 11, 2022 Share I'll run some tests with 0 exhaust fan and light exhaust fan. I just moved the exhaust fan (a 24V fan) to be tied into the bed fans (12V fans) and they never get above 60% max. That exhaust is pushing a whole lot less air now. Quote Link to comment Share on other sites More sharing options...
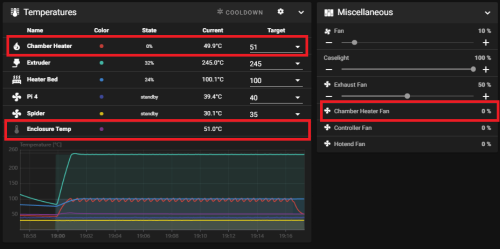
Poisson 164 Posted December 11, 2022 (edited) Share Even with no exhaust fan running, the bed at 110, the chamber heater at 100, and nevermore running, I'm still topping out a little under 45c in the chamber. This is only a couple degrees higher than I was getting with the nevermore / bed fans / no exhaust fan. My chamber thermistor is in my z chain guide on my rear gantry. Is this just life with a 350mm build? I was really hoping to get up closer to 60, to help print some PC+CF. Edited December 11, 2022 by Poisson Quote Link to comment Share on other sites More sharing options...
Simon2.4 345 Posted December 12, 2022 Share Can you describe the details of your setup: 1 link the components used 2 your cfg file setup 3 How is it connected to your controller Did you measure the heater's current draw, did you measure it's fin temperature, does it have an integrated thermostat or self resetting thermal fuse Quote Link to comment Share on other sites More sharing options...
Poisson 164 Posted December 12, 2022 (edited) Share 1 hour ago, Simon2.4 said: Can you describe the details of your setup: 1 link the components used 2 your cfg file setup 3 How is it connected to your controller Did you measure the heater's current draw, did you measure it's fin temperature, does it have an integrated thermostat or self resetting thermal fuse Heater (24V): https://www.amazon.com/dp/B07NY18B6Z/ref=twister_B07NXZGY84?_encoding=UTF8&psc=1 Thermistor: https://www.amazon.com/gp/product/B0714MR5BC/ref=ppx_yo_dt_b_search_asin_title?ie=UTF8&psc=1 120C Thermal fuse: https://www.amazon.com/gp/product/B0719DHV9P?ie=UTF8&psc=1&linkCode=ll1&tag=teamfdm-20&linkId=b6bf0c5da8977db5eb5377ec7ad615f6&language=en_US&ref_=as_li_ss_tl Relay: https://www.digikey.com/en/products/detail/omron-automation-and-safety/G3NA-210B-UTU-DC5-24/634443 Here are the parts I added to printer Printer.cfg. I can post the whole cfg if needed. ###################### ### Chamber Heater ### ###################### [heater_generic chamber_heater] heater_pin: PB10 sensor_type: Generic 3950 #sensor_type: EPCOS 100K B57560G104F sensor_pin: PF6 control: pid pid_Kp=35 pid_Ki=1 pid_Kd=350 max_power: .75 min_temp: 0 max_temp: 110 [verify_heater chamber_heater] max_error: 120 check_gain_time: 120 hysteresis: 5 heating_gain: 2 ########################## ### Chamber Heater Fan ### ########################## [heater_fan chamber_heater_fan] pin: PD14 max_power: 1.0 heater: chamber_heater heater_temp: 40.0 # fan will turn off below this level ############################# ### Enclosure Temperature ### ############################# [temperature_sensor enclosure_temp] sensor_type: ATC Semitec 104NT-4-R025H42G sensor_pin: PF5 min_temp: 0 max_temp: 80 It is connected to my controller (Octopus 1.1 board) on the HE2 heater. -Did you measure the heater's current draw, did you measure it's fin temperature, does it have an integrated thermostat or self resetting thermal fuse I have not measured it's current draw. I have not measured the fin temperature (when hot) but I do have an IR thermometer so I will take readings as temperature rises and compare to what the thermistor embedded in the fins is reading. It does not have an integrated thermostat or self resetting thermal fuse - only the inline fuse recommended in the build guide. Edited December 12, 2022 by Poisson 1 Quote Link to comment Share on other sites More sharing options...
Poisson 164 Posted December 12, 2022 Share I may have found the problem, it looks like only one of the heater cores in this heater is heating up. It's getting a bit late for work night though and I'm going to have diagnose it tomorrow. Quote Link to comment Share on other sites More sharing options...
Poisson 164 Posted December 12, 2022 (edited) Share 10 minutes ago, Simon2.4 said: I think I spotted the issue: the SSR you hose is for AC, You could just replace the heater module with an AC one. I ended up using a 500w Amazon heater with a very similar SSR to what you have: https://www.teamfdm.com/forums/topic/188-simon24s-voron-saga/page/5/ This is the heater and SSR combination that ahough lists in the bom for this...do they not work together? Edited December 12, 2022 by Poisson Quote Link to comment Share on other sites More sharing options...


 35
35
 4
4
 3
3
Recommended Comments
Join the conversation
You can post now and register later. If you have an account, sign in now to post with your account.