Jump to content

Search the Community

Showing results for tags 'msa'.

  • Search By Tags

    Type tags separated by commas.
  • Search By Author

Content Type


Forums

  • TeamFDM
    • Site Updates and Announcements
    • Frequently Asked Questions
    • General Discussion
    • Voron User Mods
    • Filaments
    • Build Diaries
    • Introductions
    • Tutorials
  • Voron Build Support
    • Voron 0
    • Voron Trident
    • Voron 2
    • Voron Legacy
    • Voron Extruders
    • Voron Electronics
    • Slicers and Print Troubleshooting
  • Other FDM Printers
    • Ender 3 / Ender 3 Pro
    • Anet A8 / AM8
    • Prusa
    • Generic / Other
  • Marketplace
    • The Bazaar
  • Vendors
    • KB-3D
    • Voron Printed Parts Co.
    • Fabreeko
  • Off-Topic
    • Random
    • TeamFDM Member's Creative Collection

Categories

  • Non Printable Files
  • Printable Voron User Mods
  • Manuals and PDF Guides
  • Creative Collection
  • Tools and Calibration
  • Official Voron Releases

Categories

  • User Mod Installs
  • Build Techniques
  • Programming
  • Team FDM Site Tutorials
  • CAD / Fusion 360 Tutorials

Blogs

  • Voron General
  • Why we are the best digital marketing services in Chennai

Find results in...

Find results that contain...


Date Created

  • Start

    End


Last Updated

  • Start

    End


Filter by number of...

Joined

  • Start

    End


Group


About Me


Voron Serial #1


Voron Serial #2


Voron Serial #3


Voron Serial #4


Voron Serial #5


Voron Serial #6


Voron Serial #7

Found 1 result

  1. Version 2022.04.08

    59 downloads

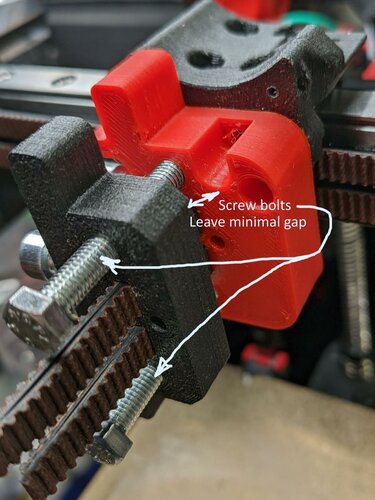
    A belt tension helper - is a tool to do pre-tension of belts A tool act as a helper to do initial belt tension. It is able to do individual belt tension or synced tension of belts BOM 2 or 3 M3 8mm bolts to mount helper to X-carriage 2x15mm M5 bolts to fix belts when needed 2x40mm M5 bolts and M5 nuts to perform tension While printing use higher infill for bottom or use cylidric modifies to add strength for pads where M5 bolts will do pressure See example here: Steps to perform: Step 1. Mount bottom part on X carriage and push thought belts. Keep in mind that loose belt backs square nut (use holes for regulate them) Step 2. Put top part and pass thought belts. Screw tension bolts to have zero minimal gap between bottom and top plate Step 3. Fix belts on top part but leave loosen on bottom Step 4. Tension belt by turning the bolts synchronously (do it sequentially by one turn for each) Step 5. When belt are in tesion fix them using service holes by allen hex key Step 6. Loose all M5 and unmount top and bottom tool parts (Optional). When need to do individual belt tension use combination of bolts fix or loosen. See example for case when need to do extra tension for top belt
×
×
  • Create New...