Search the Community
Showing results for tags 'chamber heater'.
Found 5 results
-
 I replaced both side panels with foil-faced, 16mm thick styrofoam sheets from Home Depot. I have a thermistor attached to the cable chain in the back and in the front of the bed. I also have 2x 50x30mm bed fans blowing down the middle of the bed. The styrofoam panels are attached the with modified 16mm snap latches.
-
Version 1.0.0
540 downloads
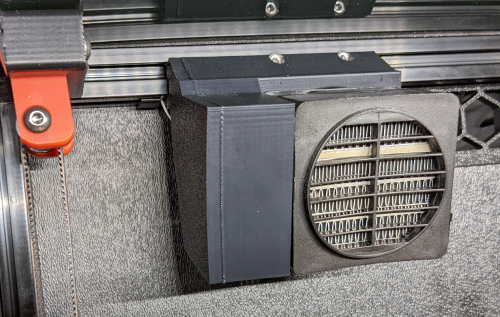
I was having trouble getting my enclosure temperatures above 45C to achieve my optimum print settings. This is the solution I came up with to solve my enclosure temperature issues. I'm running a Fystec Spider v1.1, so your printer config would likely differ. I'm also using a Hartk v4.0 PCB that has an integrated chamber thermistor. I've included my settings for this as well, but you may need to change this up if you use a different thermistor for enclosure temperature readings. I hope this is helpful for someone. I couldn't find a lot of solutions out on the net that could get me up and going with a setup like this, so it was a lot of trial and error to get to this point. Let me know if you have any comments or suggestions that can help me make this thing better! How I set things up: I removed the fan from the PTC heater and inserted a 100K NTC thermistor into one of the bordering fins on the heater core. I then filled the remaining gap in the fin with thermal grease and reattached the fan. I added a thermal fuse to make sure the power would get cut if the temperatures get out of hand from a bad config or faulty piece of hardware. First I drilled a 1/8" hole next to the center ground pin, rivetted the fuse to the heater's core, and applied thermal grease between the fuse body and the heater core. I then moved the ground wire to run from the fuse rather than the tab. Once I wired this up, I ran the temperatures up past the fuse limits to verify things fail safely as expected. I then replaced the fuse after test failed as expected. I extended all of the wiring with solder connections to make sure it would be long enough reach each wire's intended destination, and capped each connection with heat shrink. I mounted the PTC heater to the printed PTC heater mount and ran the wires to the wiring compartment. I installed the Omron relay, and ran a 24v output from my controller to the relay's 5-24v input. I then routed 110v AC to the other end of the relay on the hot lead. I finished up the wiring by hooking up the 12v line for the heater fan and the heater thermistor to the controller board. (Note: my chamber thermistor was already installed on my toolhead's PCB) I updated my printer.cfg and ran a bunch of tests on the heater to make sure it was functioning properly. BOM: Electronics: - PTC Heater w/ Fan x1 - Item on Amazon - NTC 100k thermistor - Item on Amazon - 120C Thermal Fuse - Item on Amazon - Omron 5-24v Relay - Item on West3D Printed Parts: - Printed PTC Heater Mount x1 Miscellaneous: - M3x8mm SHCS x2 - M3 T-nut x2 - 18awg stranded wire ~2 meters - 22awg stranded wire ~2 meters - 1/8" Rivet x1 - Appropriate connectors for you controller board Changes to printer.cfg: ###################### ### Chamber Heater ### ###################### [heater_generic chamber_heater] heater_pin: PC8 sensor_type: Generic 3950 sensor_pin: PC2 control: watermark max_power: .5 min_temp: 0 max_temp: 110 [verify_heater chamber_heater] max_error: 120 check_gain_time: 120 hysteresis: 5 heating_gain: 2 ########################## ### Chamber Heater Fan ### ########################## [heater_fan chamber_heater_fan] pin: PB6 max_power: 1.0 heater: chamber_heater heater_temp: 40.0 # fan will turn off below this level ############################# ### Enclosure Temperature ### ############################# [thermistor chamber_thermistor] temperature1: 25 resistance1: 10000 beta: 3950 [temperature_sensor enclosure_temp] sensor_type: chamber_thermistor sensor_pin: PC1 min_temp: 0 max_temp: 80 Macro: You can run this and immediately start your print. The print wont actually start until the specified chamber temperatures are reached. [gcode_macro CHAMBER_TEMP_WAIT] gcode: {% if params.MIN_TEMPERATURE and params.MAX_TEMPERATURE and params.MIN_TEMPERATURE|float > params.MAX_TEMPERATURE|float %} {action_raise_error("Chamber Temp Wait: MIN_TEMPERATURE must be less than or equal to MAX_TEMPERATURE Use: - CHAMBER_TEMP_WAIT MIN_TEMPERATURE=[0..80] - CHAMBER_TEMP_WAIT MAX_TEMPERATURE=[0..80] - CHAMBER_TEMP_WAIT MIN_TEMPERATURE=[0..80] MAX_TEMPERATURE=[0..80]")} {% elif params.MIN_TEMPERATURE and params.MIN_TEMPERATURE|float > -1 and params.MIN_TEMPERATURE|float < 81 %} {% if params.MAX_TEMPERATURE and params.MAX_TEMPERATURE|float > -1 and params.MAX_TEMPERATURE|float < 81 %} TEMPERATURE_WAIT SENSOR="temperature_sensor enclosure_temp" MINIMUM={params.MIN_TEMPERATURE|float} MAXIMUM={params.MAX_TEMPERATURE|float} {% else %} TEMPERATURE_WAIT SENSOR="temperature_sensor enclosure_temp" MINIMUM={params.MIN_TEMPERATURE|float} {% endif %} {% elif params.MAX_TEMPERATURE and params.MAX_TEMPERATURE|float > -1 and params.MAX_TEMPERATURE|float < 81 %} TEMPERATURE_WAIT SENSOR="temperature_sensor enclosure_temp" MAXIMUM={params.MAX_TEMPERATURE|float} {% else %} {action_raise_error("Chamber Temp Wait: invalid usage Use: - CHAMBER_TEMP_WAIT MIN_TEMPERATURE=[0..80] - CHAMBER_TEMP_WAIT MAX_TEMPERATURE=[0..80] - CHAMBER_TEMP_WAIT MIN_TEMPERATURE=[0..80] MAX_TEMPERATURE=[0..80]")} {% endif %} Updates: - I added a photo of how this is wired up in the wiring compartment. The boxes with the text in the photo represent the components of the heater that are in the chamber of the printer. - I have included the macro to wait for chamber to reach temps before starting a print. - I have attached the heater mount's fusion 360 file for others to be able to easily make edits to the chamber heater mount Chamber Heater Mount v2.f3d- 82 comments
- 2 reviews
-
- 34
-

-

-

-
- chamber heater
- heater
- (and 1 more)
-
Version 1.0.0
13 downloads
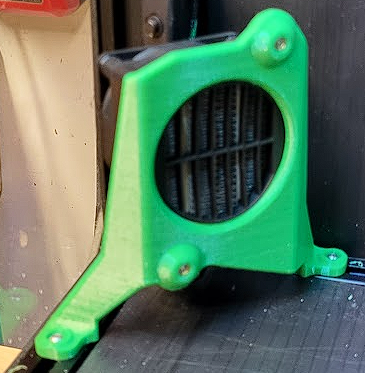
I wanted to reach ABS/ASA temperatures faster, and be able to maintain 55-60°C for those larger warp-prone prints, so I designed this chamber heater mount. If you're going to attempt this, make sure to use a temperature fuse to protect your printer (and your house) from burning down in the event of failure/over-heating. I used 2x 3mmx5mm long heatserts inserted from the front, and 3mmx12mm screws to attach the heater. 4x 3mm t-nuts and 4x 3mmx10mm screws are required for mounting the bracket. I used this 120VAC 250W heater (with 12VDC fan): https://www.amazon.ca/dp/B07NYX5DKD?psc=1&ref=ppx_yo2ov_dt_b_product_details I used this SSR: https://www.amazon.ca/dp/B06WLNHPWK?psc=1&ref=ppx_yo2ov_dt_b_product_details I loosely followed the chamber heater post from @ahough, and this would've been way harder (nigh impossible) without their post and the comments section. Notable mention goes out to @Dousi as well, since I copied and modified their config example to use as my own. I hope the configs below help someone else along their way. ******** ******** Here is my chamber heater section within my printer.cfg file: ******** ##################################################################### # CHAMBER HEATER ##################################################################### [thermistor chamber_thermistor] #define "chamber_thermistor" characteristics temperature1: 25 resistance1: 100000 beta: 3950 [thermistor heater_thermistor] #define "heater_thermistor" characteristics temperature1: 0.0 resistance1: 32116.0 temperature2: 40.0 resistance2: 5309.0 temperature3: 80.0 resistance3: 1228.0 [temperature_sensor heater_temp] #this is the temp sensor for the 10K probe inserted in the heater core sensor_type: heater_thermistor #use temp sensor characteristics as defined in "heater_thermistor" sensor_pin: PA2 #Manta 8P temp sensor input pin. This temp probe is glued to the heater core with UV resin min_temp: -100 #set minimum temp before error/shutdown max_temp: 140 #SAFETY max heater core temperature, printer will shutdown above this temp [heater_generic chamber_heater] #setup chamber heater heater_pin: PE3 #Manta 8P heater output pin to SSR. This temp probe is mounted near the top of my chamber sensor_type: chamber_thermistor #use temp sensor characteristics as defined in "chamber_thermistor" sensor_pin: PA1 #Manta *P temp sensor input pin control: watermark #use watermark control method (on/off) max_delta: 0.1 #set the delta temp to energize/deenergize chamber heater max_power: 1.0 #set maximum power of heater 1.0 = 100% min_temp: -100 #set minimum temp before error/shutdown max_temp: 70 #SAFETY max chamber temperature, printer will shutdown above this temp pwm_cycle_time: 0.01666 #Set this to avoid room lights flickering on higher power heaters. This value works well for 60Hz power. 0.1 is 10Hz [verify_heater chamber_heater] #setup chamber heater verification parameters max_error: 120 check_gain_time: 240 hysteresis: 5 heating_gain: 1 [heater_fan heater_fan] #setup fan attached to back of chamber heater pin: PE4 #Manta 8P fan output pin. Jumper selected for 12V max_power: 1.0 #set maximum power of fan 1.0 = 100% heater: chamber_heater #when "chamber_heater" is ON fan will be ON heater_temp: 30 #fan will turn off below this level ##################################################################### # MACROS ##################################################################### [gcode_macro M191] gcode: {% set S = params.S | default(0) | float %} SET_HEATER_TEMPERATURE HEATER=chamber_heater TARGET={S} M118 Chamber heating to {S}C M118 Waiting for chamber heating... TEMPERATURE_WAIT SENSOR="heater_generic chamber_heater" MINIMUM={S} M118 Chamber heating {S}C is done. ******** ******** I also run Ellis' bedfans, and modified bedfans.cfg, "Command overrides" section to the below: ******** ############ Command overrides ############ # Override, set fan speeds to low and start monitoring loop. [gcode_macro SET_HEATER_TEMPERATURE] rename_existing: _SET_HEATER_TEMPERATURE gcode: # Parameters {% set HEATER = params.HEATER|default("None") %} {% set TARGET = params.TARGET|default(0)|int %} # Vars {% set THRESHOLD = printer["gcode_macro _BEDFANVARS"].threshold|int %} {% if HEATER|lower == "extruder" %} M104 S{TARGET} {% elif HEATER|lower == "heater_bed" %} M99140 S{TARGET} {% elif HEATER|lower == "chamber_heater" %} _SET_HEATER_TEMPERATURE HEATER=chamber_heater TARGET={TARGET} {% else %} {action_respond_info("Heater %s not supported" % HEATER)} {% endif %} # Set fans to low if heater_bed temp is requested above threshold temp, and kick off monitoring loop. {% if HEATER|lower == "heater_bed" %} {% if TARGET >= THRESHOLD %} BEDFANSSLOW UPDATE_DELAYED_GCODE ID=bedfanloop DURATION=1 {% else %} BEDFANSOFF UPDATE_DELAYED_GCODE ID=bedfanloop DURATION=0 # Cancel bed fan loop if it's running {% endif %} {% endif %} ******** ******** II then modified my PRINT_START macro to include the chamber heater stuff as seen below: ******** [gcode_macro PRINT_START] # Use PRINT_START for the slicer starting script - PLEASE CUSTOMISE THE SCRIPT gcode: EXCLUDE_OBJECT_DEFINE BED_MESH_PROFILE load=default # Load variables {% set bed_temp = params.BED|default(60)|int %} {% set extruder_temp = params.EXTRUDER|default(230)|int %} {% set CHAMBER_TEMP = params.CHAMBER|default(20)|float %} M104 S150 #start nozzle heating, keep below oozing temp M117 Extruder Heating... M140 S{bed_temp} #set bed temp to "bed_temp" and move on M117 Bed Heating.... M190 S{bed_temp} #allow bed to get up to temperature M117 Heating Chamber... M191 S{CHAMBER_TEMP} G90 #Use absolute coordinates M117 Homing... G28 M117 Adjusting Z Tilt... Z_TILT_ADJUST G28 M117 Calibrating Bed Mesh... BED_MESH_CALIBRATE M117 Waiting for Extruder to Reach Printing Temperature... M109 S{extruder_temp} G92 E0 #Reset exruder M117 Purging Filament... ADAPTIVE_PURGE M117 ******** ******** I use CURA and this is my Start Gcode as defined within Cura: ******** ;Nozzle diameter = {machine_nozzle_size} ;Filament type = {material_type} ;Filament name = {material_name} M204 P500.00 R1000.00 T500.00 ;Setup Print/Retract/Travel acceleration M220 S100 ;Reset Feedrate M221 S100 ;Reset Flowrate M117 PRINT_START EXTRUDER={material_print_temperature_layer_0} BED={material_bed_temperature_layer_0} CHAMBER={build_volume_temperature} -
Version 0.2
79 downloads
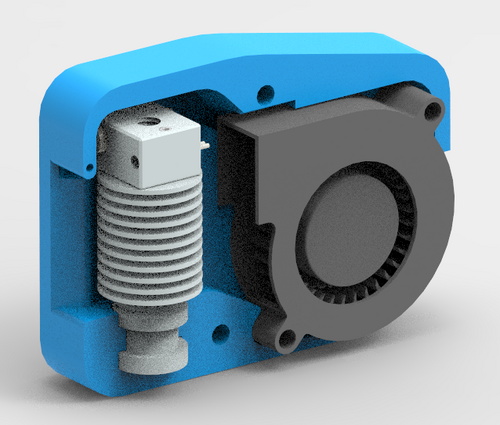
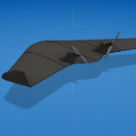
This is a sketch of an Idea that I had for a chamber heater. Its an V6 Hotend and an radial 5015 blower... There should be no gap between the heater block and the heat sink. I need help / time to test it... what temperatur is acceptable, flow..... -
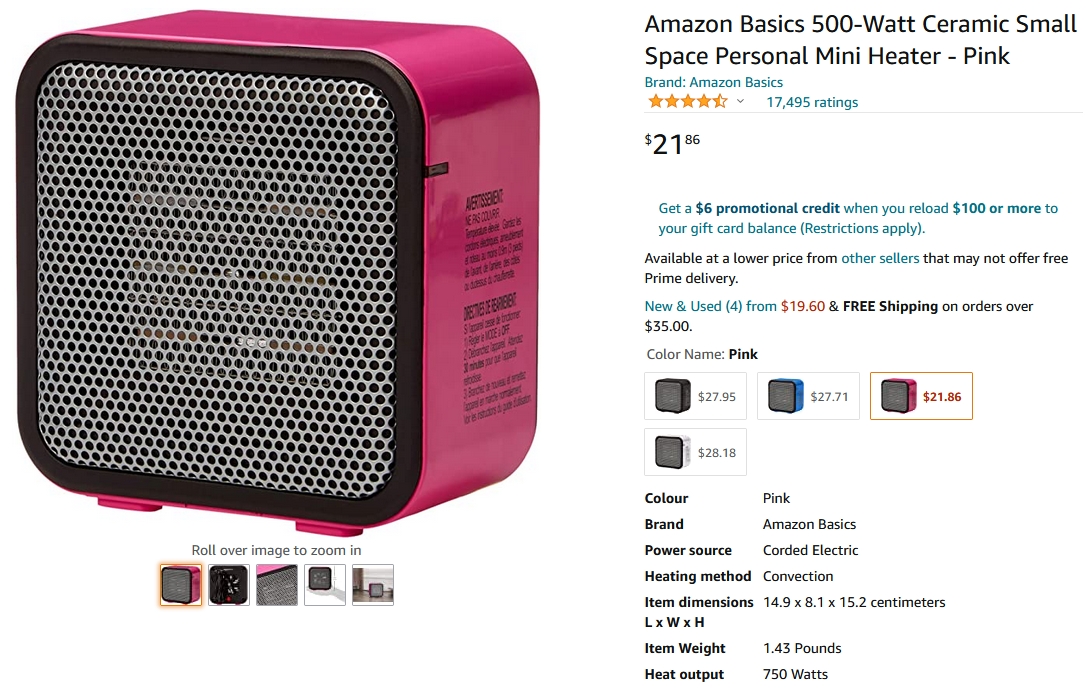
 Article in progress... In my efforts to develop an adequate chamber heater for my big glass enclosure I looked at a few options to use as a heater element to base the design around. The elaboration of the heated chamber will be covered in a complete tutorial; this post is all about the little Amazon heater Link to the Amazon Basics 500W Heater: https://amzn.to/3sAMJCC *****The Good: Dirt cheap Standardized components of adequate quality Quiet fan Usefull extra parts: Power switch, LED, 12v dc regulator!, power cord, limit switch, Hight temp wires. *****The bad: Outer casing Fireproofing smells ALOT its bad Front grill is very restrictive Fan barely adequate for flow *****The Ugly: The PTC heater element is not electrically insulated. When the grill is removed it's a lethal hazard! to do: Why it's usefull Disassembly and analysis Safe and efficiet heater principle based in this unit