Jump to content

Search the Community

Showing results for tags 'Tircown'.

  • Search By Tags

    Type tags separated by commas.
  • Search By Author

Content Type


Forums

  • TeamFDM
    • Site Updates and Announcements
    • Frequently Asked Questions
    • General Discussion
    • Voron User Mods
    • Filaments
    • Build Diaries
    • Introductions
    • Tutorials
  • Voron Build Support
    • Voron 0
    • Voron Trident
    • Voron 2
    • Voron Legacy
    • Voron Extruders
    • Voron Electronics
    • Slicers and Print Troubleshooting
  • Other FDM Printers
    • Ender 3 / Ender 3 Pro
    • Anet A8 / AM8
    • Prusa
    • Generic / Other
  • Marketplace
    • The Bazaar
  • Vendors
    • KB-3D
    • Voron Printed Parts Co.
    • Fabreeko
  • Off-Topic
    • Random
    • TeamFDM Member's Creative Collection

Categories

  • Non Printable Files
  • Printable Voron User Mods
  • Manuals and PDF Guides
  • Creative Collection
  • Tools and Calibration
  • Official Voron Releases

Categories

  • User Mod Installs
  • Build Techniques
  • Programming
  • Team FDM Site Tutorials
  • CAD / Fusion 360 Tutorials

Blogs

  • Voron General
  • Why we are the best digital marketing services in Chennai

Find results in...

Find results that contain...


Date Created

  • Start

    End


Last Updated

  • Start

    End


Filter by number of...

Joined

  • Start

    End


Group


About Me


Voron Serial #1


Voron Serial #2


Voron Serial #3


Voron Serial #4


Voron Serial #5


Voron Serial #6


Voron Serial #7

Found 5 results

  1. Ready to used PCBs in Europe. PCBs for Voron completely soldered and we also included conectors and crimp terminals.
  2. Version 2021.12.08

    306 downloads

    Voron 0.1 skirt buttons Instructions For each button you will need to print: 1x Nut.stl, 1x Lock.stl, 1x Button-.stl Print with a 0.1mm layer_height (after the first layer) to improve the quality of the threads, Solder two wires toward the inside of the legs of a 5mm tactile switch, add some heatshrink, Push the 5mm tactile switch into the button housing and snap the locking piece behind, Install the button throught a hexagonal hole in the skirt and screw the printed nut behind, Optional, use the hole in the locking piece and a ziptie for attaching the cables (strain relief).
  3. Version 2021.08.24

    13 downloads

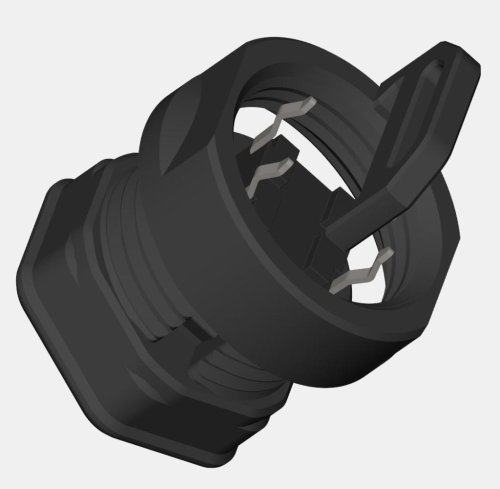
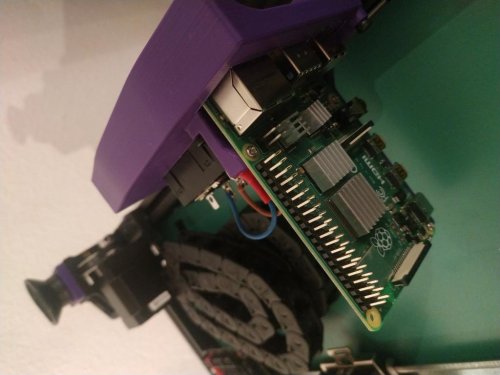
    Voron 2.4 Raspberry vertically installed in plug panel For the DD11 version I used this reference: SCHURTER DD11.0113.1111 Many other versions of SHURTER DDXX plugs are compatible. Check out sizes on datasheet. Instructions Put three M3 threaded inserts in the back of the panel. Install the pi on the bracket with three M2x10 self tapping screws. Pass the USB cable(s) for inner components such as SKR before attaching the bracket to the panel. There is a notch on the side of the opening for the raspberry to that purpose. Use three M3x8 to attach the bracket to the raspberry. The rest of the installation is pretty similar to the original bracket: check the official manual.
  4. Version 2021.08.24

    419 downloads

    Voron 2.4 5
  5. Version 2021.08.24

    11 downloads

    DIN support for MeanwWell PSU RS-15-5
×
×
  • Create New...