Search the Community
Showing results for tags 'meanwell'.
Found 3 results
-

Version 1.0.0
12 downloads
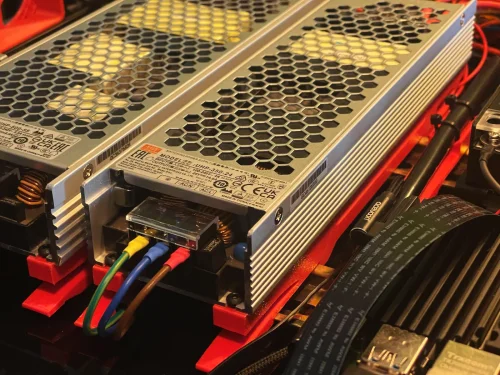
A DIN Rail Mount for a Mean Well UHP-500-XX Power Supply that attaches across two DIN Rails. Print Instructions: I've used the usual Voron 0.2mm Layer Height, 4x Perimeter, 5x Top / Bottom Layers, and 40% Infill Settings which should work for anything using Heat Set Inserts. The Models come with in the Slicer added Mouse Ears to help with bed Adhesion - If you don't need them just remove the “Generic-Disk” BOM ( for a Set of Two ) : 4x Voron Style M3x4mm Heat Set Inserts 8x M3x10mm Button Head Cap Screws 4x M3 Washers Assembly: Install two M3x10mm Button Head Cap Screws with the M3 Washers ( marked in blue ) into the bottom of the Mounts acting as Reinforcements for the Hooks - The PSUs turned out to be surprisingly heavy and I didn't want to risk the weight of them pulling down on the Hooks causing the latter to become loose. Install two Voron Style M3x4mm Heat Set Inserts ( marked in blue ). The one behind the Securing Latch is a bit hard to get into - Use a longer M3 to help pull it in. Attach the Mean Well UHP-500-XX Power Supply to the Mounts using the remaining M3x10mm Button Head Cap Screws. Attach the Assembly to the DIN Rails with a sliding motion while pressing down at the end with the Securing Latches. To remove the Assembly, pull the Latches slightly up followed by sliding it back out. Word of Caution: This Design requires the distance between the DIN-Rails to be of proper length! Too far apart and the rear Hook will prevent the Locking Mechanism from properly seating onto the front Rail. Too close together and the rear Hook might not catch. As such perhaps consider using the Mounts themselves with setting up the required distance between the DIN-Rails. -
Version 1.0.0
25 downloads
A DIN Rail Mount for a Mean Well UHP-350-XX Power Supply that attaches across two DIN Rails. Print Instructions: I've used the usual Voron 0.2mm Layer Height, 4x Perimeter, 5x Top / Bottom Layers, and 40% Infill Settings which should work for anything using Heat Set Inserts. The Models come with in the Slicer added Mouse Ears to help with bed Adhesion - If you don't need them just remove the “Generic-Disk” BOM ( for a Set of Two ) : 4x Voron Style M3x4mm Heat Set Inserts 8x M3x10mm Button Head Cap Screws 4x M3 Washers Assembly: Install two M3x10mm Button Head Cap Screws with the M3 Washers ( marked in blue ) into the bottom of the Mounts acting as Reinforcements for the Hooks - The PSUs turned out to be surprisingly heavy and I didn't want to risk the weight of them pulling down on the Hooks causing the latter to become loose. Install two Voron Style M3x4mm Heat Set Inserts ( marked in blue ). The one behind the Securing Latch is a bit hard to get into - Use a longer M3 to help pull it in. Attach the Mean Well UHP-350-XX Power Supply to the Mounts using the remaining M3x10mm Button Head Cap Screws. Attach the Assembly to the DIN Rails with a sliding motion while pressing down at the end with the Securing Latches. To remove the Assembly, pull the Latches slightly up followed by sliding it back out. Word of Caution: This Design requires the distance between the DIN-Rails to be of proper length! Too far apart and the rear Hook will prevent the Locking Mechanism from properly seating onto the front Rail. Too close together and the rear Hook might not catch. As such perhaps consider using the Mounts themselves with setting up the required distance between the DIN-Rails. -
Version 1.0.0
295 downloads
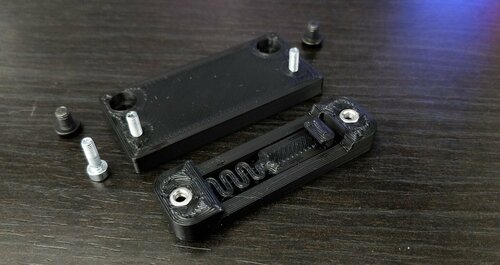
I wanted to use Demosth's Stiffer DinMount for my PSU, but as I had ran out of self tapping screws and didn't want to wait for new ones to be delivered I modded his design slightly to accept M3 screws and nuts. Because the spacing between the screw holes would not fit the PSU's mounting holes center-to-center distance without interfering with the spring design, I added a very simple base plate which bolts onto the PSU using M4x6 screws. Assemble the DIN bracket onto the base plate first, then the base plate onto the PSU. These mounts are for PSUs with mounting holes 50mm apart center-to-center. The tolerances of the holes are tight, so your printer has to print with dimensional accuracy or the screws won't fit. If too tight for your printer, try using Hole Horizontal Expansion in your slicer. Photo sample printed with 0.3mm layer height, 0.5mm width, 7% infill, complete set of 4 in about 37mins. No supports needed. Hardware: M3x10 SHCS x 4 M3 nut x 4 M4x6 BHCS x 4