Jump to content

Search the Community

Showing results for tags 'leandromarceddu'.

  • Search By Tags

    Type tags separated by commas.
  • Search By Author

Content Type


Forums

  • TeamFDM
    • Site Updates and Announcements
    • Frequently Asked Questions
    • General Discussion
    • Voron User Mods
    • Filaments
    • Build Diaries
    • Introductions
    • Tutorials
  • Voron Build Support
    • Voron 0
    • Voron Trident
    • Voron 2
    • Voron Legacy
    • Voron Extruders
    • Voron Electronics
    • Slicers and Print Troubleshooting
  • Other FDM Printers
    • Ender 3 / Ender 3 Pro
    • Anet A8 / AM8
    • Prusa
    • Generic / Other
  • Marketplace
    • The Bazaar
  • Vendors
    • KB-3D
    • Voron Printed Parts Co.
    • Fabreeko
  • Off-Topic
    • Random
    • TeamFDM Member's Creative Collection

Categories

  • Non Printable Files
  • Printable Voron User Mods
  • Manuals and PDF Guides
  • Creative Collection
  • Tools and Calibration
  • Official Voron Releases

Categories

  • User Mod Installs
  • Build Techniques
  • Programming
  • Team FDM Site Tutorials
  • CAD / Fusion 360 Tutorials

Blogs

  • Voron General
  • Why we are the best digital marketing services in Chennai

Find results in...

Find results that contain...


Date Created

  • Start

    End


Last Updated

  • Start

    End


Filter by number of...

Joined

  • Start

    End


Group


About Me


Voron Serial #1


Voron Serial #2


Voron Serial #3


Voron Serial #4


Voron Serial #5


Voron Serial #6


Voron Serial #7

Found 2 results

  1. Version 2021.08.24

    5 downloads

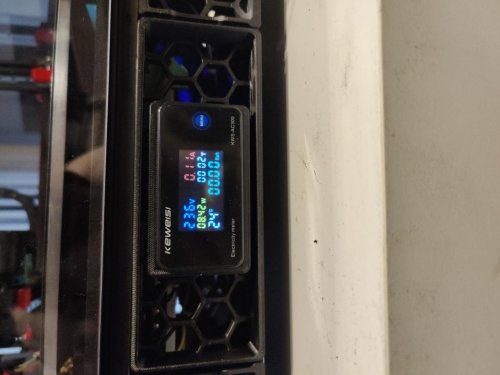
    V2 Power Skirt A skirt piece to replace the lefthand (empty) or righthand fan holder with this. I bought the screen here: https://nl.aliexpress.com/item/4001268132948.html?spm=a2g0s.9042311.0.0.48094c4dXCEnMz I chose the one with the torus because that's the easiest to install one. Steps to install: 1) Disconnect printer from mains 2) Connect the screen's wires (L-N and CT). You can also plug in the provided temperature sensor already, just be careful when inserting the screen into the skirt. 3) Slide the screen into it, it should be press fit, maybe a bit on the loose side. 4) Slide the torus over the mains input, before you split it off to power the PSUs/Bed. This way you measure the entire printer, not just one branch of the split. 5) If you didn't do the temperature sensor at 2, now's your moment to do it. I tiewrapped mine to a wire so it measures the electronics compartment. 6) Remove the M5 T-nut from the rail and insert two M3 T-nuts to hold the skirtpiece. 7) Fasten with 2 M3*8. 8) Power up.
  2. Version 2021.08.24

    13 downloads

    ADXL356 mounts for the Galileo extruder These are my edited standard galileo chain mounts to be able to mount an adxl356 against it permanently. I attached them with two M3x6. It'll work for an adxl356 of the following layout: It'll end up looking like this:
×
×
  • Create New...