

Description
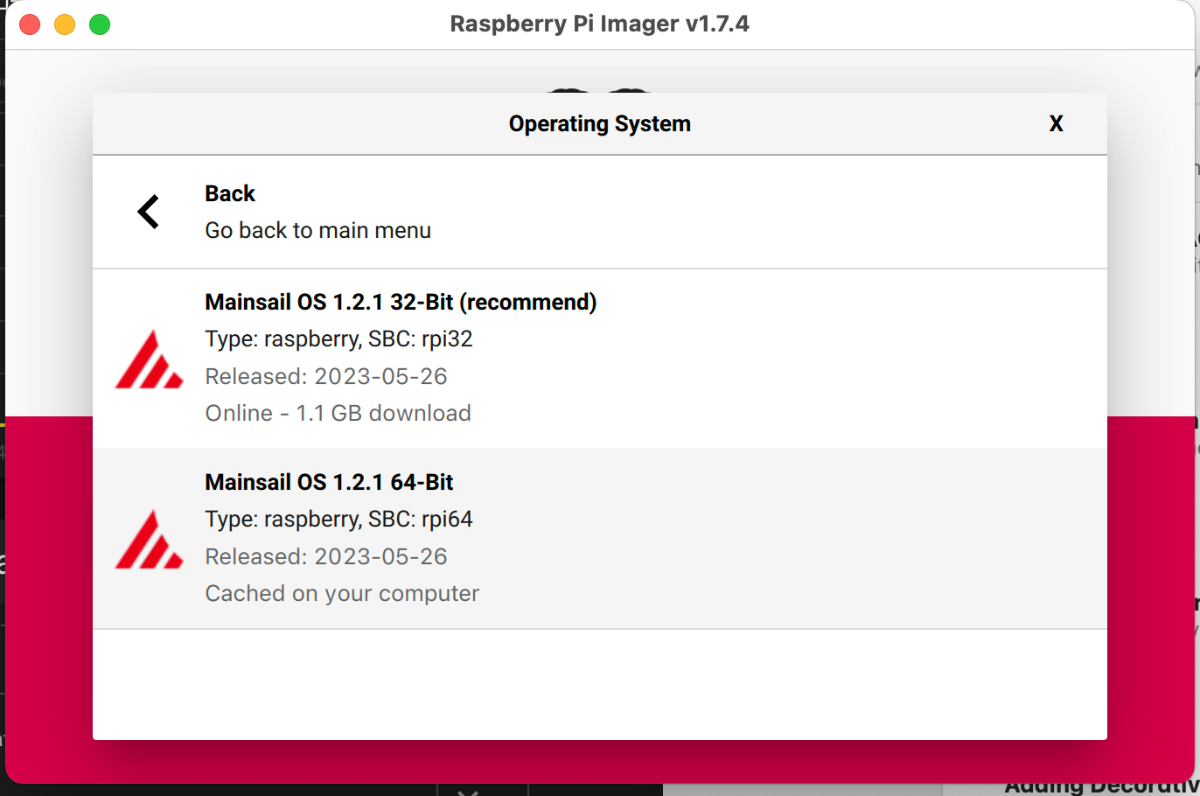
1. Install mainsail OS with Raspberry Pi Imager. Does not matter which flavour.
2. SSH into the Raspberry pi:
ssh [email protected]
Replace”machine name” with the name you used during the install of the os.
3. Issue the following commands:
sudo apt update
sudo apt upgrade
Now install python
sudo apt install python3 python3-pip python3-can
pip3 install pyserial
Change to the Klipper directory to update with the latest version:
cd ~/klipper
git pull
- Now install the CanBoot software called katapult form here (https://github.com/Arksine/katapult)
cd ~
git clone https://github.com/Arksine/katapult
cd ~/katapult
- We need to configure the canboot firmware for both the octopus and the SHT36
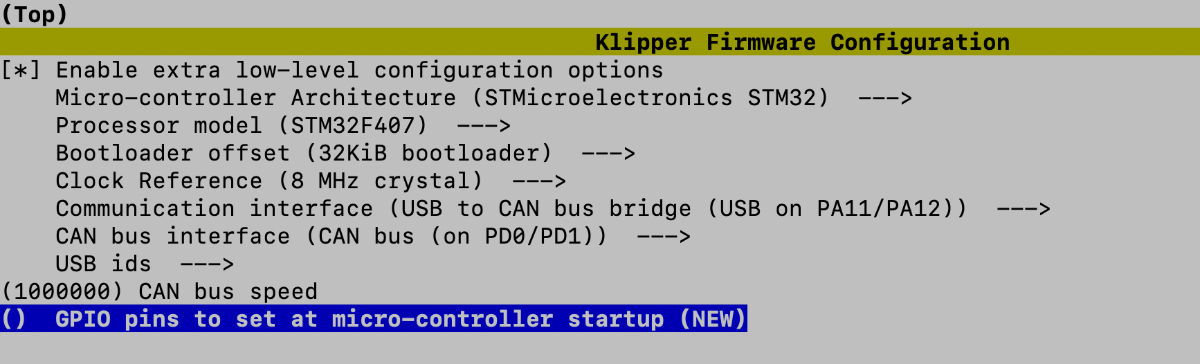
First compile the Octopus firmware:
Make menuconfig

Change your processor model to the one on your octopus board - here I used STM32F407, but it may be a STM32F446 or STM32F429, etc. Make sure you get the clock reference correct. (The STM32F407 and STM32F429 uses a 8 MHz crystal whilst the STM32F446 uses a 12MHz crystal)
Compile by entering the command:
make
Create a directory to store the files in until they needed. Call it firmware or installations, etc. Let’s use firmware
mkdir ~/firmware
Move the newly created file to this directory
mv ~/katapult/out/canboot.bin ~/firmware/octopus_canboot.bin
Note: In the ~/katapult/out directory you will have a katapult.bin a canboot.bin file. I did not have success flashing the katapult.bin file, so use the canboot.bin file
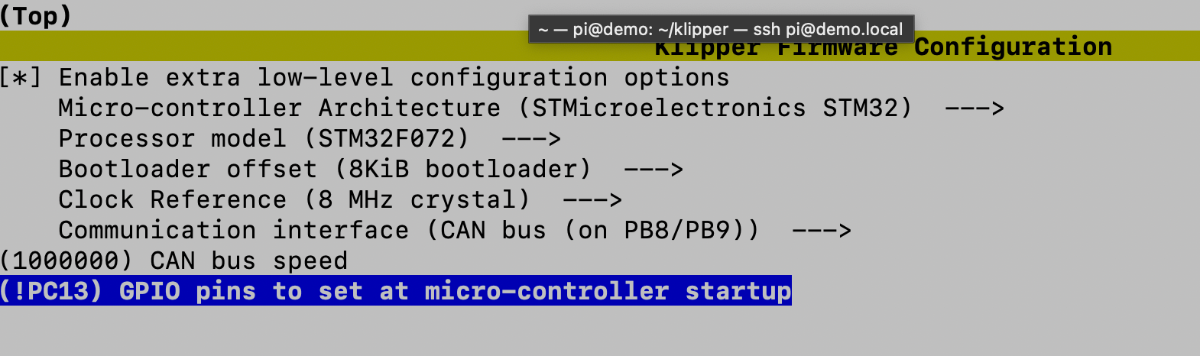
Next compile the SHT36 V2 firmware
make menuconfig
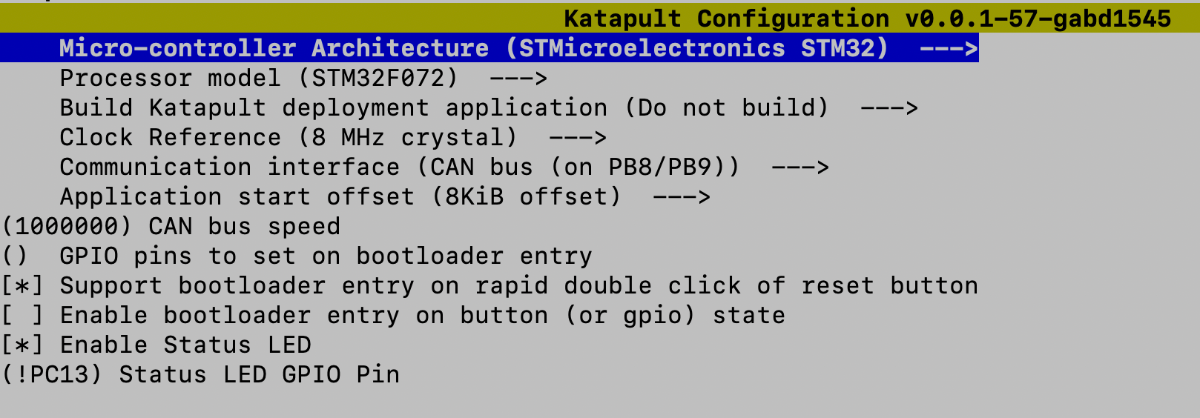
Again, ensure you have the correct processor model - load at the onboard chip. The above is for the F072 chip
(According to Mellow: Note, please pay attention to the main control chip purchased after 2022-10-18, the first batch is GD32F103, and the later shipment is APM32F072)
Compile by entering the command:
make -j 4
Move the newly created file to this directory
mv ~/katapult/out/canboot.bin ~/firmware/sht36_canboot.bin
6. Prepare the boards to be flashed. Turn off both the pi sudo shutdown now, and the octopus board by turning off the power supply to the printer.
7. We first need to flash the octopus board by putting it in DFU mode.
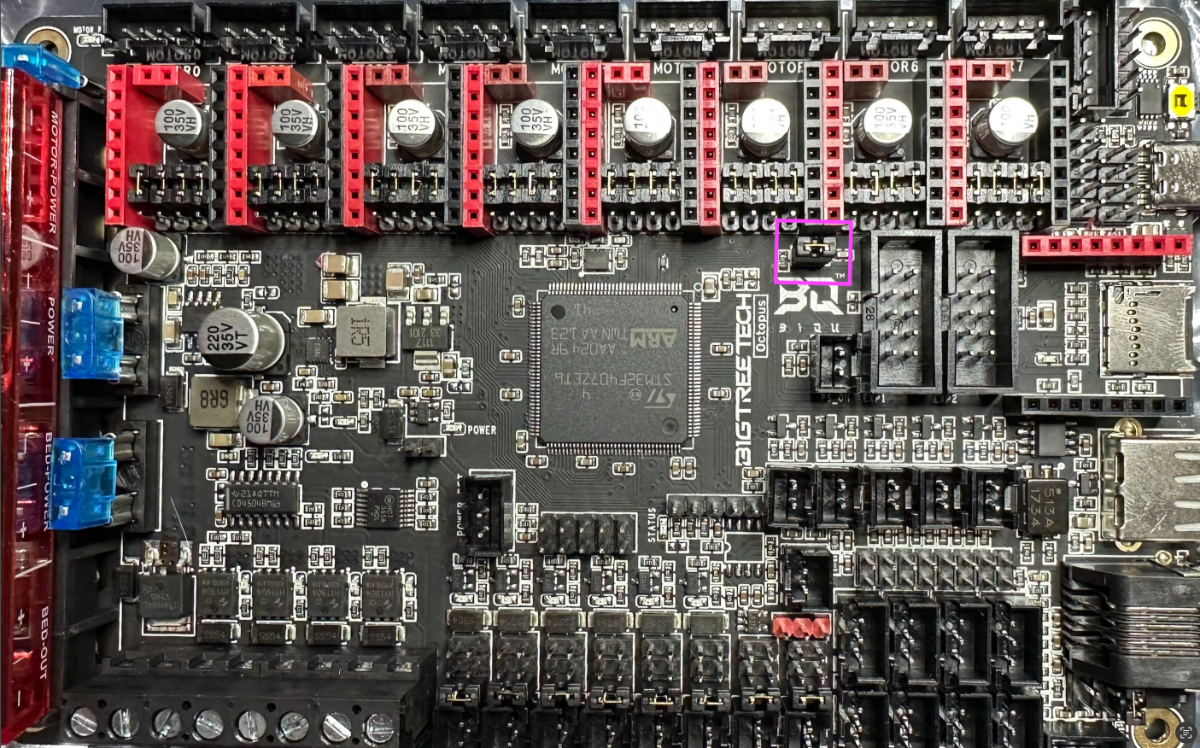
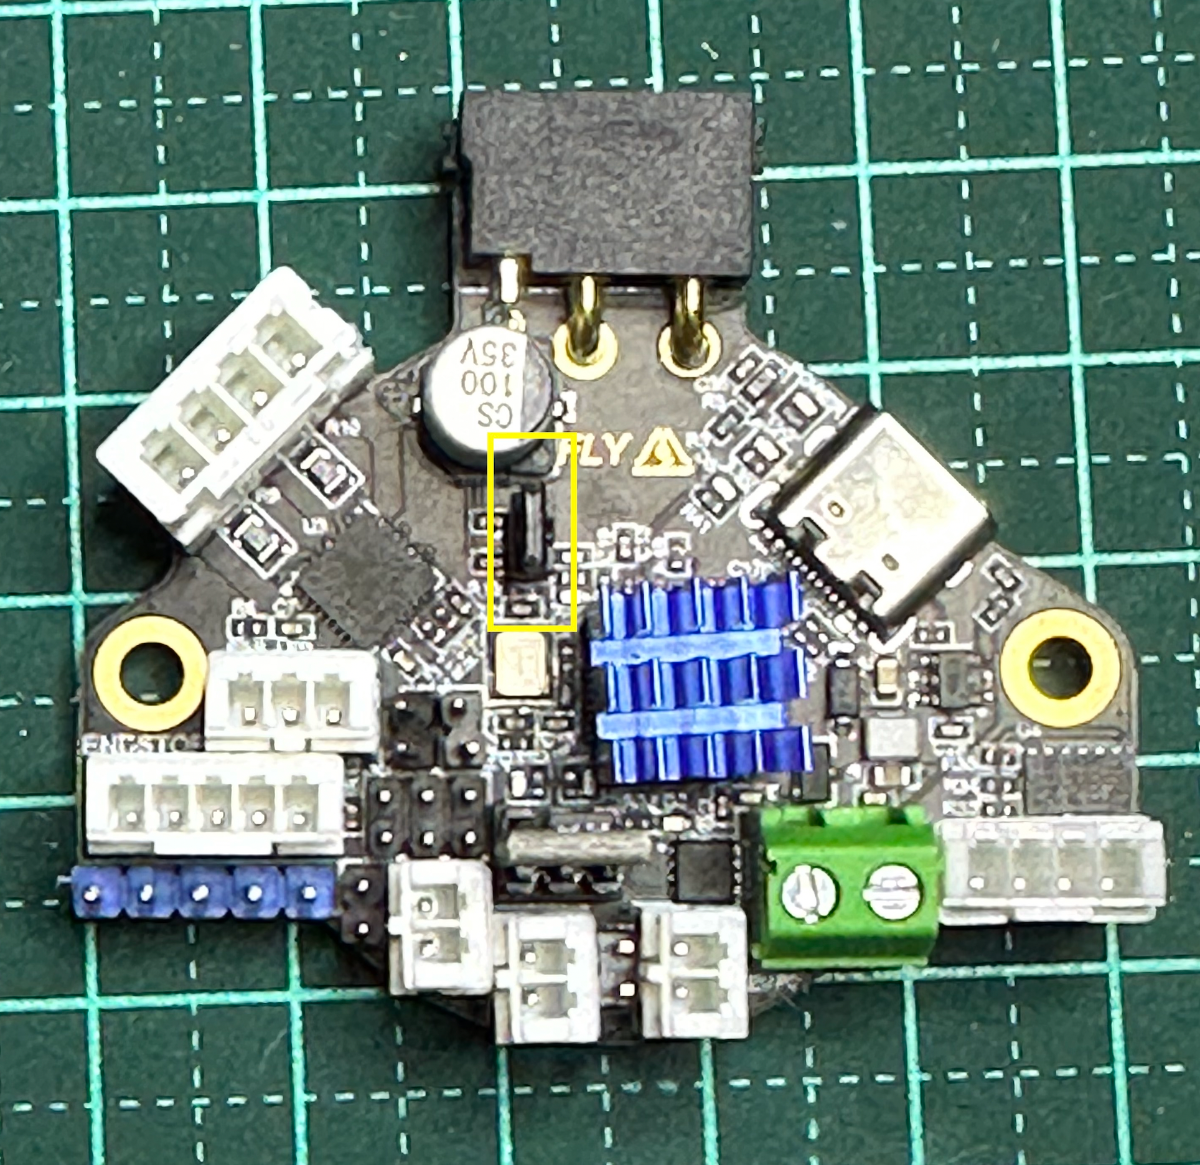
If there is a jumper on blue - remove it
Place a jumper on the purple area:
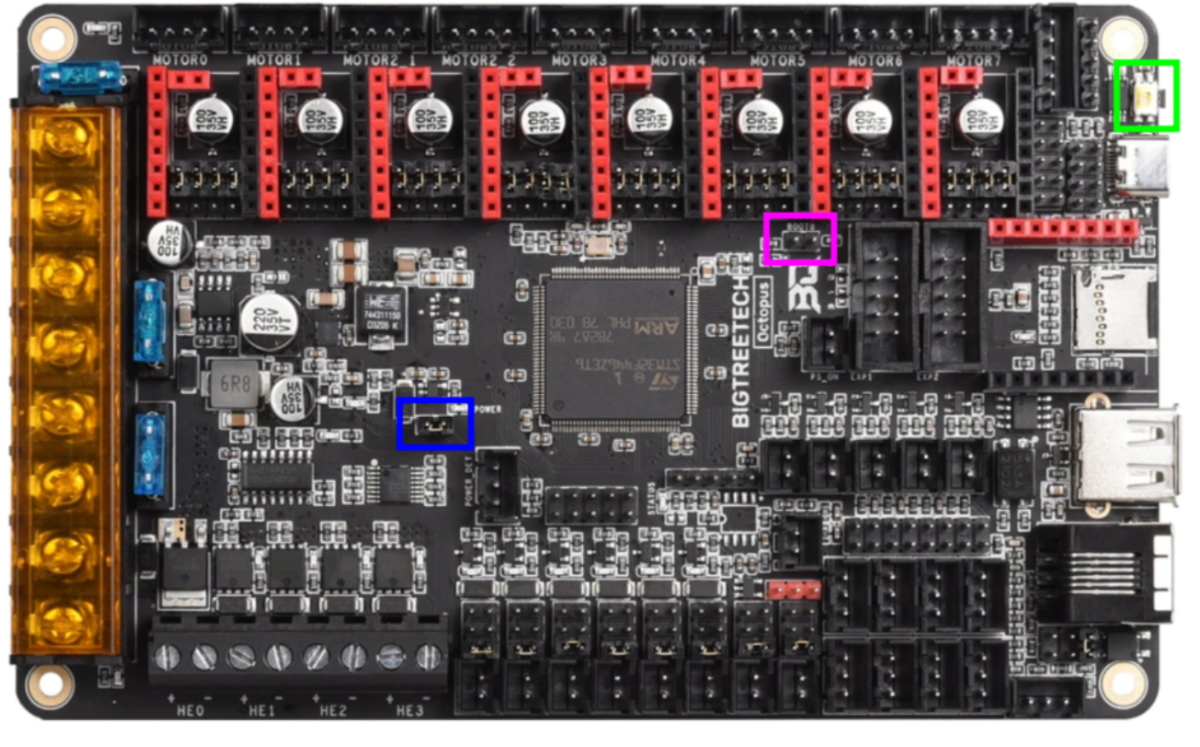
8. Power up the octopus ONLY and press the green jumper once. (This is not time critical, can be done as soon as the LED’s on the octopus lights up, or after it has fully booted, or in between)
Confirm you are in dfu mode by issuing the command:
lsusb
It should return something like this:

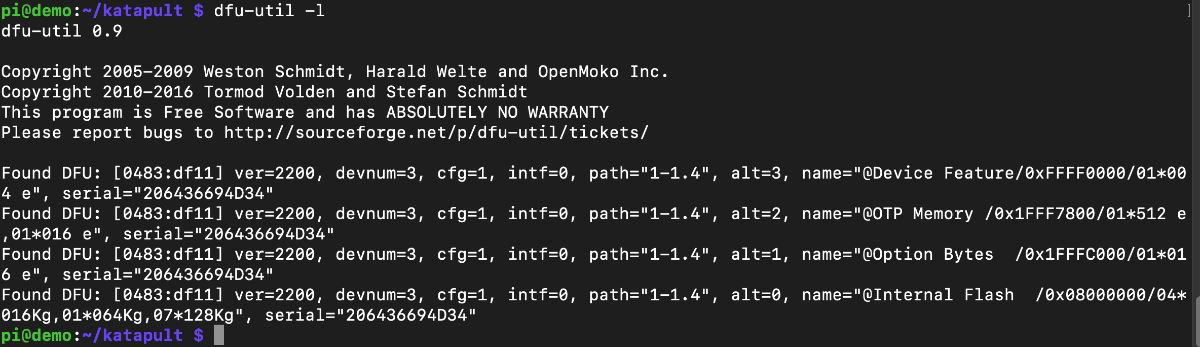
We need to get the internal flash memory details by issuing the command:
dfu-util -l
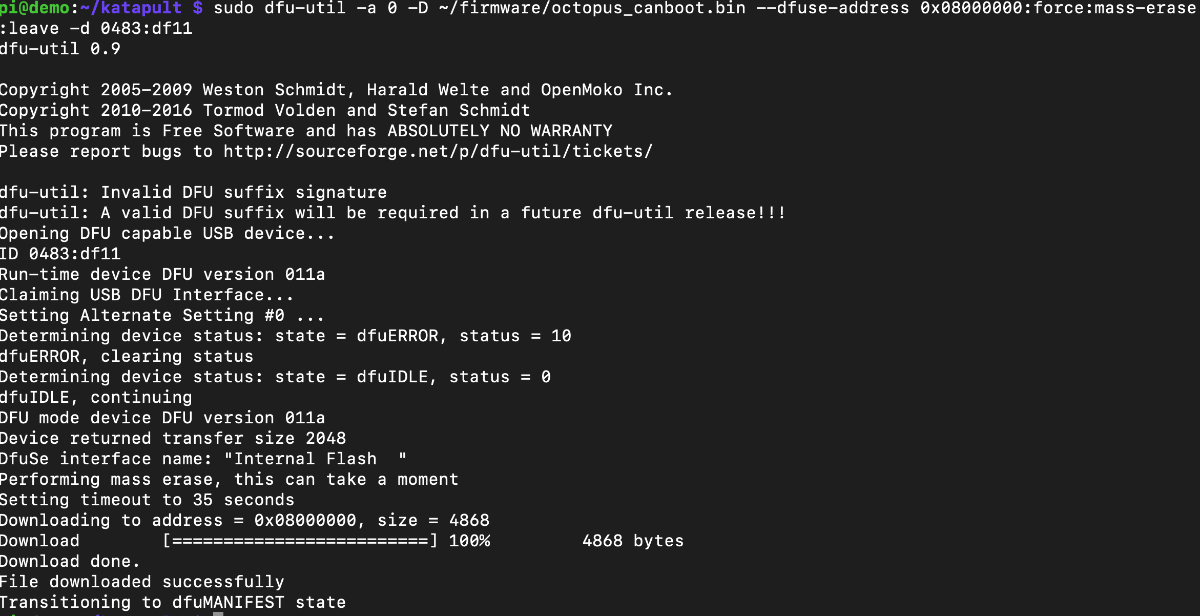
9. Flash the boatload to the octopus board :
sudo dfu-util -a 0 -D ~/firmware/octopus_canboot.bin --dfuse-address 0x08000000:force:mass-erase:leave -d 0483:df11
Iff all went well, then this is the outcome:
10. Time to flash the SHT36 V2.
In order to do this, the board needs to be put in dfu mode.
Place the termination jumper on the 120ohm resistor.
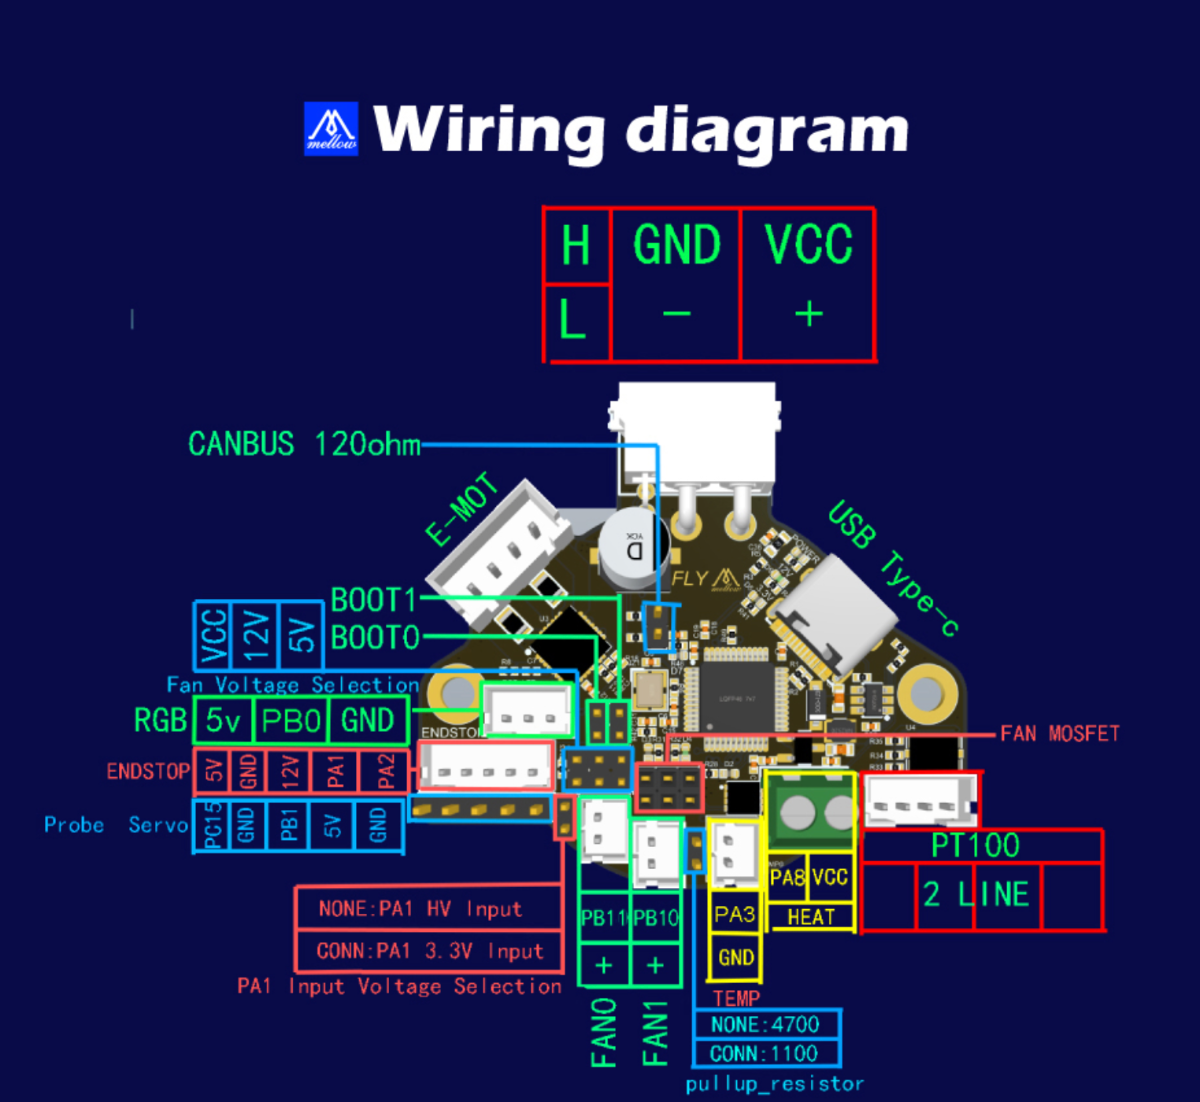
Put a jumper on the pins of boot0
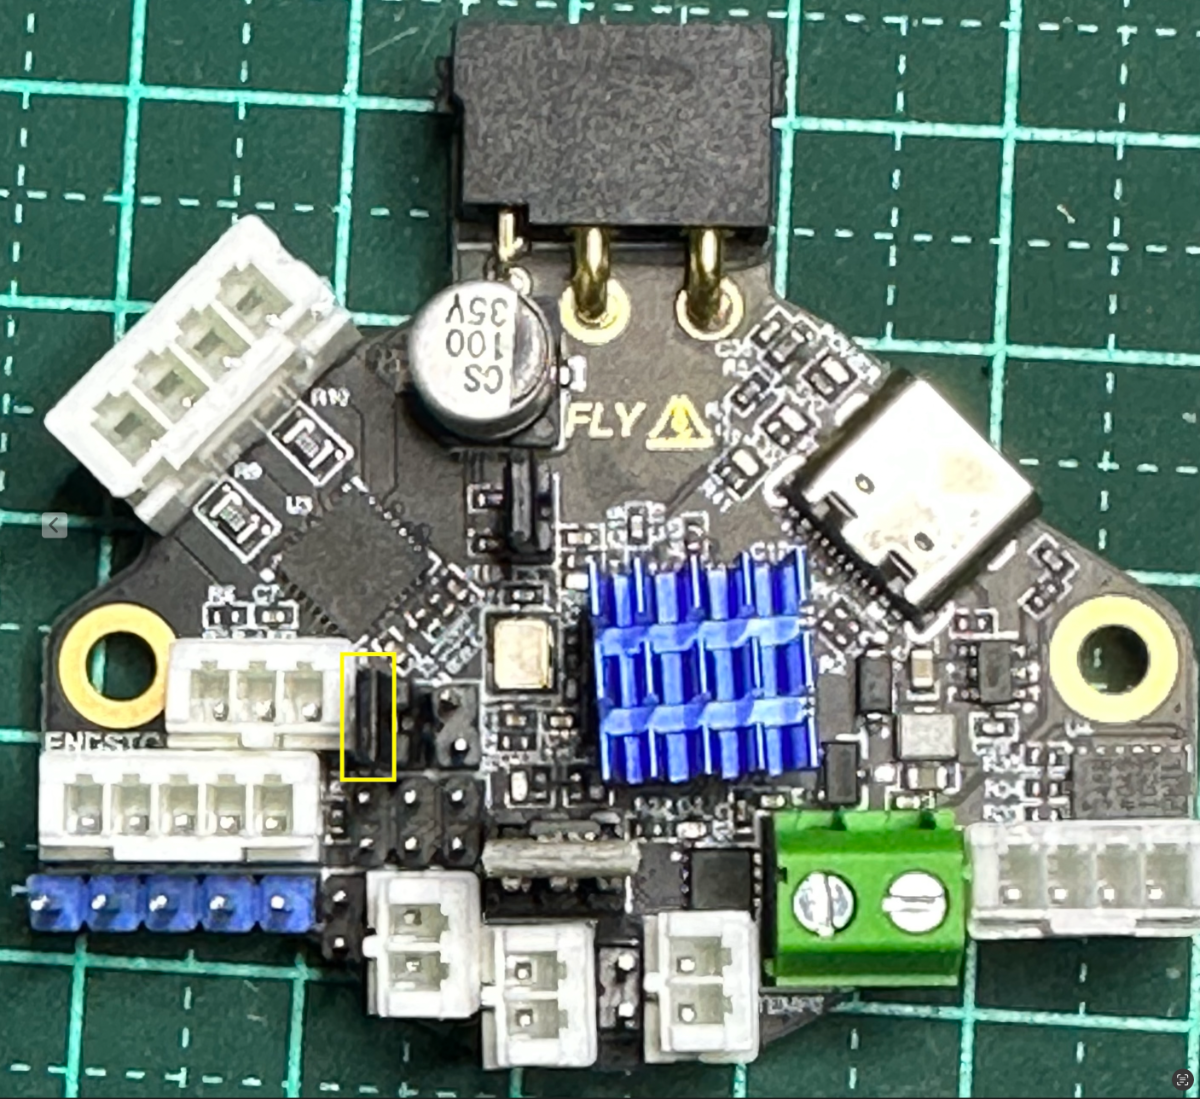
Connect the SHT36 to the USB port on the raspberry pi and issue the following command:
lsusb
Your output should be:
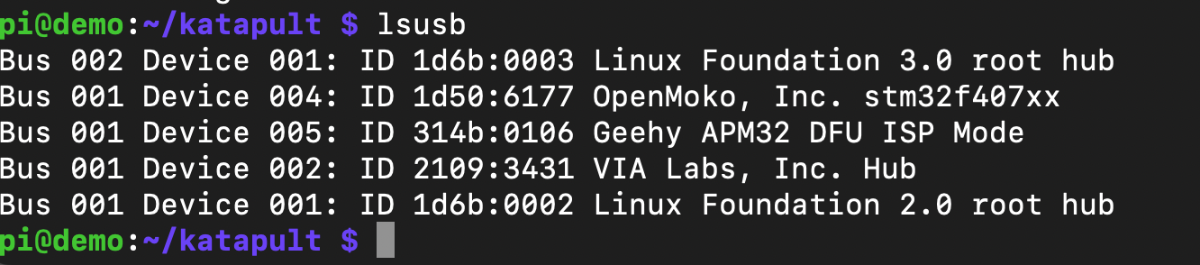
The SHT36 is listed as ID 314b:0106. We need more information
Issue the command:
sudo dfu-util - l
Again we have the internal address to flash the board:

Flash the firmware by issuing the following command:
sudo dfu-util -a 0 -d 314b:0106 --dfuse-address 0x08000000 -D ~/firmware/sht36_canboot.bin
When successful you will again see the terminal output as you did when flashing the octopus board.
11. Time to set up the can0 network interface:
sudo nano /etc/network/interfaces.d/can0
Enter the following text:
allow-hotplug can0
iface can0 can static
  bitrate 1000000
  up ifconfig $IFACE txqueuelen 1024
Ctr-X to exit, Y to save and enter on the name.
12. IMPORTANT: Power of everything.
sudo shutdown now
Turn off the power to the octopus board
13. Remove the jumper for dfu mode on Octopus and SHT36 and unplug the USB cable from the SHT36.
14. Power up the Octopus board only and flash klipper in order to activate the can0 interface
cd ~/klipper
make menuconfig
Ensure you have the correct board parameters. Change the STM32F407 to your board chip and change the clock reference to suit the board. Here I used STM32F407, but it may be a STM32F446 or STM32F429
make
mv ~/klipper/out/klipper.bin ~/firmware/octopus_klipper.bin
15. Whilst we are here, let's compile klipper for the SHT36 board:
cd ~/klipper
make menuconfig
make
mv ~/klipper/out/klipper.bin ~/firmware/sht36_klipper.bin
16. Flash the ONLY Octopus board this time around.
Start by getting the serial of the board
ls -al /dev/serial/by-id

Now issue the following commands:
cd ~/katapult/scripts
pip3 install pyserial
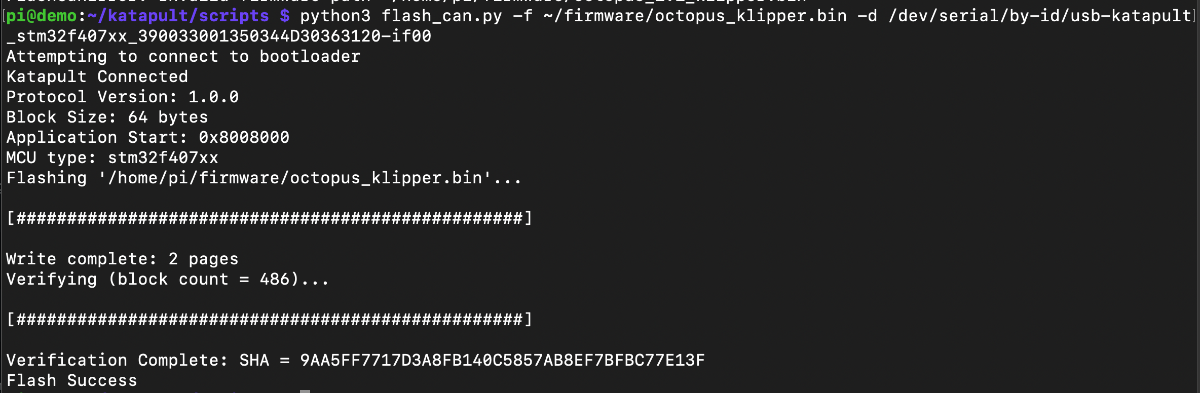
python3 flash_can.py -f ~/firmware/octopus_klipper.bin -d /dev/serial/by-id/usb-katapult_stm32f407xx_390033001350344D30363120-if00
Ensure to use the value you got from the previous step for the id.
When successful you should get the following:
IMPORTANT : Reboot the board to activate the Can0 Interface before flashing the SHT
sudo shutdown now
Turn off the power to the Octopus board and raspberry pi
17. Remove he boot jumper from the SHT 36. Plug in the power to the SHT36, and connect to the octopus board through the canbus port.
18. Time to flash the SHT36 with klipper, but we need to see if the network is up:
ip a

The network is up and running and more details can be gotten by issuing the following:
ip -details -statistics link show can0
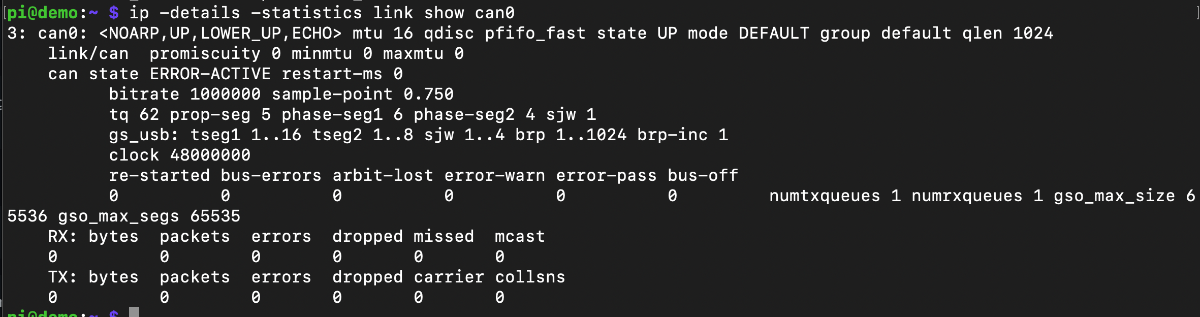
As this is a new network, there won’t be any transmission as yet
19. Obtain the UUID addresses of the two boards:
cd ~/katapult/scripts
python3 flash_can.py -i can0 -q
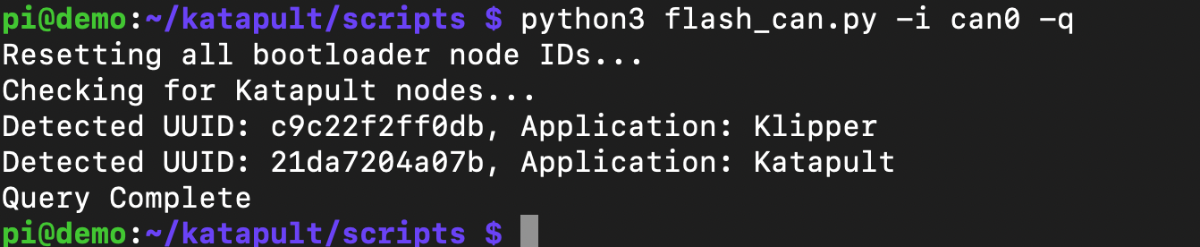
The octopus board has already been flashed with klipper, thus the Application: Klipper. We have only flashed the SHT36 with katapult, thus this is indicated as such Application: Katapult. This is the UUID we want as we now need to flash klipper to it.
If the UUID of the SHT board does not show up for some reason, repeat step 10 and resume step 19 when done.
WRITE THESE TWO UUID's DOWN
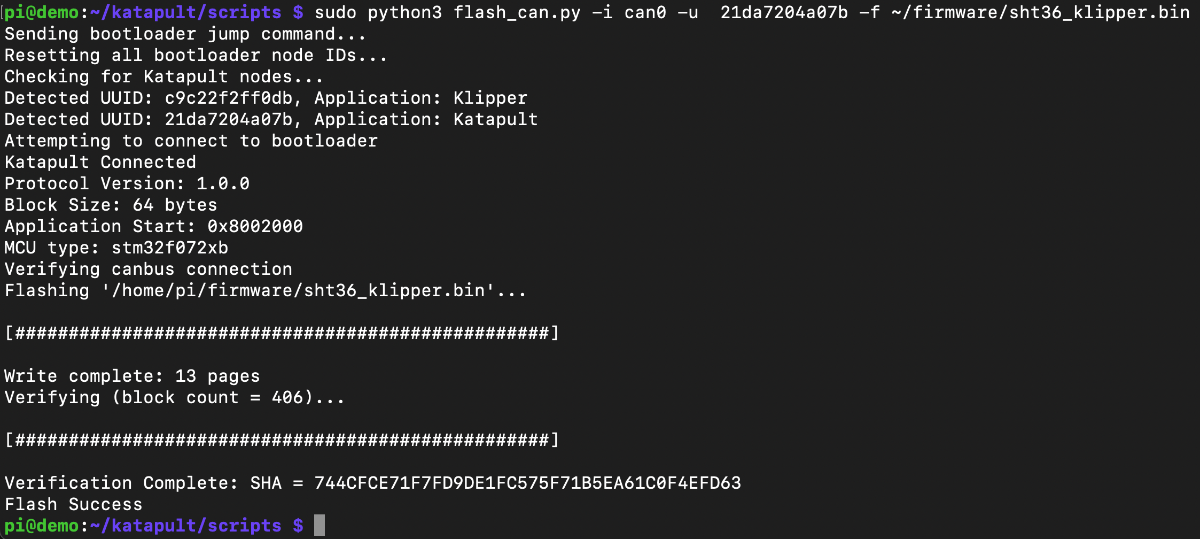
20. Install klipper to the SHT36 board. Remember we moved the file earlier to the firmware directory.
sudo python3 flash_can.py -i can0 -u 21da7204a07b -f ~/firmware/sht36_klipper.bin
Replace the UUID with the one you obtained.
A successful flash:
21. Remember to write down the Two UUID's - you will need those for your printer.cfg file.
Generate the printer.cfg file for your printer and start klipper.
Happy printing.
Inspiration and help from:
https://github.com/Arksine/katapult
https://mellow.klipper.cn/?spm=a2g0o.detail.1000023.17.566a6b5carjmy3#/advanced/canboot
https://mellow.klipper.cn/?spm=a2g0o.detail.1000023.17.566a6b5carjmy3#/board/fly_sht_v2/shtv2line
https://github.com/akhamar/voron_canbus_octopus_sb2040

Recommended Comments
Join the conversation
You can post now and register later. If you have an account, sign in now to post with your account.